AX 2012 R2 for Retail – Setting up discount coupons with bar codes for scanning into POS
The release of R2 for AX 2012 has added 2 new fields (discount code and bar code) to the Discounts form in the Retail module. This now gives us the ability to scan or type in a coupon/discount barcode directly into POS. The steps below are performed on the general Discounts, but the same steps would apply for Mix and Match Discounts and Quantity Discounts. The only difference would be how the items are configured for discounts in the Lines sections of each setup.
NOTE: In AX 2012 R3 with the addition of the Call Center module, discounts can now be used with sales orders created in AX. In order to do so, the user logged into AX must be a Channel user for a Call Center channel. This will make a call to the CRT to perform the discount calculation.
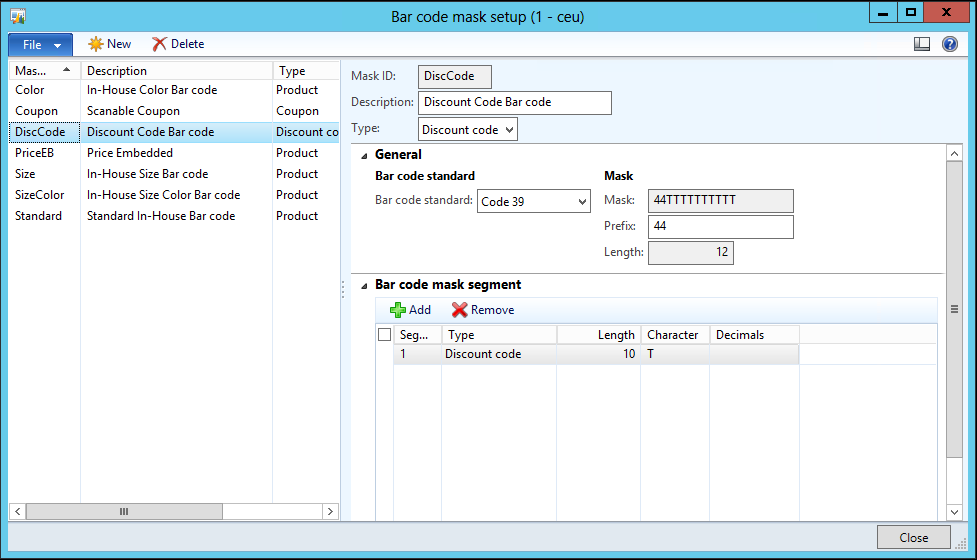
1. Set up the bar code masking: Retail > Setup > Bar codes and labels > Bar code mask setup (Example setup)
a. Mask ID = DiscCode
b. Description = Discount Code Bar Code
c. In the Type field, select Discount Code
d. Set up the Masking configurations (Example configuration below)
i. Barcode standard = Code 39
ii. Mask Prefix = 44
iii. Bar code mask segment
1. Type = Discount Code
2. Length = 10
3. Character = T
NOTE: When this barcode is scanned into POS, it uses this prefix and segment to identify the entry as a discount.
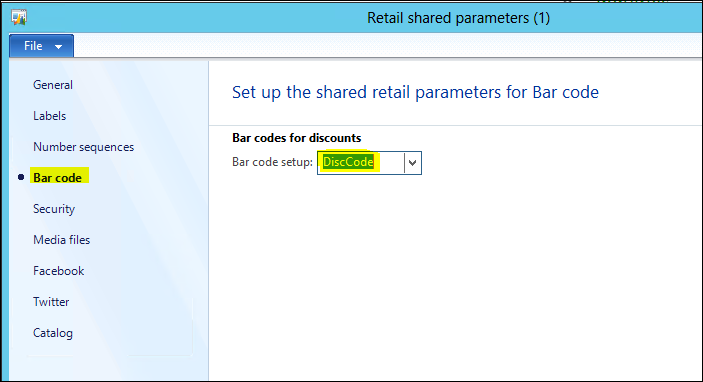
2. Set the bar code for use with Retail discounts.
a. Go to: Retail > Setup > Parameters > Retail shared parameters
b. Select the Bar code navigation
c. Select your bar code mask from step 1.
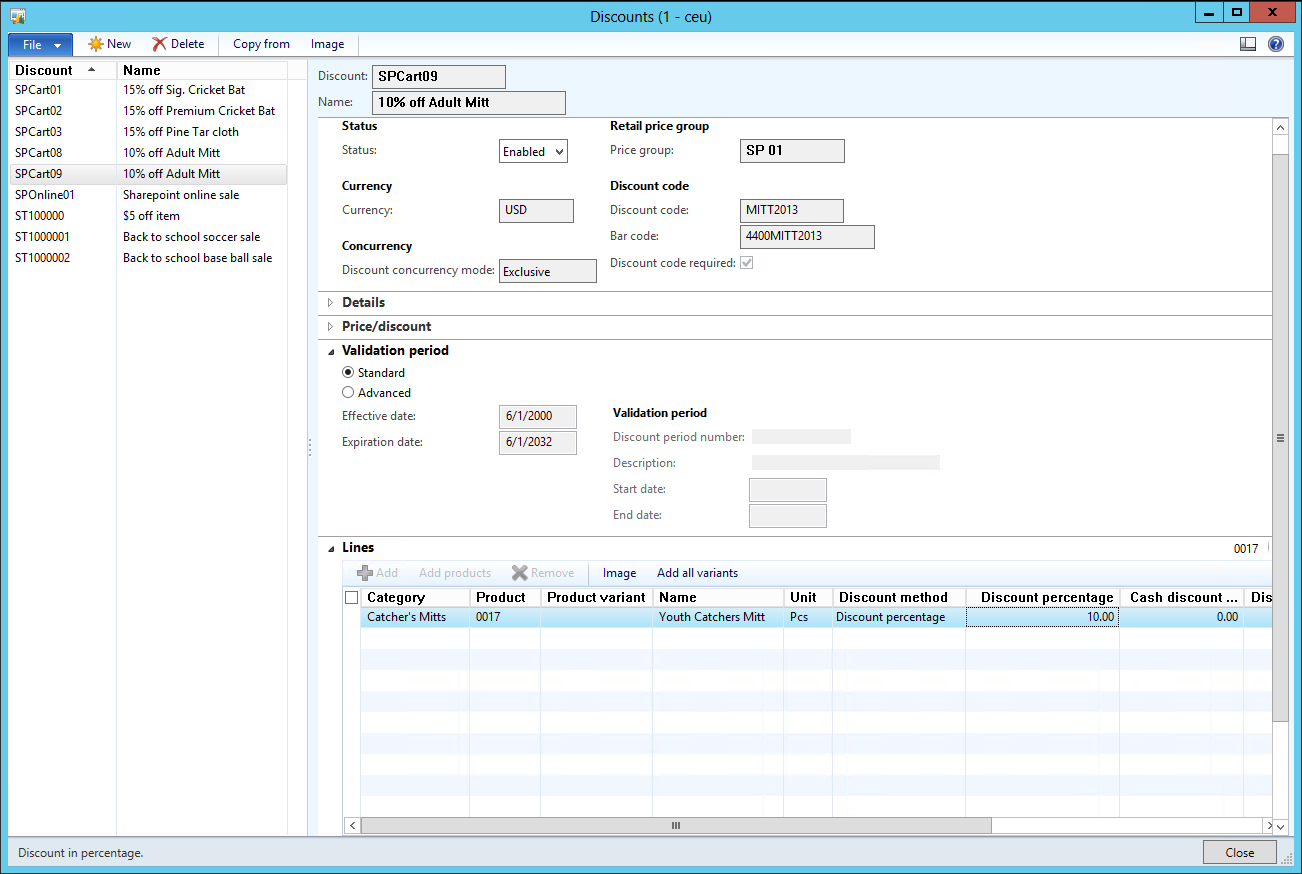
3. Set up a specific discount/coupon: Retail > Common > Pricing and Discounts > Discounts
a. Fill in the Discount and Name fields.
b. Enter currency: USD
c. Select a Price Group, or create a new one. (SP 01)
d. Enter a Discount Code (MITT2013)
e. This auto-creates the barcode based on our discount code bar code in step 1 (4400MITT2013)
NOTE: This is case sensitive when entering this into POS.
f. Select a concurrency mode:
i. Exclusive – this discount cannot be used in conjunction with another
ii. Best price – will determine the best price and use that discount
iii. Compounded – will apply this discount on top of other discounts as long as the other discount is stackable
g. Discount code required
i. Checked – this will require the code to be entered or scanned at POS in order for the discount to apply.
ii. Unchecked – otherwise this will auto apply the discount whenever the items tied to the discount are entered.
h. Validation period
i. Complete the validation period for when this discount can be used. Once this period expires, you can either reuse this discount or delete it.
i. Under Lines click Add
i. Add a product (0017 – Youth Catchers Mitt)
ii. Select a Discount Method = Discount percentage
iii. Enter the amount in the corresponding field. (Discount percentage = 10)
j. Lastly, change the Status to Enabled
k. Close out of the discounts form.
NOTE: Save and sync issues may occur if this form is not Saved or Closed. If this form is simply completed with no save or close performed, you may note that your discount does not work at the POS.
4. Add the Price Group to your store: Retail > Common > Retail Channels > Retail Stores
(This is used to assign the discount to specific stores)
a. Select your store (S0001)
b. Click Price Groups
c. Click New
d. Select the price group used in Step 2.c from the dropdown menu. (SP 01)
5. Sync over your changes: Retail > Periodic > Data Distribution > Distribution Schedule
a. Run the N-1020 (Discount) to sync over the specific Retail discounts to POS
b. Run the N-1100 (Product and price parameters) to sync over the BarcodeMask and Discounts.
c. If Step 2 was used to create a new Price Group, then run the N-1040 to sync the new group at POS
d. If Step 3 was performed to add the Price Group to the store, then run the N-1070 (Stores and tenders) to update the Store at POS
6. Log into POS (close and reload POS if it was open)
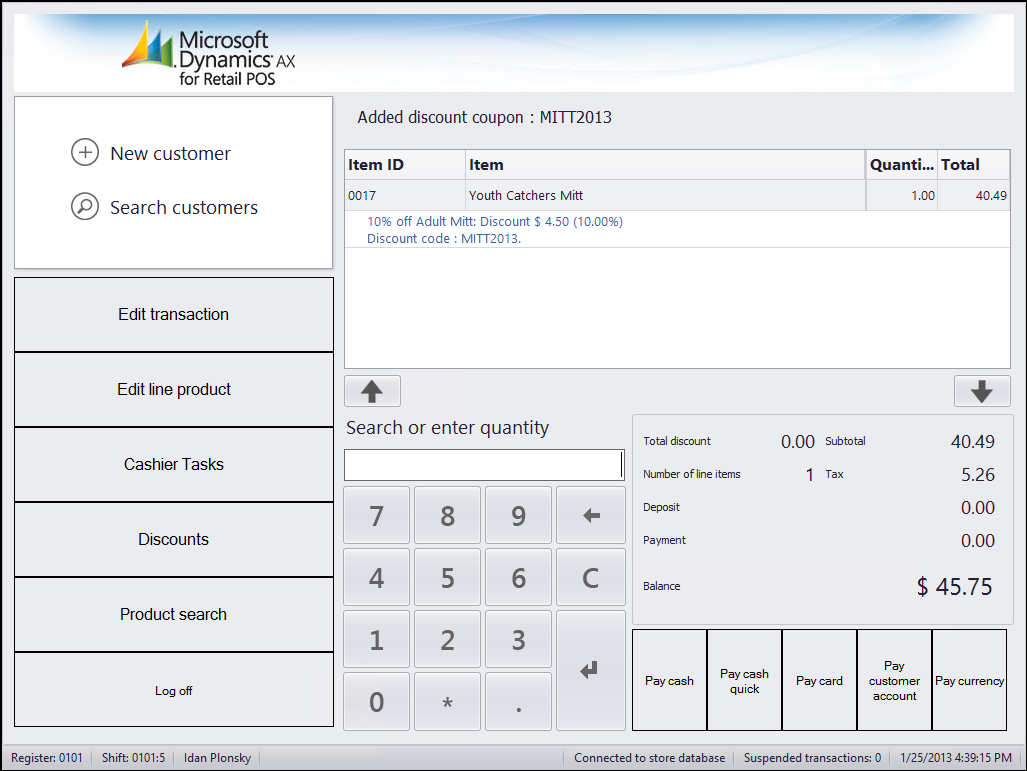
7. Add item 0017
8. Scan or type in the case sensitive discount barcode (4400MITT2013)
9. You will see the discount (MITT2013) applied to the line item associated with that discount.