
Emailing Customer Invoices from a batch
This is an example of emailing the Sales Invoices with Print Management Settings and using a Batch Server. One of the prerequisites to email from a batch is to have
an SMTP Server setup and running. This blog goes into the setup within AX, but does not cover the setup of the SMTP Server.
The one suggestion I have for you is that when you setup your print management is that you do include the option to “Save in print archive”. This will help you if the
batch processing fails as it will allow you to go back and manually process the emails that did not get processed when the batch failed. When processing the failed transactions it will use the print management setting you have for that customer.
Configure email parameters in Dynamics AX
- Navigate to System Administration – Setup – System – E-mail parameters
- On the E-mail parameters window add the SMTP server name or IP address to the Outgoing mail server field
- In the SMTP port number field add the port the SMTP server is using
- Additional setup may need to be done in the E-mail parameters window depending on the setup of the individual environment
- Click on the Close button

Configure a Batch Group for the email batches
- Navigate to System Administration – Setup – Batch group
- On the Batch group window click on the New button
- In the Group field type in a name of the new batch group for emailing documents
- In the Description type in a description of the new batch group for emailing documents
- While the new batch group is highlighted click on the Batch Servers tab
- In the Remaining servers section find the AOS that will be used to process the batch group documents for email, click on it, and then click on the “<” button to add it to the selected servers
- Click on the Close button

Configure Print Management to email Invoices
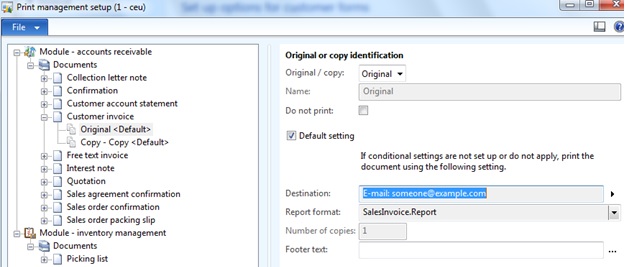
- Navigate to Accounts Receivable – Setup – Forms – Form Setup
- On the Form setup page click on the Print management button
- Click on the “+” sign Expand Customer invoice
- Select Original <Default>
- Click the arrow on the Destination field and select Printer setup
- Click the Save in print archive checkbox
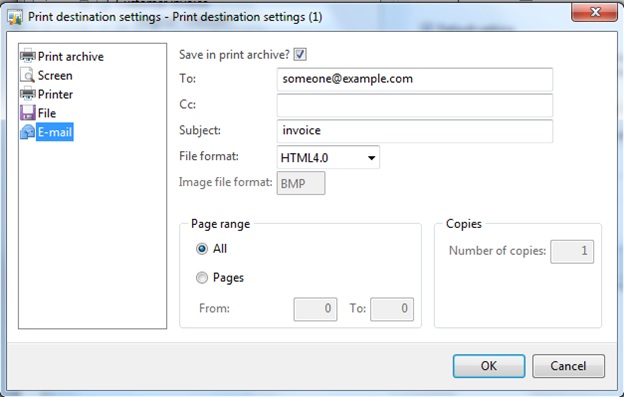
- Click E-mail, and in the To: field enter the email address
- In the Subject field enter a subject
- Select file format of the attachment
- Click on File and set the file location and file format
- Click the Save in print archive checkbox
- Click the OK button
- On the Print management setup window click the close button
- On the Form setup window click the close button
Configure Customer setup for email
- Navigate to Accounts Receivable – Common – Customers – All Customers
- Select Customer and click on the Edit button
- Click on the General tab
- Click Print management
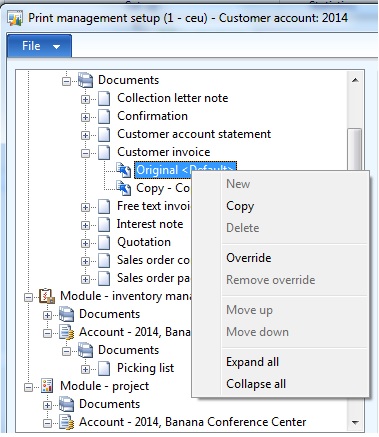
- Click on the “+” sign Expand Customer invoice
- Right click on Original and choose override
- Click the arrow on the Destination field and
select Printer setup - Click the Save in print archive checkbox
- Click E-mail, and in the To: field enter the email address
- In the Subject field enter a subject
- Select file format of the attachment
- Click on File and set the file location and file format
- Click on the Close button
Create batch to email Customer invoices
- Navigate to Accounts Receivable – Common – Sales orders – All sales orders
- On the Sales order tab, in the New section click on Sales order
- On the Create Sales Order window select the customer from the Customer account drop down menu and then click on the OK
button - On the Sales Order window enter an Item number in the Item number field and tab off of the Item number field
- Click on the Invoice tab and in the Generate area click on Invoice (Click the F5 button refresh the screen if the Invoice
button is grayed out ) - Select the Quantity drop down menu and select All
- Mark the Print invoice and User print management destination checkboxes
- Click on the Batch button in the lower right corner of the Point invoice window
- On the Batch processing window mark the Batch processing checkbox
- In the match group drop down menu select the Batch group for emailing batch documents
- Click on the Recurrence button and configure when the batch should run and click on the OK button
- Click the OK button on the Batch Processing Window
- Click the OK button on the Posting Invoice Window
- When the Posting Invoice closing Window closes a message that says: Some print management report destination are not valid for
batch processing. Do you want to continue? Click on the Yes button. - An Infolog window should appear with the message: The Order invoice job is added to the batch queue. Click on the Close button.
- When the batch runs, the email should send.


