How to build a multi-level container structure using Containerization process
Introduction
We have received a number of questions regarding multi-level container structures in an outbound process. This blog post will show you how to achieve that by using the new Containerization feature in Microsoft Dynamics AX 2012 R3, and work through an example of building a two-level container structure.
A multi-level container structure refers to nested containers, that is, containers inside other containers. In some situations, for example, you may want to pack your goods into cartons (first level containers), and then put several of those cartons on a pallet (second level containers), for transportation. Using the containerization process, the system can calculate the required containers at different levels and build up the nested structure for you.
This post assumes you are already familiar with the containerization feature. For an introduction to this feature, you can refer to my previous post here.
Set up Wave templates
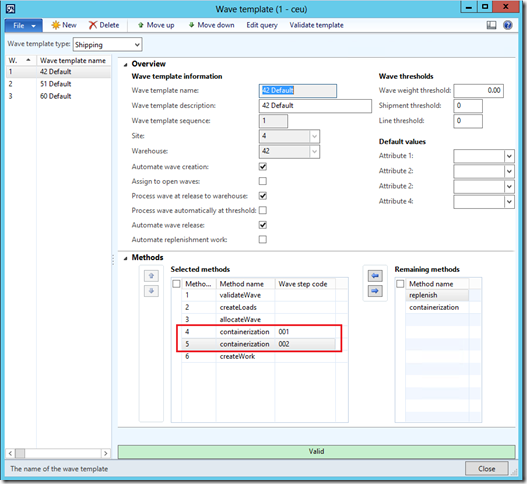
Figure 1. Wave template (Warehouse management > Setup > Waves > Wave templates)
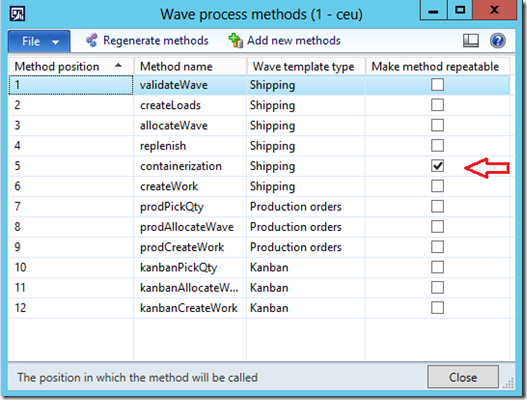
The idea is that we run the containerization process twice in a wave, with the first process creating the first level containers and the second one creating the second level containers. Therefore, we need to add the Containerization method twice to the wave templates, and assign two Wave step codes to them. Remember, to be able to add it multiple times you will first need to select Make method repeatable in the Wave process methods form, as shown below.
Figure 2. Wave process methods (Warehouse management > Setup > Waves > Wave process methods)
Set up Containerization
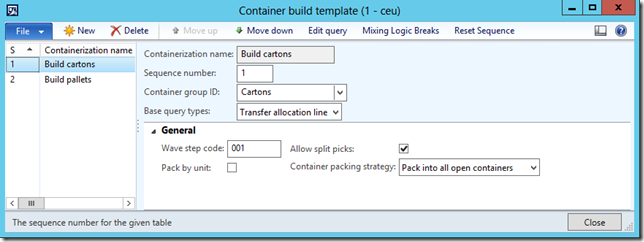
Figure 3. The first template for building cartons
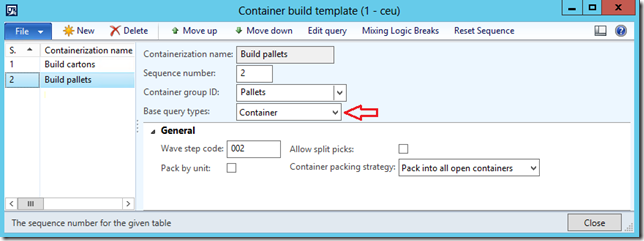
Figure 4. The second template for build pallets
Here we have two Container build templates matching the wave templates. The first one is responsible for creating cartons to pack the items in, and the second one is for creating pallets to contain the cartons. Note that the first template has Base query type set to Transfer order line since a transfer order is used in this example but the process is the same for sales orders. Also note that the second template has Base query type set to Container, meaning it is used to build containers for containers.
To keep the example simple, I don’t have any special setup on the template query or mixing logic breaks. The container groups Cartons and Pallets contain only one container type each. The container types are configured as below.
Figure 5. Container types (Warehouse management > Setup > Containers > Container types)
Set up work break on Work templates (optional)
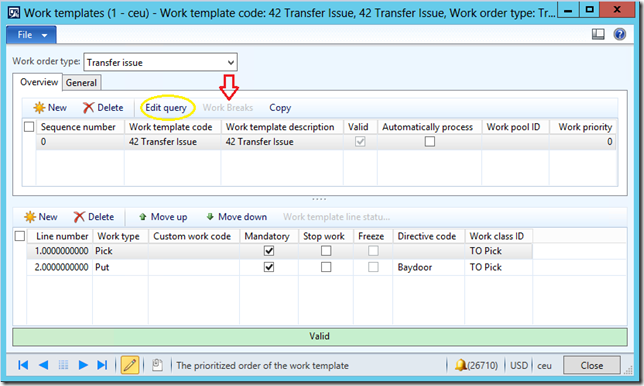
As we know, when using containerization, the created Work lines will break by the capacity of the enclosing containers, that is, the child containers (cartons) in this case. Now that we are building two container levels, you might want the Work (headers) to break by the parent containers (pallets). This way our work structure will match the container structure. When the warehouse worker completes a work line, a carton is packed and when they have completed a Work, a pallet is packed. This can be achieved by setting up Work break on the Work templates.
Figure 6. Work template (Warehouse management > Setup > Work > Work templates)
Here is our work template for transfer issue. Click Edit query on the template header.
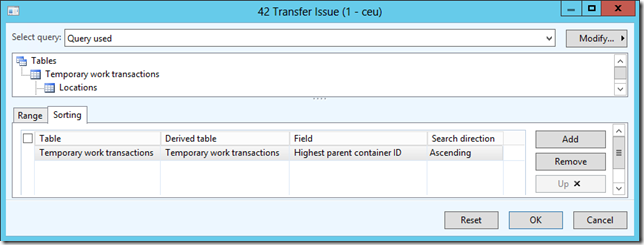
Figure 7. Query on Work template
On the query form, under the Sorting tab, add the field: Highest parent container ID, and click OK.
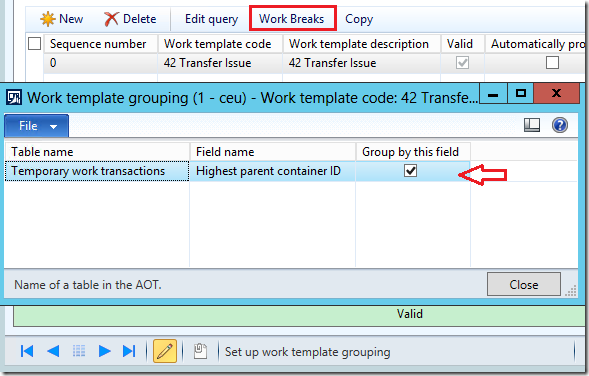
Figure 8. Work template grouping
The Work Breaks button on the Action pane is now enabled. Click it and in the popped-up form, select the checkbox to enable the work to be broken up by the Highest parent container ID.
Source order
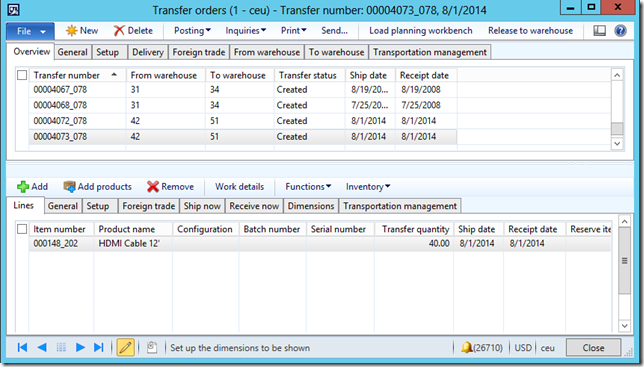
Figure 9. Transfer order
We now have a transfer order with one item of a certain quantity. Assume that the item has enough on-hand inventory and has been reserved.
Execute Containerization
Now we will release the order to warehouse and thereby start the wave and containerization process.
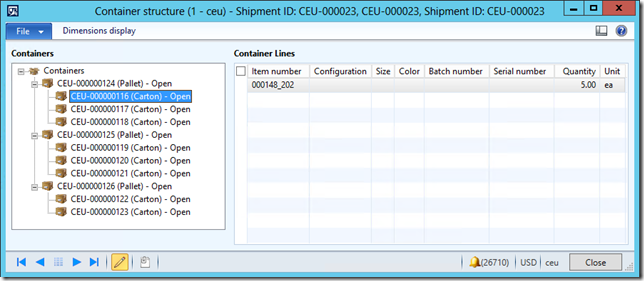
Figure 10. Container structure (Shipment detail form > Transportation > Container structure)
As a result of the process, eight cartons were generated, with each carton containing five items. Three parent containers (pallets) were created, with the first two pallets containing three cartons each and the last containing the remaining two cartons. From the physical dimensions setup of the container types above, you will notice that a pallet can only contain a maximum of three cartons due to the volume constraint, and this is reflected in the generated container structure.
Note that in the situation where weight is the constraint, when building second level containers, the container tare weight will be taken into account.
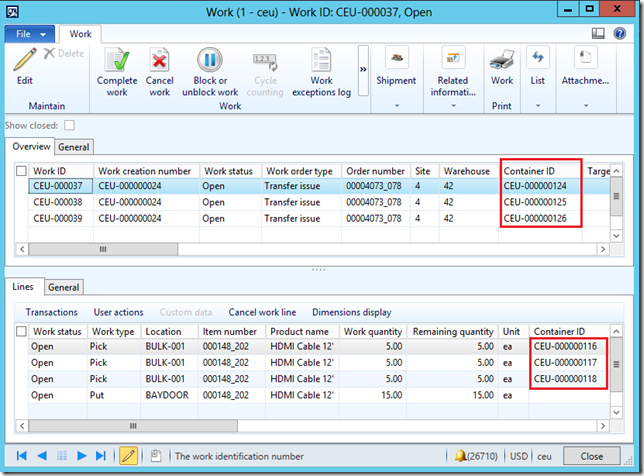
Figure 11. The created work
Work has been successfully broken by parent containers (pallets), and we have three work created for each pallet. The work lines, as expected, break into quantities that match the calculated quantity assigned to each carton.
From this point, we can continue with the rest of the outbound process of executing work, confirming shipment, and so on.
Conclusion
This post has demonstrated how to build a nested container structure by using the containerization feature and together with the work template setup, how it can help you achieve desired work breaking that matches your packing structure.
