
Extensibility for the Microsoft Dynamics NAV Tablet Client
Get in touch
With Microsoft Dynamics NAV 2015, you will be able to run your Microsoft Dynamics NAV application on tablets. The touch interface on these devices opens for a few new cool scenarios. One of the obvious usage of touch is to allow users to write directly on the tablet, for example to sign documents.
In this blog post, I will walk you through how to develop a client control add-in with JavaScript that you will be able to add to any Microsoft Dynamics NAV page. This add-in shows a box in which the user can write with a tablet pen or just with his finger. It also demonstrates how to save the image into a Microsoft Dynamics NAV table as a BLOB.
If you are not familiar with JavaScript client add-ins or if you just need a refresher, take a look at this walkthrough for your classic ‘Hello World’ example.
I am referring to this add-in as the ‘Signature Add-in’ and to the graphical data as ‘the signature’, but it could really be any type of hand-drawn graphics.
So, let’s get started.
Creating the C# class library
In Visual Studio, create a new C# class library project and add a reference to the Microsoft.Dynamics.Framework.UI.Extensibility.dll assembly. You will find this assembly in a directory similar to C:\Program Files (x86)\Microsoft Dynamics NAV\80\RoleTailored Client.
If you are already familiar with Microsoft Dynamics NAV HTML/JavaScript add-ins, you know that the purpose of this class library is merely to specify the interface and make the C/AL compiler happy. It does not contain any actual executing code.
On the server side, besides the usual AddInReady event, we will need two more events; one to write the signature data: the SaveSignature and one to read the signature from the Microsoft Dynamics NAV table to trigger an update on the page; the UpdateSignature.
On the client side, that is in the JavaScript code, we also need a method to actually draw the graphics and we also want to be able to clear the content.
To specify this API, create a single public interface looking like this:
namespace SignatureAddIn
{
using Microsoft.Dynamics.Framework.UI.Extensibility;
/// <summary>
/// Interface definition for the signature add-in.
/// </summary>
[ControlAddInExport(“SignatureControl”)]
public interface ISignatureAddIn
{
[ApplicationVisible]
event ApplicationEventHandler AddInReady;
[ApplicationVisible]
event ApplicationEventHandler UpdateSignature;
[ApplicationVisible]
event SaveSignatureEventHandler SaveSignature;
[ApplicationVisible]
void ClearSignature();
[ApplicationVisible]
void PutSignature(string signatureData);
}
public delegate void SaveSignatureEventHandler(string signatureData);
}
Notice that the SaveSignatureEventHandler delegate takes a string parameter, which will contain the actual serialized data representing the image.
Build your assembly to make sure you did not forget a semi-colon somewhere.
Next, you will need to sign your assembly, obtain its public key token and copy it to the client add-ins folder. To do that, follow the steps as described in the walkthrough.
Creating the manifest file
In the manifest of an add-in, which is just regular XML file, we specify the resources that the control will use. The client side code consists of one single JavaScript file signature.js and use a single CSS file to style the HTML. We will also add a call to an initialization method in our script. The manifest is a good place to do that as the framework ensures that it gets called only when the browser is ready.
That makes our manifest look like this:
<?xml version=”1.0″ encoding=”utf-8″ ?>
<Manifest>
<Resources>
<Script>signature.js</Script>
<StyleSheet>signature.css</StyleSheet>
</Resources>
<ScriptUrls>
</ScriptUrls>
<Script>
<![CDATA[
init();
]]>
</Script>
<RequestedHeight>200</RequestedHeight>
<RequestedWidth>700</RequestedWidth>
<VerticalStretch>false</VerticalStretch>
<HorizontalStretch>false</HorizontalStretch>
</Manifest>
Creating the CSS file
No big deal here, just create a file named signature.css (the name needs to match the one in the manifest) with the following content:
.signatureArea {
width: 300px;
}
.signatureCanvas {
border: solid;
border-width: 1px;
border-color: #777777;
background-color: #fff;
width: 100%;
}
.signatureButton {
width: 100px;
height: 40px;
color: white;
background-color: #666666;
font-size: 12pt;
outline: 0;
border-color: white;
}
Feel free to play with the styles, this will only affect your add-in and will not affect the Microsoft Dynamics NAV pages whatsoever.
The interesting part
All of what has been described so far is boilerplate stuff, which you will have to do for any Microsoft Dynamics NAV HTML client add-in. We are now getting to the interesting piece, which is the JavaScript code.
Create a file named signature.js. Again here, the name has to match the one you declared in the manifest.
Let’s start with the implementation of the interface contract that we previously defined in the C# class library:
var signature;
function init() {
signature = new ns.SignatureControl();
signature.init();
RaiseAddInReady();
}
// Event will be fired when the control add-in is ready for communication through its API.
function RaiseAddInReady() {
Microsoft.Dynamics.NAV.InvokeExtensibilityMethod(‘AddInReady’);
}
// Event raised when the update signature has been called.
function RaiseUpdateSignature() {
Microsoft.Dynamics.NAV.InvokeExtensibilityMethod(‘UpdateSignature’);
}
// Event raised when the save signature has been called.
function RaiseSaveSignature(signatureData) {
Microsoft.Dynamics.NAV.InvokeExtensibilityMethod(‘SaveSignature’, [signatureData]);
}
function PutSignature(signatureData) {
signature.updateSignature(signatureData);
}
function ClearSignature() {
signature.clearSignature();
}
As you can see the SignatureControl object in the ns namespace is doing all the work, so let’s take a closer look at it.
(function (ns) {
ns.SignatureControl = function () {
var canvas,
ctx;
function init() {
createControlElements();
wireButtonEvents();
wireTouchEvents();
ctx = canvas.getContext(“2d”);
}
…
Here we declare the SignatureControl class in the ns namespace and the init()method. The createControlElements() creates the various HTML elements that the control is made of.
function createControlElements() {
var signatureArea = document.createElement(“div”),
canvasDiv = document.createElement(“div”),
buttonsContainer = document.createElement(“div”),
buttonClear = document.createElement(“button”),
buttonAccept = document.createElement(“button”),
buttonDraw = document.createElement(“button”);
canvas = document.createElement(“canvas”),
canvas.id = “signatureCanvas”;
canvas.clientWidth = “100%”;
canvas.clientHeight = “100%”;
canvas.className = “signatureCanvas”;
buttonClear.id = “btnClear”;
buttonClear.textContent = “Clear”;
buttonClear.className = “signatureButton”;
buttonAccept.id = “btnAccept”;
buttonAccept.textContent = “Accept”;
buttonAccept.className = “signatureButton”;
buttonDraw.id = “btnDraw”;
buttonDraw.textContent = “Draw”;
buttonDraw.className = “signatureButton”;
canvasDiv.appendChild(canvas);
buttonsContainer.appendChild(buttonDraw);
buttonsContainer.appendChild(buttonAccept);
buttonsContainer.appendChild(buttonClear);
signatureArea.className = “signatureArea”;
signatureArea.appendChild(canvasDiv);
signatureArea.appendChild(buttonsContainer);
document.getElementById(“controlAddIn”).appendChild(signatureArea);
}
Besides plain old divs and buttons, the canvas is where we will actually be able to draw. Canvas has been supported in most browsers for a while and you can read more about it here.
The control has three buttons. One to accept the signature, which will save it to the database, one to clear the field and one to redraw the signature from the database, mostly for test purposes, as you would probably not need it in most real-life scenarios. Let’s wire these buttons so do something useful:
function wireButtonEvents() {
var btnClear = document.getElementById(“btnClear”),
btnAccept = document.getElementById(“btnAccept”),
btnDraw = document.getElementById(“btnDraw”);
btnClear.addEventListener(“click”, function () {
ctx.clearRect(0, 0, canvas.width, canvas.height);
}, false);
btnAccept.addEventListener(“click”, function () {
var signatureImage = getSignatureImage();
ctx.clearRect(0, 0, canvas.width, canvas.height);
RaiseSaveSignature(signatureImage);
}, false);
btnDraw.addEventListener(“click”, function () {
RaiseUpdateSignature();
}, false);
}
Notice that we use the drawing context ctx, that we obtained during initialization to clear the content of the canvas. We will see what the getSignatureImage() exactly does to obtain the data in a sec but before that let’s wire the touch events.
The touch events
In order to be able draw, we want to react to touch events. In this example, we also hook up mouse events, which is convenient if you want to test your add-in on a non-touch device with an old-fashioned mouse.
function wireTouchEvents() {
canvas.addEventListener(“mousedown”, pointerDown, false);
canvas.addEventListener(“touchstart”, pointerDown, false);
canvas.addEventListener(“mouseup”, pointerUp, false);
canvas.addEventListener(“touchend”, pointerUp, false);
}
As you can see, touchstart is the equivalent of a mousedown, while a touchend is the counterpart of a mouseup.
Once we have detected a touchstart, the trick is to start listening to touchmove and draw in the canvas to the current position of the ‘touching’. Once we get a touchend, we will then stop the listening and the drawing:
function pointerDown(evt) {
ctx.beginPath();
ctx.moveTo(evt.offsetX, evt.offsetY);
canvas.addEventListener(“mousemove”, paint, false);
canvas.addEventListener(“touchmove”, paint, false);
}
function pointerUp(evt) {
canvas.removeEventListener(“mousemove”, paint);
canvas.removeEventListener(“touchmove”, paint);
paint(evt);
}
function paint(evt) {
ctx.lineTo(evt.offsetX, evt.offsetY);
ctx.stroke();
}
Canvas image data
We want to be able to serialize and de-serialize the image data from the canvas, so we can send it back and forth to the server in a string. The HTML canvas has built-in functionalities to do that through the context:
function updateSignature(signatureData) {
var img = new Image();
img.src = signatureData;
ctx.clearRect(0, 0, canvas.width, canvas.height);
ctx.drawImage(img, 0, 0);
}
function getSignatureImage() {
return canvas.toDataURL();
}
function clearSignature() {
ctx.clearRect(0, 0, canvas.width, canvas.height);
}
return {
init: init,
updateSignature : updateSignature,
getSignatureImage: getSignatureImage,
clearSignature: clearSignature
};
The toDataURL() method converts the image into a (rather long) URL encoded string containing all the pixels. To convert it back, we only need to create an image and set its src property to this URL encoded string and pass this image to the method drawImage on the canvas context. This is pretty convenient as it allows us to use a simple string rather than more complex data structure such as arrays.
We are now done with the JavaScript part and the entire file looks like this:
var signature;
function init() {
signature = new ns.SignatureControl();
signature.init();
RaiseAddInReady();
}
// Event will be fired when the control add-in is ready for communication through its API.
function RaiseAddInReady() {
Microsoft.Dynamics.NAV.InvokeExtensibilityMethod(‘AddInReady’);
}
// Event raised when the update signature has been called.
function RaiseUpdateSignature() {
Microsoft.Dynamics.NAV.InvokeExtensibilityMethod(‘UpdateSignature’);
}
// Event raised when the save signature has been called.
function RaiseSaveSignature(signatureData) {
Microsoft.Dynamics.NAV.InvokeExtensibilityMethod(‘SaveSignature’, [signatureData]);
}
function PutSignature(signatureData) {
signature.updateSignature(signatureData);
}
function ClearSignature() {
signature.clearSignature();
}
(function (ns) {
ns.SignatureControl = function () {
var canvas,
ctx;
function init() {
createControlElements();
wireButtonEvents();
wireTouchEvents();
ctx = canvas.getContext(“2d”);
}
function createControlElements() {
var signatureArea = document.createElement(“div”),
canvasDiv = document.createElement(“div”),
buttonsContainer = document.createElement(“div”),
buttonClear = document.createElement(“button”),
buttonAccept = document.createElement(“button”),
buttonDraw = document.createElement(“button”);
canvas = document.createElement(“canvas”),
canvas.id = “signatureCanvas”;
canvas.clientWidth = “100%”;
canvas.clientHeight = “100%”;
canvas.className = “signatureCanvas”;
buttonClear.id = “btnClear”;
buttonClear.textContent = “Clear”;
buttonClear.className = “signatureButton”;
buttonAccept.id = “btnAccept”;
buttonAccept.textContent = “Accept”;
buttonAccept.className = “signatureButton”;
buttonDraw.id = “btnDraw”;
buttonDraw.textContent = “Draw”;
buttonDraw.className = “signatureButton”;
canvasDiv.appendChild(canvas);
buttonsContainer.appendChild(buttonDraw);
buttonsContainer.appendChild(buttonAccept);
buttonsContainer.appendChild(buttonClear);
signatureArea.className = “signatureArea”;
signatureArea.appendChild(canvasDiv);
signatureArea.appendChild(buttonsContainer);
document.getElementById(“controlAddIn”).appendChild(signatureArea);
}
function wireTouchEvents() {
canvas.addEventListener(“mousedown”, pointerDown, false);
canvas.addEventListener(“touchstart”, pointerDown, false);
canvas.addEventListener(“mouseup”, pointerUp, false);
canvas.addEventListener(“touchend”, pointerUp, false);
}
function pointerDown(evt) {
ctx.beginPath();
ctx.moveTo(evt.offsetX, evt.offsetY);
canvas.addEventListener(“mousemove”, paint, false);
canvas.addEventListener(“touchmove”, paint, false);
}
function pointerUp(evt) {
canvas.removeEventListener(“mousemove”, paint);
canvas.removeEventListener(“touchmove”, paint);
paint(evt);
}
function paint(evt) {
ctx.lineTo(evt.offsetX, evt.offsetY);
ctx.stroke();
}
function wireButtonEvents() {
var btnClear = document.getElementById(“btnClear”),
btnAccept = document.getElementById(“btnAccept”),
btnDraw = document.getElementById(“btnDraw”);
btnClear.addEventListener(“click”, function () {
ctx.clearRect(0, 0, canvas.width, canvas.height);
}, false);
btnAccept.addEventListener(“click”, function () {
var signatureImage = getSignatureImage();
ctx.clearRect(0, 0, canvas.width, canvas.height);
RaiseSaveSignature(signatureImage);
}, false);
btnDraw.addEventListener(“click”, function () {
RaiseUpdateSignature();
}, false);
}
function updateSignature(signatureData) {
var img = new Image();
img.src = signatureData;
ctx.clearRect(0, 0, canvas.width, canvas.height);
ctx.drawImage(img, 0, 0);
}
function getSignatureImage() {
return canvas.toDataURL();
}
function clearSignature() {
ctx.clearRect(0, 0, canvas.width, canvas.height);
}
return {
init: init,
updateSignature : updateSignature,
getSignatureImage: getSignatureImage,
clearSignature: clearSignature
};
};
})(this.ns = this.ns || {});
Packaging your add-in
Now that we have all the parts of the component, we need to zip it together and import it in Microsoft Dynamics NAV. This is again as you would do for any other add-in.
Create a zip file with the following structure:

Put the manifest at the root, the JavaScript file in the script folder and the CSS file in the Stylesheet folder.
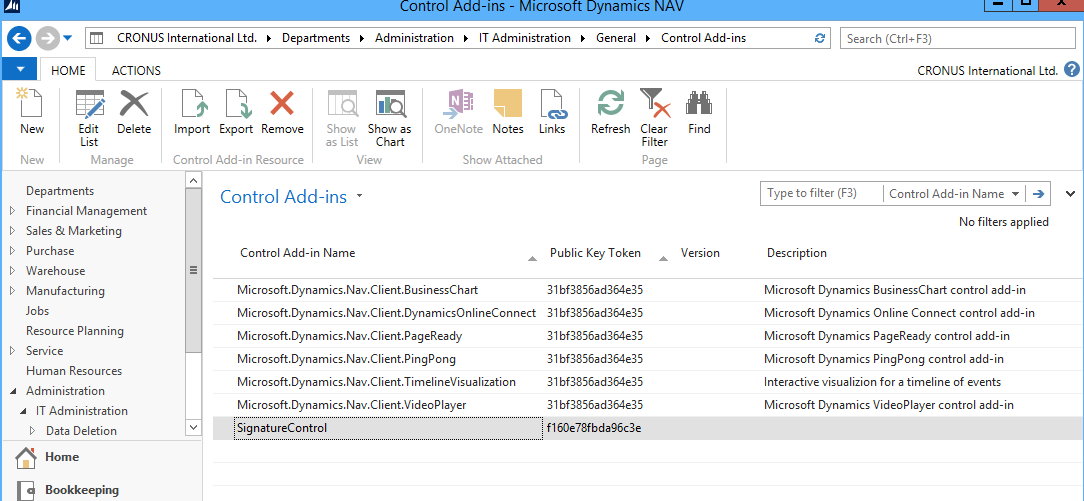
Open any of the Microsoft Dynamics NAV clients (Windows, Web or Tablet) and go to the Control Add-ins page. Create a new entry named SignatureControl and enter the public key token that you saved earlier. Import the zip file.
The C/SIDE side of things
Now that our add-in is sitting comfortably within the confines of the Microsoft Dynamics NAV database, we need to add it to page. But before that, we want a place to save the signature image data. In this fabricated example, I will add the signature to the Sales Invoice card page from the Mini app (1304) which is based on the Sales Header table.
- In Object Designer, open the Sales Header table and add BLOB field called ‘SignatureImage’.
-
Add the actual control page by opening page 1304 and add the control into a separate group.
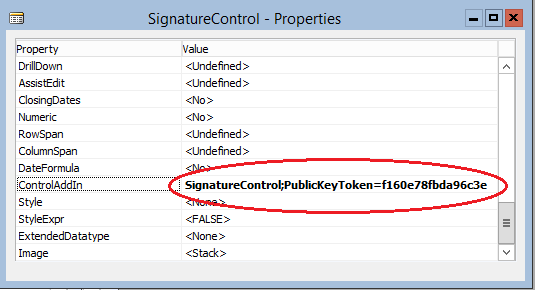
-
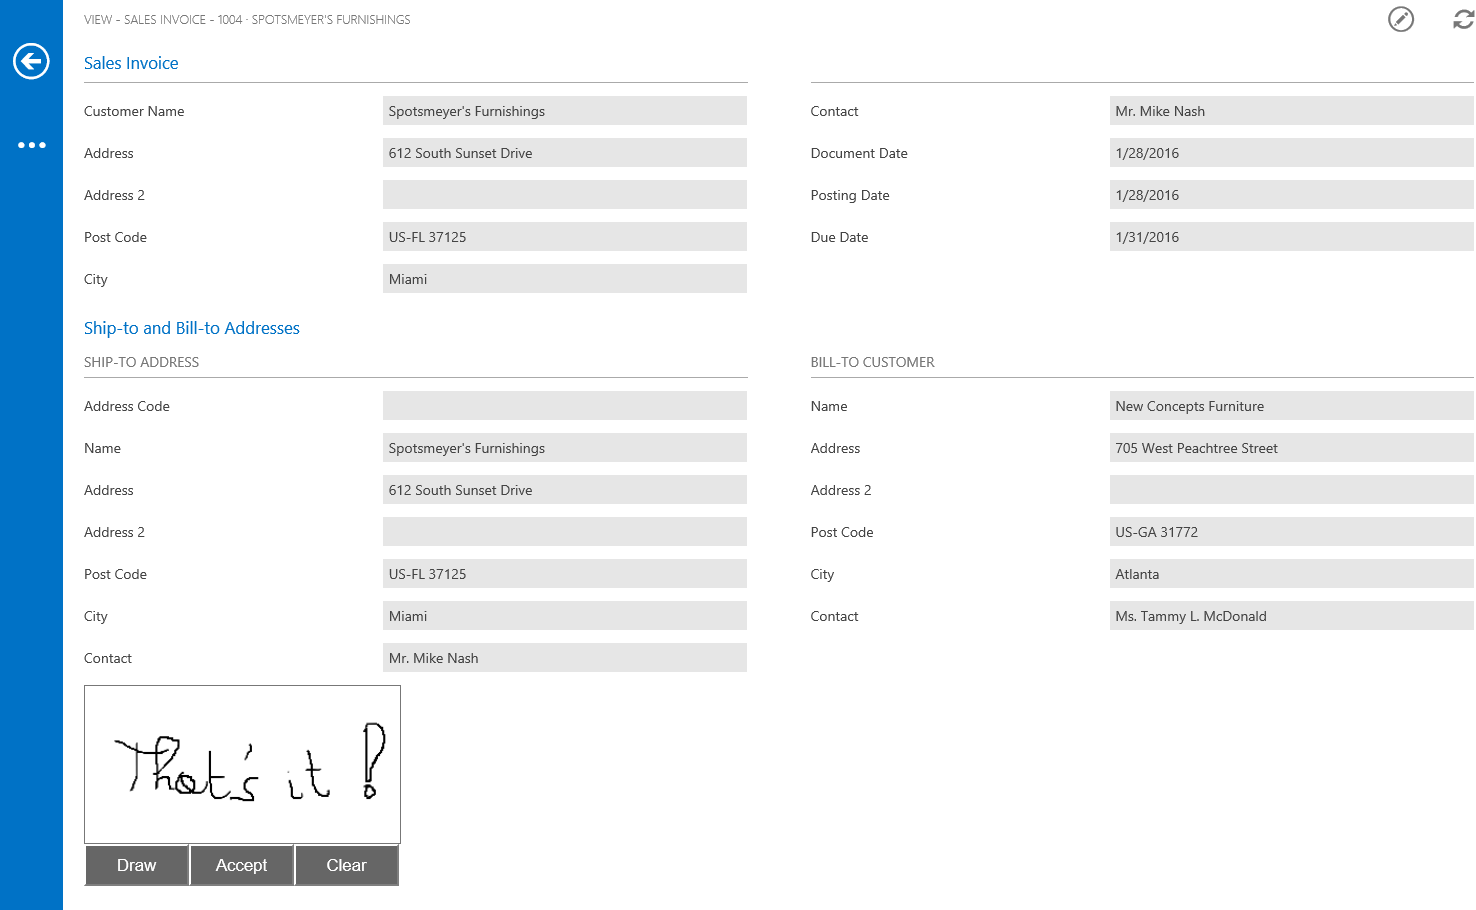
By now you should be able to fire up this page and see how our control looks like. To do that open the client of your choice in the mini app. Navigate to the Sales Invoices and open the Sales Invoice card page.
You should see the signature control. Try to draw in with the mouse or with your finger if you are on a touch enabled device.
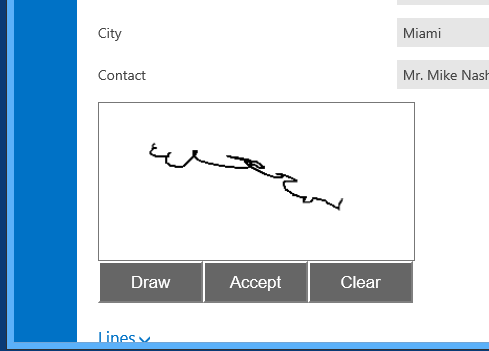
Even the clear button works already and allows you to delete your doodles.
The last part that we are missing is to save and retrieve the pixels to the Microsoft Dynamics NAV database. To do that we need to write a bit of C/AL code.
The C/AL code
If you recall how we defined the add-in interface, we have three triggers to take care of: AddInReady, UpdateSignature and SignatureSaved.
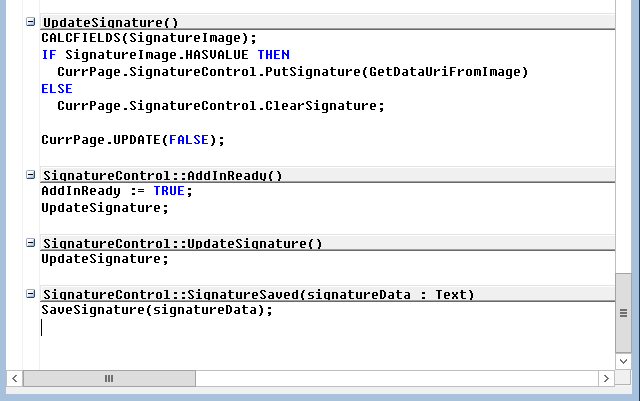
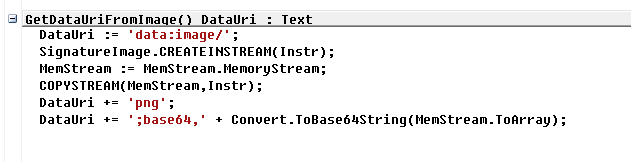
Nothing surprising here. The really interesting methods are SaveSignature and GetDataUriFromImage.
This is where the conversion from between the URL encoded image string and a Microsoft Dynamics NAV BLOB occurs.
The most convenient way to do this is to use the power of .NET for regular expressions matching and memory streams.
So, let’s create a SaveSignature method and add the following .NET type variables to the locals:
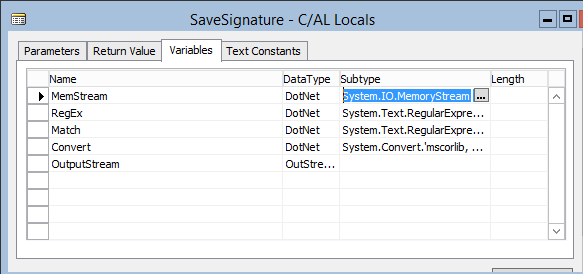
The URL encoded representation of the image contains some goo around the actual pixel information. With .NET regular expressions, we strip the header by matching it and preserving the rest.
What is left is a base 64 encoded string, which we can convert to a byte array using the .net Convert utility class. We then pass it to the memory stream and save it to the Microsoft Dynamics NAV table as a BLOB.

Obtaining the encoded URI is obviously the reverse operation. This is somewhat simpler; after reading the BLOB, we just need to re-add the header.
Finally, we want to update the drawing, when we navigate the records:
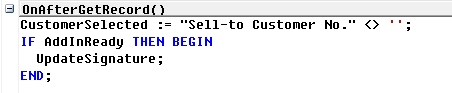
That’s it!
Now you should be able to save the graphics and when you close and re-open the page or navigate through the Sales Invoices, the picture gets updated accordingly.
Even though the most obvious usage scenarios are on the tablet, this add-in works on all three clients (Windows, Web and Tablet).
NOTE: To copy the code samples, see Extensibility for the Microsoft Dynamics NAV Tablet Client on MSDN.


