
Sending email receipts from Retail MPOS Transactions (AX 2012)
MPOS has the ability to send receipt emails in real-time. This utilizes the RTS to call directly back to AX to send the email at the time of the transaction. This is unlike EPOS where the posting of the transactions via statement posting process is required before the email can be sent. EPOS has not changed, see the EPOS blog article for these specific steps.
The intent of this blog is to help provide the basic information and links on how to configure and send email receipts for MPOS transactions.
To get started, you will first need to configure a SMTP server to send the emails. The link below will take you to the TechNet article that walks you through the steps to configure this.
IMPORTANT NOTE: At the time of writing this article, the sendEmail method in the RetailTransactionService class does require the use of SMTP to send email receipts. It may be possible to customize this if you would like to use an Exchange service, but it is not supported at this time.
Configure email functionality in Microsoft Dynamics AX
https://technet.microsoft.com/en-us/library/aa834374.aspx
You will then need to configure the email receipts settings in the Retail. There are 3 options for how receipts will be printed/sent: POS, e-mail, or both. You can set these to be specific to a Customer or in the Retail parameters. The Retail parameters setting will be used when you ring up a transaction at the MPOS without a customer. See the TechNet link below for details on setting these configurations.
Set up email receipts
https://technet.microsoft.com/en-us/library/hh597117.aspx?f=255&MSPPError=-2147217396
Set default options for email receipts
- Click Retail > Setup > Parameters > Retail parameters.
- Click the Posting tab, and then under Email receipt, in the Receipt option field, select an option as the default:
- POS – Print receipts from the point-of-sale register.
- E-mail – Send receipts to customers in email messages.
- Both – Print receipts from the point-of-sale register and send receipts to customers in email messages.
- In the Subject field, enter the text that appears by default in the subject line of a receipt that is sent as an email message.
- In the File name field, enter the file name for the attachment such as “ContosoSalesReceipt”. Do not include the file extension.
NOTE: You will need to following KB in order for the entered File Extension name to be used:
– KB 3147122 – Emailed receipts do not use the file name specified in the retail parameters
– https://fix.lcs.dynamics.com/home/index/373711/kb/3147122
Set email receipt options for a customer
- Click Accounts receivable > Common > Customers > All customers.
- On the All customers list page, select a customer, and then, on the Customer tab, in the Maintain group, click Edit.
- In the Customers form, on the Retail FastTab, select an option in the Receipt option field:
- POS – The customer will receive only printed receipts. The printed receipt is generated from the point-of-sale register.
- E-mail – The customer will receive only email receipts.
- Both – The customer will receive both a printed receipt and an email receipt.
- In the Receipt email field, enter the customer’s email address if you selected either E-mail or Both in the Receipt option field.
Set up an E-mail Template for receipts
- Click Organization Administration > Setup > E-mail Templates
- Press CTRL + N to create a new template.
- Complete the following in the Overview tab:
- E-mail ID: EmailRecpt (this name is to be entered exactly as seen, it has been hardcoded to look for this ID).
- E-mail description: Enter a description.
- Default language code: Select the desired language.
- Sender name: Specify a name for the sender of the email – customers will see this on the email as the From name.
- Sender e-mail: Specify a valid email address – customers will see this on the email as the From email address.
- In the lower grid, configure the following:
- E-mail ID: This should already be populated as EmailRecpt.
- Language: Specify the desired language here again.
- Subject: Enter a subject for the title of the email that will appear on all email receipts.
- Layout: Choose the desired formatting language.
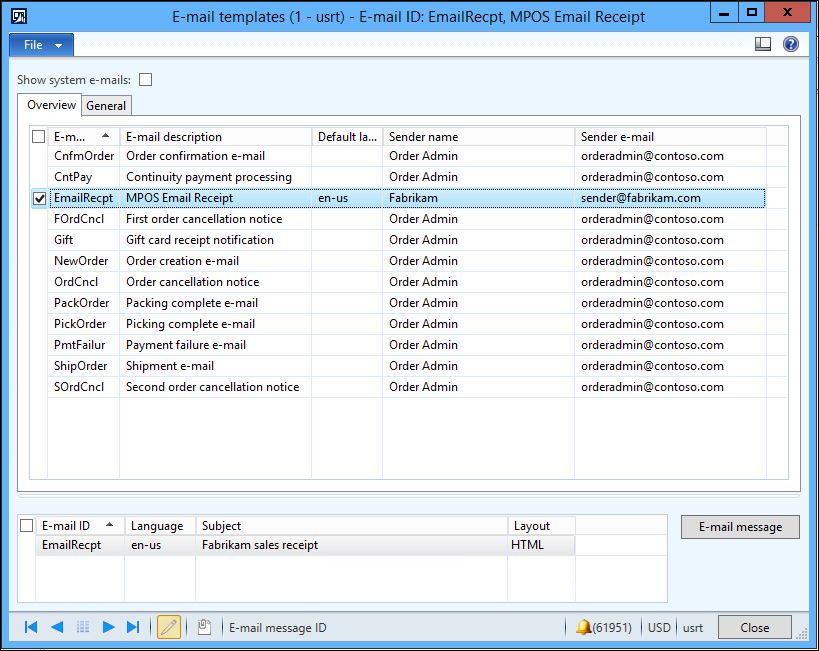
- Click the E-mail message button to fill out the template for the Body of email messages to be sent.
NOTE: EPOS attaches the receipt as a PDF, MPOS sends the receipt in the body of the email message.- Type up the body of the message you want to have for the customers.
- Wherever you want the receipt to appear (as seen in MPOS), insert the placeholder %message%
NOTE: This is the only placeholder the code will replace when sending MPOS receipts as it is the only thing sent by MPOS – getting more placeholder options would require customization on the MPOS side. 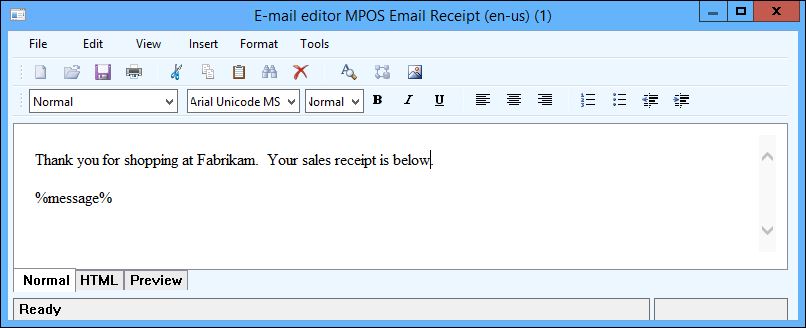
Depending on the settings that you configured, you will need to run the respective Distribution schedule jobs to sync these changes to POS.
- 1010 – Customer
- 1070 – Channel configuration
- 1090 – Registers
- 1110 – Global configuration
MPOS transaction
Perform a transaction in MPOS, enter an email address, and click Send.

The following email is sent to customer real-time.


