- Home
- Security, Compliance, and Identity
- Microsoft Entra Blog
- Getting started with Windows Azure Multi-Factor Authentication
- Subscribe to RSS Feed
- Mark as New
- Mark as Read
- Bookmark
- Subscribe
- Printer Friendly Page
- Report Inappropriate Content
Howdy folks,
Just about 2 weeks back, ScottGu announced the general availability of Windows Azure Multi-Factor Authentication on his blog . We've seen a LOT of interest in this service and have even closed several large enterprise deals since we announced.
Given this level of excitement, I thought many of you might find it useful to have a deep dive post with step by step instructions on how to get started with Windows Azure Multi-Factor Authentication. To help with that, Bhavini Soneji, the Program Manager in my team who owns the service offered to write up a detailed post explaining how to configure MFA for both cloud and on-premise use.
So without further ado, let me turn it over to Bhavini.
Best regards,
Alex
Hi everyone,
I'm Bhavini Soneji from the Active Directory PM team here at Microsoft. Over the past year I've been working on getting the Azure Multi-Factor Authentication service ready for the world and I'm excited about the opportunity to walk you through how to get it set up and running now that we've GA'd.
Windows Azure MFA has a range of exciting capabilities that can be used to secure access to both cloud and on-premises resources. In this blog post we will go into details that show how easy it is to use MFA to enhance security for your users when they access cloud-hosted applications such as Office 365, Windows Intune, Dynamics CRM, Windows Azure and third party apps that run in the cloud. We will also show you how to secure access to on-premises resources by connecting MFA to your VPN solution, IIS applications and Active Directory authentication endpoints. You can also use our MFA SDK to build these security capabilities into your own applications.
Take a look at this video to see an overview of the solutions you can build with our MFA services. You can also watch walkthrough videos for the topics we will cover in detail below:
-
Turn MFA on for Windows Azure Active Directory and Office365 – view video
-
Add MFA to on-premises applications – view video
-
Build MFA into your applications – view video
Getting Started – Create a Multi-Factor Authentication Provider
To start using Windows Azure Multi-Factor Authentication, you'll need to add a Multi-Factor Authentication provider.
To do this, sign in to Windows Azure Management Portal, select NEW -> APPLICATION SERVICES -> ACTIVE DIRECTORY -> MULTI-FACTOR AUTH PROVIDER , and select QUICK CREATE .

Pick a name to refer to your MFA provider, a usage model for billing , and a Windows Azure AD tenant that you want to use this Multi-Factor Auth Provider with. Note that you will need to be signed in as a global admin on the Windows Azure AD tenant to link your directory.
Turn MFA on for Windows Azure Active Directory and Office 365
Most of you will probably want to use Multi-Factor Authentication to secure access to cloud applications like Office 365 and Dynamics CRM Online, and third-party cloud services that integrate Windows Azure Active Directory.
Enabling MFA for users
First you will need to enable MFA for your directory users. You can do this by opening the source directory in which the user already exists. Click on the USERS tab and select the MANAGE MULTI-FACTOR AUTH button in the command bar.

On this page, you can add, delete, or change MFA settings for the users in this directory. To do this, multi-select the users you want to enable for MFA, select ENABLE , and then ENABLE MULTI-FACTOR AUTH in the confirmation dialog to complete the task.

It is important that you plan your roll-out of MFA to your organization carefully because the MFA service is currently optimized for cloud applications that are accessed via web browsers.
Initially when users have been enabled for MFA they can continue using their regular password for non-browser applications such as Outlook, Lync and email clients on mobile devices – until they have completed an enrollment process in which they provide MFA contact details and create special application passwords for these apps. This multi-step process helps you ensure that users don't unexpectedly lose access to important apps as you roll out MFA. When most of your users have completed enrollment, you can close your rollout period and enforce MFA for any last stragglers.
We also recommended that you send an email notification to these users before enabling them for MFA to educate them and to make them aware of the need to generate app passwords for signing into non-browser apps (Outlook, Lync, etc.). We've included a template email here to get started. And, if one of your users loses a device, you can always reset their application passwords and require that they re-do the enrollment process by selecting the MANAGE USER SETTINGS .
You are now done with your admin tasks!
The User Enrollment Process
Once you have enabled Multi-Factor Authentication for a user, they will be prompted to go through the MFA enrollment process the next time they sign in. They will be asked to select and configure one of these Multi-Factor Authentication methods:
-
Mobile App - Use the Multi-Factor Auth mobile app to receive a verification request or generate a One Time Passcode (OTP)
-
Mobile Phone - Use a phone call to the user's mobile phone or receive a verification code as a text message on the mobile phone
-
Office Phone - Use a phone call to the user's office phone
This enrollment process makes deploying MFA hassle-free for you, while providing your users the flexibility to select the primary verification method that suits their needs. Users can also add or change methods later by visiting their settings page . Take a look at this user enrollment process video to learn more.
The Multi-Factor Auth Mobile App
Our favorite method here in the Azure team is the Multi-Factor Auth Mobile App.
To use it, your users will have to install the Multi-Factor Auth mobile app from the app store for their mobile device (Windows Phone, iPhone, or Android device). When they sign in to Office 365 or any other app that relies on Windows Azure AD they will be prompted to add the contact details needed for MFA. The Set it up now button will take them to a wizard experience to enter this information.

To use the Mobile App, they just need to choose Mobile app from the drop down menu on the next page and click on the Configure button. This will bring up the Configure Mobile app page.

Now, the user must launch the Multi-Factor Auth app on their device and click the '+ ' sign to add a new account. Then they should click the scan button at the bottom of the screen and scan the QR code that is on the Configure Mobile app page on the computer screen.

After a few seconds the user will see a 6 digit code on the mobile device screen and then will have to click on the done button. On the next page users will be asked to ensure everything is set up correctly. To do this they select Verify Now button on the page, and then receive a notification on the mobile device that opens the MFA app. They complete the verification by selecting the Verify button in the app.
Since there is always a chance a user might inadvertently uninstall the mobile app on their device, they will be prompted to enter a mobile phone number on the next screen of the wizard.

Now your users can take advantage of MFA without having to be disturbed by annoying ringtones or dealing with text message costs!
Application Passwords
Now that MFA is configured for browser apps, your users will need to select generate app passwords to generate application passwords to sign in non-browser clients such as Outlook, Lync, Word and PowerPoint. For security reasons, application passwords are currently available for end users, but not for administrators.

Application passwords are system-generated 16-character strings to be used only on non-browser clients. We highly recommend that your users create an individual application password for each device that is used.
When any of your users launches an application like Outlook, they must enter your username as usual, but will need to enter their application password for that device instead of their regular password. Please remind them to check the Remember my password or Keep me signed in check box so you don't have to enter your app password at each sign in attempt!
When an MFA-enabled user signs in to a cloud application that relies on Windows Azure AD, they will get a notification on their phone that asks them to Verify or Cancel the sign-in attempt. And they will also be able to report fraudulent sign-in attempts if you have turned on the fraud alert feature for your directory.

Use MFA for on-premises applications
You can also use Windows Azure Multi-Factor Authentication to protect your on-premises resources using the Windows Azure Multi-Factor Authentication Server. The MFA Server integrates with IIS authentication to secure Microsoft IIS web applications, RADIUS authentication, LDAP authentication, and Windows authentication.
Download and Activate Multi-Factor Authentication Server
To get started, launch the Windows Azure Management Portal. Go to the MULTI-FACTOR AUTH PROVIDERS tab within ACTIVE DIRECTORY . Select a provider that you have already created in the list view and click on the MANAGE command to bring up the MFA Management Portal .

In the MFA Management Portal, select SERVER in the left pane to bring up the MFA Server download page. Select DOWNLOAD , followed by Generate New Activation Credentials to create credentials that will be used to activate the MFA Server after it is installed.

Activate the MFA Server you just downloaded using the credentials retrieved above.

Directory Synchronization
The MFA Server is configured to integrate with Active Directory out of the box, but can also be used with other directories. To get started, click on the Directory Integration icon, select the Synchronization tab and then click the ADD button to configure sync and set up the desired sync frequency.

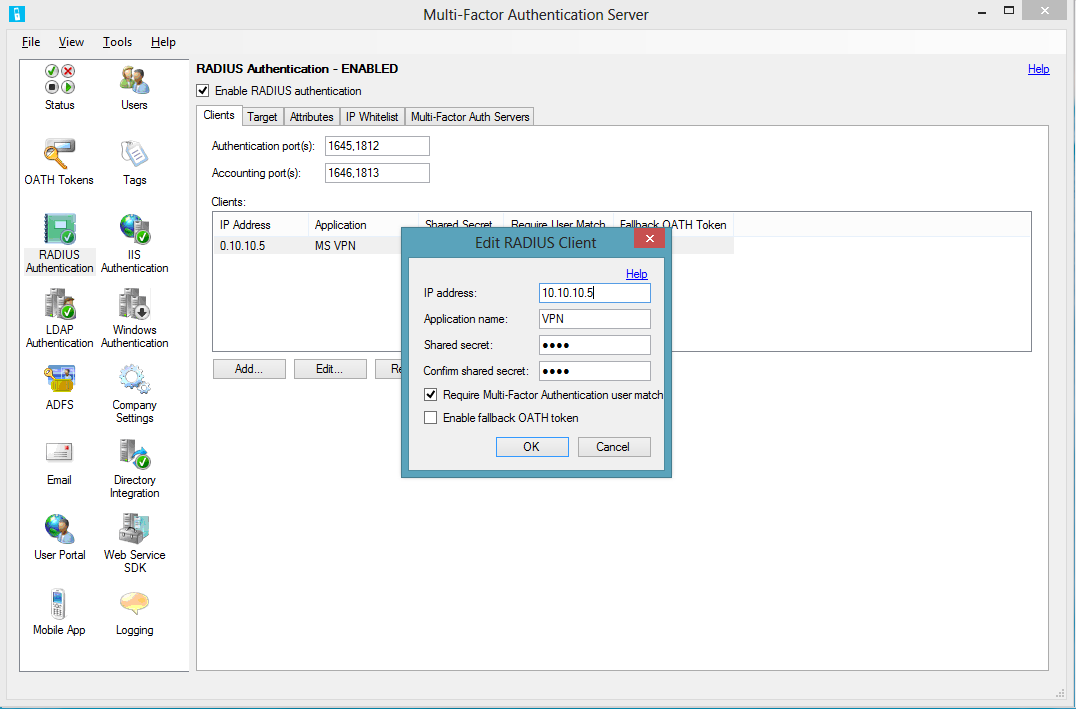
RADIUS Configuration
You can use RADIUS Authentication to add MFA for VPN and other remote access gateways such as Microsoft Unified Access Gateway, Threat Management Gateway and Remote Desktop Gateway. To get started, click on the RADIUS Authentication icon, click ADD to add the RADIUS client info and enable RADIUS Authentication.
For more detailed information, you can check out our TechNet articles:
Build MFA into your applications
You can also build MFA phone call and text message verification methods into your own custom application's sign-in or transaction processes while leveraging your application's existing user database. We provide an SDK to enable direct integration with your cloud services.
You can learn more about enabling MFA for your application at:
-
Alex & Steve's blog post: Building Multi-Factor Authentication to Your Applications using the SDK
- MSDN: Windows Azure Multi Factor Authentication SDK
I hope that what you have read here helps you think of some great ways in which you can use our new Multi-Factor Authentication capabilities in your organization and for applications you develop.
Get started with MFA today! Give us your feedback and feature requests via the MFA forum . The MFA team will be excited to hear from you!
Regards,
Bhavini Soneji
You must be a registered user to add a comment. If you've already registered, sign in. Otherwise, register and sign in.