- Home
- Security, Compliance, and Identity
- Microsoft Entra Blog
- More preview enhancements for Windows Azure AD Premium
- Subscribe to RSS Feed
- Mark as New
- Mark as Read
- Bookmark
- Subscribe
- Printer Friendly Page
- Report Inappropriate Content
Howdy folks,
Today I want to let you know about a new set of features we've just released for Windows Azure Active Directory, which as most of you are aware, is currently in public preview.
These new features are:
- Self-service group management for security groups
- Security group membership requests and approvals
- Application access management using user-managed security groups
- New security and usage monitoring reports and analytics
- Self-service password reset
I've included an overview of each of these features below, just scroll down a little.
But if you are the type of person who wants to just start using them, navigate to the Windows Azure Preview Feature page and add Windows Azure Active Directory Premium to your subscription by clicking " try it now ." Then, sign in to the Windows Azure Management Portal at https://manage.windowsazure.com , open your directory, and on the CONFIGURE tab, set PREMIUM FEATURES to be ENABLED .

Fig 1 : Premium features enabled on the CONFIGURE tab
Once you've got that set up, you can check out self-service password reset and the new reports right there in the Windows Azure Management Portal. To try out self-service group management, sign in to the Access Panel at https://myapps.microsoft.com using an organizational account.
Self-Service Group Management
The Access Panel already provides users with single-sign on to SaaS applications. We've added tabs on the Access Panel where users can now see, create and manage groups.
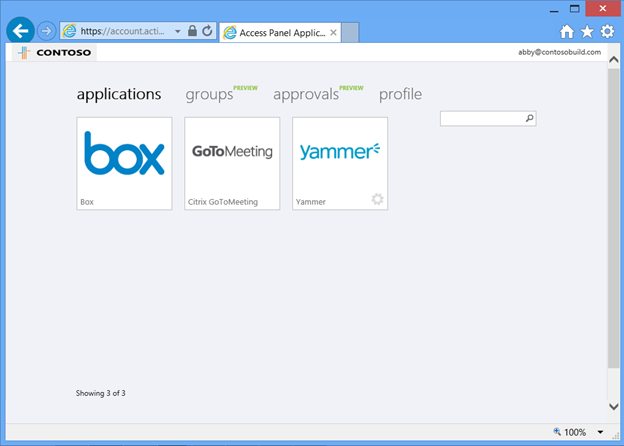
Fig 2 : Access Panel
You can try out-service group management by clicking on the groups tab. By default this shows all the security groups in your Windows Azure AD.
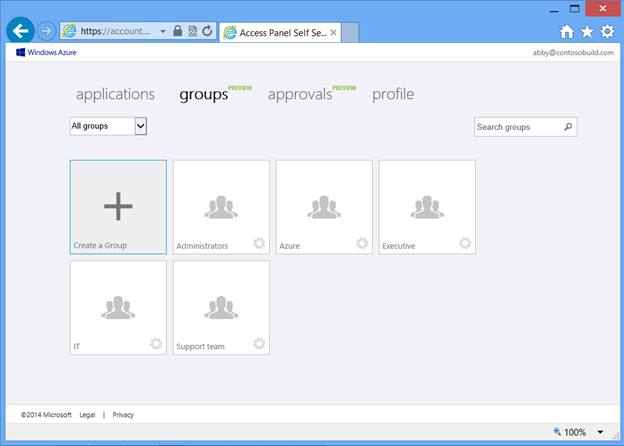
Fig 3 : Groups view
By using our self-service group management features, the day-to-day control of group membership can be delegated to people in the business who understand the business context for that membership. This frees up IT staff to focus on higher-value activities.
A user can begin creating a group by clicking on the Create a group tile in the upper left of the Access Panel. To create the group, just enter the display name that you want the group to have. You can optionally enter a description to help others in your organization understand how the group will be used or who the members will be. Figure 3 shows Abby, an end user in Contoso, creating a group for the sales team that she manages.
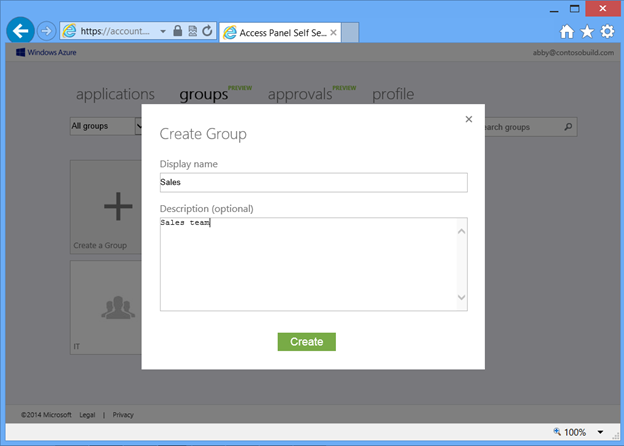
Fig 4 : Creating a group
Once the group is created, you'll see it on the groups tab. To add members to the group, click the add members tile, then choose members for the group in the Add members dialog.

Fig 5 : Adding members to a group
Assigning application access to a group
One of the key features of Windows Azure AD is enable administrators to manage access to SaaS applications. With Windows Azure AD Premium, global administrator can assign application access to group. And since groups created by end users are stored in Windows Azure AD just like any other security group, these user-created groups can be seen by administrators in the Windows Azure Management Portal, and can be used like any other security group, such as to control access to an application or SharePoint site. Figure 6 shows that Steven, the global administrator for Contoso, can see the Sales group created by Abby in Figure 3, above.
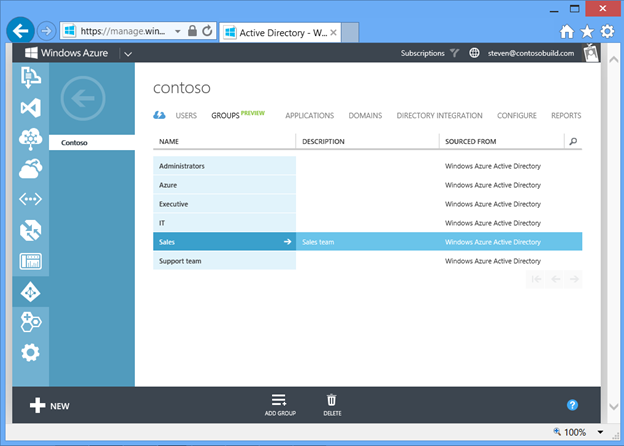
Fig 6 : Groups in the Windows Azure Management Portal
Using groups to assign access to applications simplifies access administration. Group membership can be managed in a single place, and used to assign access to all the applications or other resources to which that group needs access. In particular, the global administrator no longer needs to be involved each time someone needs access to an application: the user can request to join a group that has been assigned access to the application, and if the group owner approves, then the user is assigned access automatically.
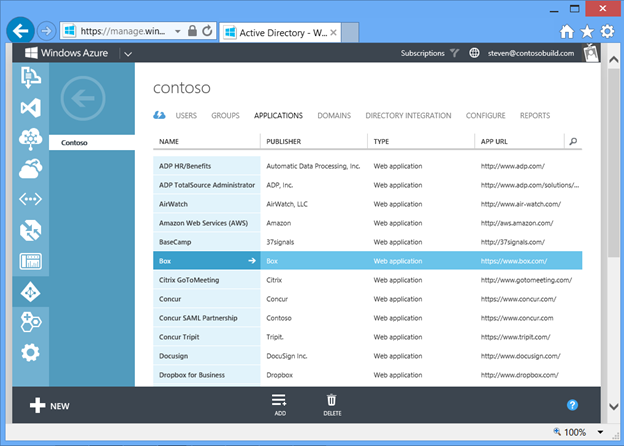
Fig 7 : Selecting an application
Figure 8 shows Steven assigning access for the Box application to the Sales group created by Abby. Since Abby manages the membership of the Sales group, Abby can now assign or revoke access to the Box application without requiring ongoing assistance from Steven.
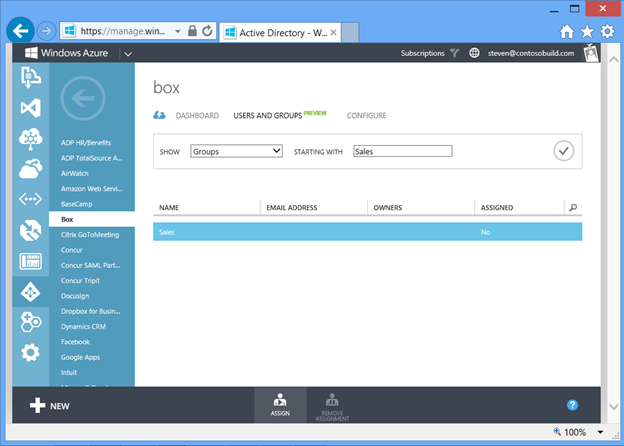
Fig 8 : Assigning members of a group access to an application
Requests and approvals for group membership
Our preview experience also enables users to request membership in groups by clicking on the gear icon on the group and clicking join. Figure 9 below shows Wallace, another end user at Contoso, requesting membership in Abby's Sales group.
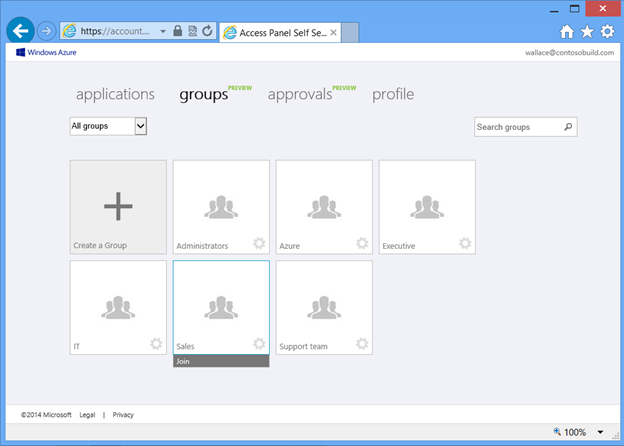
Fig 9 : Requesting to join a group
The administrator of the group can see requests to join the group on the approvals tab of the Access Panel, and can approve the request by clicking the approve button below the list of request. Figure 10 shows Abby approving Wallace's request.

Fig 10 : Approving a request
Once a user is approved as a member of the group, the user has access to all the resources which are assigned to the group. For example, if the group is assigned access to a particular SaaS application, the user will see the tile for that SaaS application on their Access Panel, and can click on that tile to get access to the application. Figure 11 shows that Wallace now has access to the Box application.
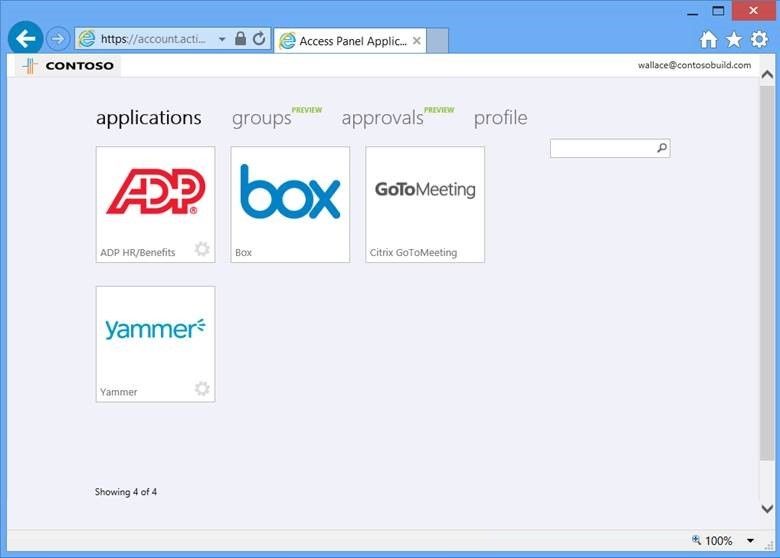
Fig 11 : Box application is visible on the Access Panel
In subsequent releases we'll be adding more delegation scenarios for richer administration of security groups and support for email enabled groups.
Self-Service Password Reset
The basic version of Windows Azure AD (the free ones that comes with every O365 or Azure subscription) already enables administrators to reset a user's password, and we've also provided self-service for administrators who've forgotten their own password. In the preview of Windows Azure AD Premium we've now added self-service password reset which lets end users – not just administrators -- reset their own password. This reduces IT expense from answering service desk calls for users who've forgotten their passwords.
To begin using self-service password reset, sign in to the Windows Azure Management Portal, open your directory, and click on the CONFIGURE tab. In the user password reset policy section, change the setting for USERS ENABLED FOR PASSWORD RESET to ALL and click SAVE . Once you enable the feature, you can configure the type and number of contact methods a user must use while resetting his/her password as well as customize the logo and helpdesk link users see on the password reset portal. If you don't want to specify your user's contact data yourself, they can also self-register their own contact data at https://aka.ms/ssprsetup .
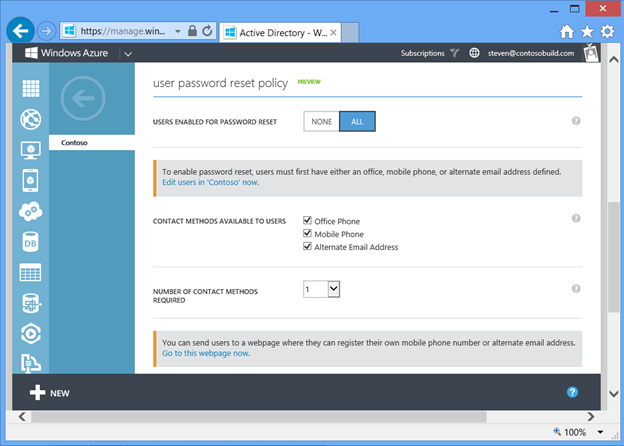
Fig 12 : Configuring self-service password reset
When a user who has forgotten their password when signing in to Windows Azure AD, such as to access Office 365 or their Access Panel, they see link we've added just below the sign in button: Can't access your account .
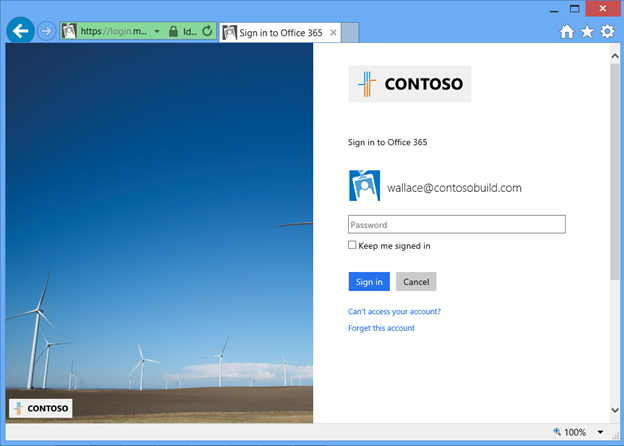
Fig 13 : sign in page with customized branding for the organization
When a user clicks the Can't access your account link, they see the "Reset your password" dialog, which guides them through the process to reset their password by using the contact methods configured by the global administrator of the directory.

Fig 14 : Password reset verification
Once the user has completed the password verification process, the user can enter their new password.
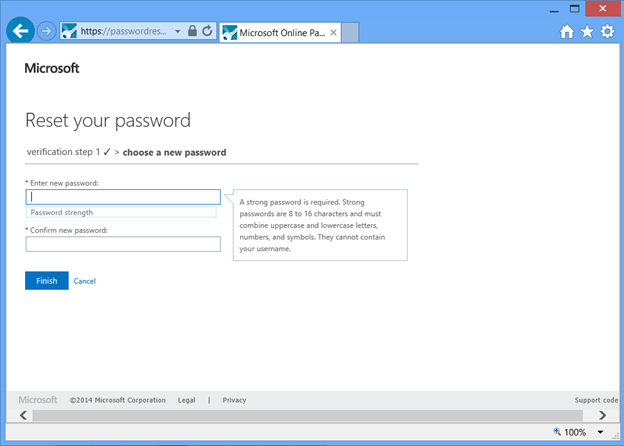
Fig 15 : Entering a new password
Once the user has entered their new password, they can sign in to Windows Azure AD immediately and access the applications that they need.
Currently the self-service password reset scenario can be used by users who sign in directly to Windows Azure AD or other Microsoft Online Services. In subsequent releases, we'll extend self-service password reset for users who sign in to Windows Azure AD using federation or password sync.
Reporting and Analytics
We've been expanding the scope of reporting and analytics that we provide in Windows Azure AD. Our reports help IT organizations gain visibility into user access to resources so they can meet security, compliance, and other business requirements while they continue to adapt to evolving organizational requirements to quickly adopt ever more SaaS applications.
To see the reports, sign in to the Windows Azure Management Portal, open your directory, and click on the REPORTS tab. All of these reports shown below are available to administrators when Windows Azure AD Premium preview is enabled.
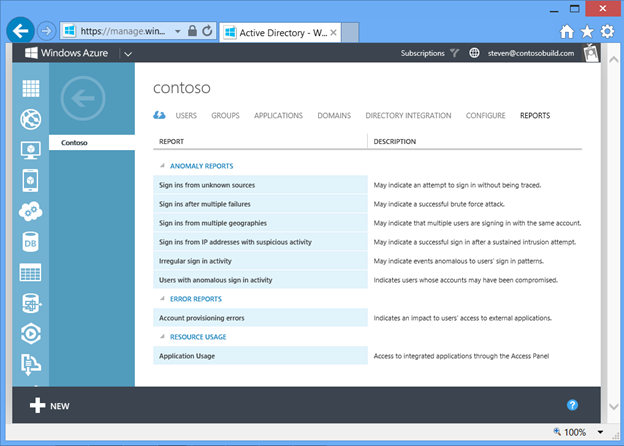
Fig 16 : Windows Azure Active Directory Reports
We provide several reports to help organizations see anomalous user sign in activity, which can help organizations identify and take action on user accounts which may have been compromised.
Figure 17 shows the 'Users with anomalous sign in activity' report, which enables an administrator to see all users for whom there have been any anomalous sign ins within a particular time interval. For each of those users, the administrator can drill in to see the date and time of each of the anomalous sign ins, and the reason that AD flagged the sign in as an anomaly. We employ several methods to identify anomalies, including machine learning algorithms which flag sign in activity that is atypical for a user, based on that user and their organization's sign in patterns.
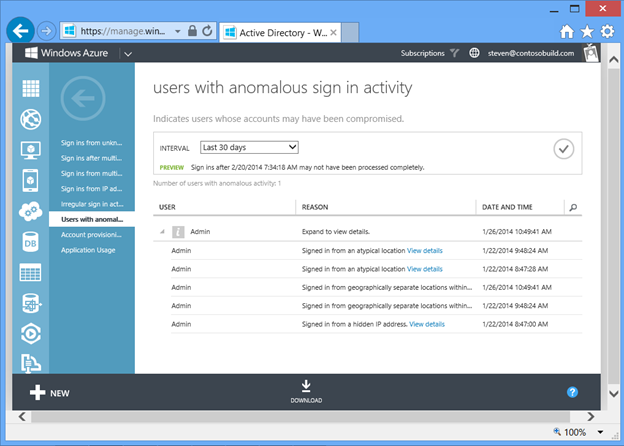
Fig 17 : Users with anomalous sign in activity report
Figure 18 shows the 'Application usage' report, which helps administrators to understand SaaS application usage in their organization. The report shows how many times users in the organization accessed a particular application by clicking on the application tile in the user's Access Panel. One of the uses of this report is to help administrators identify whether there are users who are licensed or authorized for a particular application, but who may not need to use the application. The data for this and other reports can be downloaded for offline analysis.

Fig 18 : Application usage report
We've also added a report in Windows Azure AD Premium that enables an administrator to see sign in activity for a particular user. To see this report, click on the USERS tab in your directory, open the user whose sign-in activity you want to see, and click on the DEVICES tab. The report shows each of the devices from which the user has signed in to Windows Azure AD, as well as the last time the user signed in from that device, and the IP address and location of the sign in.
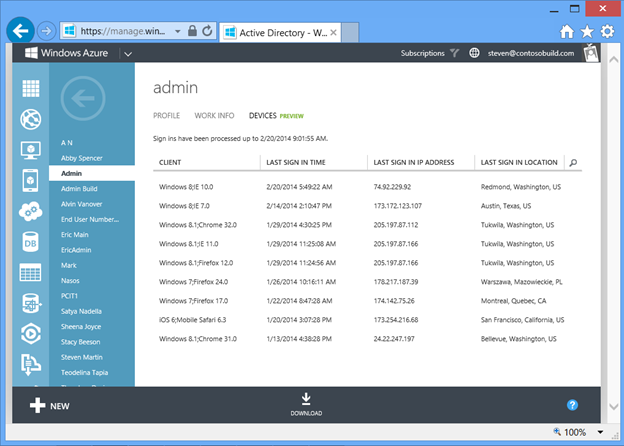
Fig 19 : User devices report
Let us know if you have any questions, and as always, we're looking forward to your feedback and suggestion. Just head on over to the Windows Azure AD Forum .
Best regards,
Alex Simons (twitter: Alex_A_Simons)
Director of Program Management
Active Directory
You must be a registered user to add a comment. If you've already registered, sign in. Otherwise, register and sign in.