Turn on suggestions
Auto-suggest helps you quickly narrow down your search results by suggesting possible matches as you type.
- Home
- Security, Compliance, and Identity
- Microsoft Entra Blog
- Employee Self-Service App Access for Azure AD now in preview!
Employee Self-Service App Access for Azure AD now in preview!
- Subscribe to RSS Feed
- Mark as New
- Mark as Read
- Bookmark
- Subscribe
- Printer Friendly Page
- Report Inappropriate Content
Published
Sep 06 2018 08:07 PM
2,598
Views
Sep 06 2018
08:07 PM
Sep 06 2018
08:07 PM
First published on CloudBlogs on Apr, 23 2015
Howdy folks, We know that that enabling self-service is one of the top initiatives for many of our enterprise customers. Lots of users, lots of applications, and the person who is best-informed to make access grant decisions probably doesn't work in the IT department. Often the best person to decide who can access an application is a team lead or other delegated administrator. But at the end of the day, it's the user who uses the app, and they generally have a pretty good idea about what apps they need to do their job! So today we're happy to announce a preview of self-service application access in Azure AD. This will allow administrators to do things like:
Howdy folks, We know that that enabling self-service is one of the top initiatives for many of our enterprise customers. Lots of users, lots of applications, and the person who is best-informed to make access grant decisions probably doesn't work in the IT department. Often the best person to decide who can access an application is a team lead or other delegated administrator. But at the end of the day, it's the user who uses the app, and they generally have a pretty good idea about what apps they need to do their job! So today we're happy to announce a preview of self-service application access in Azure AD. This will allow administrators to do things like:
- Enable users to request access to applications using a "Get more applications" tile in the Azure AD access panel
- Set which applications users can request access to
- Create an approval policy if needed
- Specify who should approve requests for specific applications
To get started:
- Sign into the Azure management portal .
- Under the Active Directory section, select your directory, then select the Configure tab.
- Near the bottom of the page, set Allow users to self-assign access to enabled applications to Yes , and click Save to enable the feature.

- Next, select the Applications tab. Select the Add button, and use the gallery option to select and add an application.

- After your app has been added, you'll get the app Quick Start page. Click Configure Single Sign-On , select the desired single sign-on mode, and save the configuration.

- Next, select the Configure tab. To enable users to request access to this app from the Azure AD access panel, set Allow self-service application access to Yes .

- To optionally configure an approval workflow for access requests, set Require approval before granting access to Yes . Then one or more approvers can be selected using the Approvers button.

- Click Save at the bottom of the screen to save the configuration. Now users will be able to request access to this app from the access panel.
- To try the end user experience, sign into you organization's Azure AD access panel at https://myapps.microsoft.com , preferably using a different account that isn't an app approver.

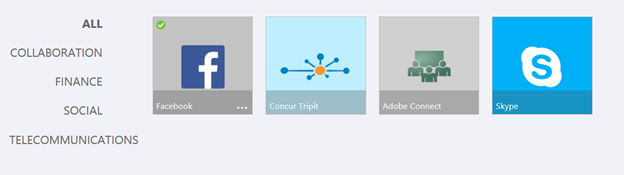
- Under the Applications tab, click the Get more applications tile. This displays a gallery of all of the applications that have been enabled for self-service application access in the directory, with the ability to search and filter by app category on the left.
- Clicking on an app kicks off the request process. If no approval process is required, then the application will be immediately added under the Applications tab after a short confirmation. If approval is required, then you will see a dialog indicating this, and an email will be send to the approvers. (Quick note: You need to be signed into the access panel as a non-approver to see this request process).

- The email directs the approver to sign into the Azure AD access panel, and approve the request under the Approvals tab. Once the request is approved (and any special processes you define have been performed by the approver), the user will then see the application appear under their Applications tab where they can sign into it.

0
Likes
You must be a registered user to add a comment. If you've already registered, sign in. Otherwise, register and sign in.