
Master data science with Docker’s storage and data persistence: Part 2
In part 1 of this series, I covered the basics of using Docker on a local environment and building a simple image that could then be customised to include your own requirements. Next, I showed you how to move this image to Microsoft Azure, execute it there, and pull from your cloud registry to a local execution model.
I’d like to highlight that the early articles in this series focus less on good practice than they do on exploring the nature of the capabilities. The reason for this is that when you focus purely on good practice, you risk missing many useful lessons that you can learn while exploring capabilities. I’ll discuss good practice towards the end of the series, but the key objective in the early stages is to understand more about how a container approach supports data science patterns.
A core part of the data science process is collating and cleaning data to build plausible models of the world and evaluate hypotheses. Another vital requirement is working with others across systems and platforms, often over long timescales. In this article, I’ll mostly focus on data persistence at the container file level. To keep this relatively short, I’ll cover databases and other state managers in later articles.
In the first article in this series, I outlined two core assumptions of working with containers:
- Containers are expected to be stateless and disposable. They provide compute, and, on exit, everything inside that container disappears with it.
- A container should focus on as few things as possible. This supports a microservices approach and allows designers to combine primitive containers in interesting combinations without worrying too much about interdependencies.
The statelessness of a container provides a basis for scalability and resilience. Multiple copies can run in parallel and if they fail or crash, they can be restarted. Having an external state also allows those microservices to share information with minimal concern about how that data is managed or needing to own its veracity or performance. This is contrary to typical application design.
So, if containers are expected to be stateless, where is that state held? There are a number of options, including:
- In an external directory—for example, locally accessible disk holding files
- In a Docker-defined volume—this can be shared between multiple running containers
- In an external database or network resource—for example, IP:port, message queue
I’m going to show you the first two options by running the container (jon/alpine:1.0) that I created in the previous article. If you need to create it, follow this link to get the Dockerfile and build it locally.
Creating a volume
First, let’s create a volume in the Docker environment. A volume is a Docker-managed resource that containers can easily use as external storage.
$ docker volume create v-common
$ docker volume ls
DRIVER              VOLUME NAME
local               v-common
$
I also have some local files that I want to put into that container. There are several automated ways of doing this, but I want the principles to make sense. I created a small directory called standard-dir containing some open data sets and the source for a script to run keyframe extraction.
Feel free to use any sample directory. I’m only simulating how you might want to share a set of common libraries, data sets and standard utilities across containers and developers.
It looks like this:
standard-dir/
├── code
│   └── extractkeyframe
│       ├── LICENSE
│       └── xkf.sh
└── data
    ├── open-data
    │   ├── LFB-Incident-data-from-Jan2009-Dec2012.zip
    │   ├── breast-cancer-wisconsin-data.zip
    │   ├── dow_jones_index.zip
    │   └── seattle-crime-stats.zip
    └── test-data
Let’s run a container mounting that directory, and the Docker volume that I just created so that I can copy the content across. I do this interactively in the ash shell. On exit, it will automatically remove the stopped container. Focus on the -v flag.
Here, I’m mounting the v-common volume to a directory in the container called /dest, and the current directory (`pwd`) to a directory in the container called /src. Then, copy everything from /src to /dest. Note that any changes that take place in mounted volumes will persist after the container exits.
$ cd standard-dir
$ docker run --rm -v v-common:/dest -v `pwd`:/src -it jon/alpine:1.0 ash
# ls -l /dest /src
/dest:
total 0

/src:
total 0
drwxr-xr-x    4 root     root           128 Apr 22 16:42 data
drwxr-xr-x    3 root     root            96 Apr 22 16:56 code
# cp -R /src/* /dest
# ls -l /dest /src
/dest:
total 8
drwxr-xr-x    4 root     root          4096 Apr 22 17:28 data
drwxr-xr-x    3 root     root          4096 Apr 22 17:28 code

/src:
total 0
drwxr-xr-x    4 root     root           128 Apr 22 16:42 data
drwxr-xr-x    3 root     root            96 Apr 22 17:27 code
#
In that container, create a new file in our /src directory called new-file. Confirm it’s there:
# touch /src/new-file
# ls -l /src
total 0
drwxr-xr-x    4 root     root           128 Apr 22 16:42 data
-rw-r--r--    1 root     root             0 Apr 22 17:45 new-file
drwxr-xr-x    3 root     root            96 Apr 22 17:27 source
#
From another local terminal, list the files in standard-dir. Note that the new file will appear in the host directory.
standard-dir/
├── code
│   └── extractkeyframe
│       ├── LICENSE
│       └── xkf.sh
├── data
│   ├── open-data
│   │   ├── LFB-Incident-data-from-Jan2009-Dec2012.zip
│   │   ├── breast-cancer-wisconsin-data.zip
│   │   ├── dow_jones_index.zip
│   │   └── seattle-crime-stats.zip
│   └── test-data
└── new-file
If I now remove the file from within the host directory (not within the container):
$ rm new-file
When I go back to the container, and list the files, this is what I see:
# ls -l /src
total 0
drwxr-xr-x    4 root     root           128 Apr 22 16:42 data
drwxr-xr-x    3 root     root            96 Apr 22 17:27 source
#
I’ve shown two ways to change state in a container that remains after the container dies. The first maintains the state in a separate Docker volume (v-common, in this case) that can be remounted on another container in the future. The second is where the state is changed on the host file system. A future container could also access those changes.
It seems like a recipe for disaster if containers can cause damage on a host. However, you can also mount containers in read-only mode. Note the ‘ro’ suffix at the end of the /src path. Here, I try to create a new empty file and this is denied.
$ docker run --rm -v `pwd`:/src:ro -it jon/alpine:1.0 ash
# cd /src
# ls -l
total 0
drwxr-xr-x    3 root     root            96 Apr 22 17:27 code
drwxr-xr-x    4 root     root           128 Apr 22 16:42 data
# touch new-file
touch: new-file: Read-only file system
From two different terminal windows, mount the v-common storage volume on two concurrent containers:
Container 1
$ docker run --rm -v v-common:/src -it jon/alpine:1.0 ash
# cd /src
# ls -l
total 8
drwxr-xr-x    3 root     root          4096 Apr 22 17:28 code
drwxr-xr-x    4 root     root          4096 Apr 22 17:28 data
# touch fred
Container 2
$ docker run --rm -v v-common:/src -it jon/alpine:1.0 ash
# cd /src
# ls -l
total 8
drwxr-xr-x    3 root     root          4096 Apr 22 17:28 code
drwxr-xr-x    4 root     root          4096 Apr 22 17:28 data
-rw-r--r--    1 root     root             0 Apr 28 12:08 fred
# touch bloggs
Now go back to container 1 and look at the content.
Container 1
# ls -l
total 8
-rw-r--r--    1 root     root             0 Apr 28 12:08 bloggs
drwxr-xr-x    3 root     root          4096 Apr 22 17:28 code
drwxr-xr-x    4 root     root          4096 Apr 22 17:28 data
-rw-r--r--    1 root     root             0 Apr 28 12:08 fred
#
They both have access to and could trample over each other’s actions. I did say this wasn’t necessarily good practice, but I think how volumes work should be clearer by now.
Let’s expand on this a little and reference storage in Azure itself. Here, I create a new Azure storage account:
$ az storage account create --location eastus --name jondockerstorage --resource-group docker-rg --sku "Standard_LRS"
{
  .

  .
}
$
Let’s create a shared file area and get a URL for it:
$ az storage share create --account-name jondockerstorage --name jondockerfileshare
{
  "created": true
}
$ az storage share url --account-name jondockerstorage --name jondockerfileshare
"https://jondockerstorage.file.core.windows.net/jondockerfileshare"
$
Now, mount it locally. How you do this will be different depending on whether you’re using Windows, Mac, or Linux. After mounting, it has a local path:
$ mount
//jondockerstorage@jondockerstorage.file.core.windows.net/jondockerfileshare on /Volumes/jondockerfileshare (smbfs, nodev, nosuid, mounted by jon)
$
Now start a container, mounting that remote share, and make a change within it:
$ docker run --rm -v /Volumes/jondockerfileshare:/remote -it jon/alpine:1.0 ash
# cd /remote/
# touch put-this-in-the-cloud.txt
# exit
$ ls -l /Volumes/jondockerfileshare/
total 0
-rwx------  1 jon  staff  0 27 Apr 17:32 put-this-in-the-cloud.txt
$
Note that the change is reflected locally, but to show that this is really in the cloud, I installed the Azure Storage Explorer so that I can interact with Azure storage natively using drag and drop. I’ve avoided it so far to show that almost everything is scriptable and something you can automate. You can get more information about the Azure Storage Explorer here.
Add your Azure account details to sign in to your Azure subscription, and it should give you similar functionality to Windows Explorer, Mac Finder, or Linux File Manager.
On my Mac, this is what I see after navigating to my shared file area:
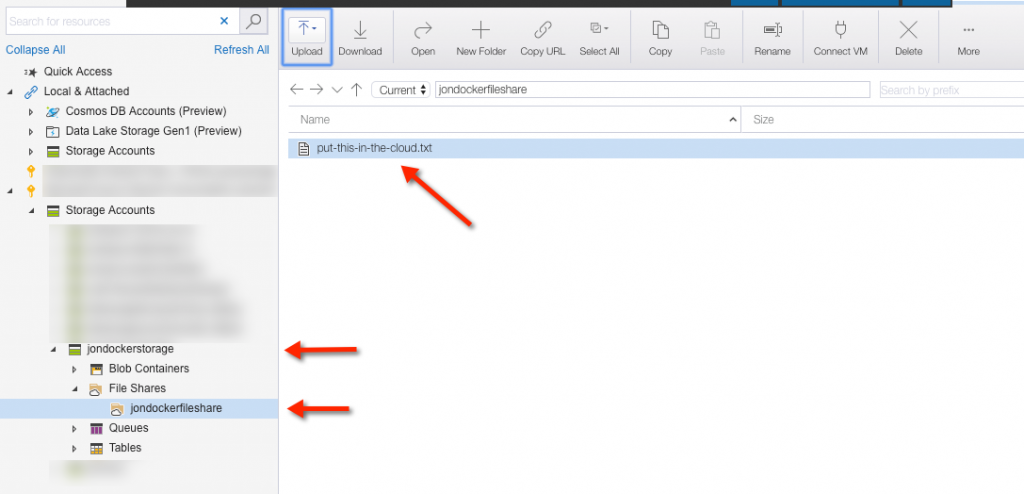
This clearly isn’t the most performant of solutions, but, again, you can imagine a scenario where a cloud-based SMB share needs to be available globally, perhaps read-only, to numerous processes. A co-located container would also benefit from it.
$ az storage share url --account-name jondockerstorage --name jondockerfileshare
"https://jondockerstorage.file.core.windows.net/jondockerfileshare"
$
I’d now like to access that same storage from containers running in the cloud. This needs to be done securely. Let’s find out what the storage keys are for the storage account:
$ az storage account keys list --resource-group docker-rg --account-name jondockerstorage
[
  {
    "keyName": "key1",
    "permissions": "Full",
    "value": "xxxxxxxxxxxxxxxxxxxxxxxxxxxxxxxxxxxxxxxxxxxxxx"
  },
  {
    "keyName": "key2",
    "permissions": "Full",
    "value": "xxxxxxxxxxxxxxxxxxxxxxxxxxxxxxxxxxxxxxxxxxxxxx"
  }
]
$
If you still have the service principal details from the previous article, then you can use them. If you’ve forgotten them, then you can update them using the following script.
You’ll need to change the container registry name and service principal name for your own. The link also shows how to create your Azure container registry and push the local Docker image to that registry.
#!/bin/bash

# Modify for your environment.
# ACR_NAME: The name of your Azure Container Registry
# SERVICE_PRINCIPAL_NAME: Must be unique within your AD tenant
ACR_NAME="joncreg"
SERVICE_PRINCIPAL_NAME=jon-acr-sp

# Obtain the full registry ID for subsequent command args
ACR_REGISTRY_ID=$(az acr show --name $ACR_NAME --query id --output tsv)

# Create the service principal with rights scoped to the registry.
# Default permissions are for docker pull access. Modify the '--role'
# argument value as desired:
# acrpull:     pull only
# acrpush:     push and pull
# owner:       push, pull, and assign roles
SP_PASSWD=$(az ad sp create-for-rbac --name http://$SERVICE_PRINCIPAL_NAME --scopes $ACR_REGISTRY_ID --role acrpull --query password --output tsv)
SP_APP_ID=$(az ad sp show --id http://$SERVICE_PRINCIPAL_NAME --query appId --output tsv)

# Output the service principal's credentials; use these in your services and
# applications to authenticate to the container registry.
echo "Service principal ID: $SP_APP_ID"
echo "Service principal password: $SP_PASSWD"
This should provide you with a service principal ID and password. Now use them to start up a container, mounting the file share on /mnt/azfile:
$ az container create --registry-username  --registry-password  --resource-group docker-rg --name alpine-ssh --image joncreg.azurecr.io/alpine:1.0  --cpu 1 --memory 0.1 --dns-name-label jm-alpine-ssh-2 --ports 22 --azure-file-volume-share-name jondockerfileshare --azure-file-volume-account-name jondockerstorage --azure-file-volume-account-key >   --azure-file-volume-mount-path /mnt/azfile
{
  .

  .
}
$
You should see a JSON response with details confirming your deployment, but you can also find the fully qualified DNS name for your new container using the following:
$ az container show --resource-group docker-rg --name alpine-ssh --query ipAddress.fqdn
"jm-alpine-ssh-2.eastus.azurecontainer.io"
$
Now let’s sign in and interact with the shared area. I’ll create an empty file and test whether I can see it from my local Mac:
$ ssh root@jm-alpine-ssh-2.eastus.azurecontainer.io
root@jm-alpine-ssh-2.eastus.azurecontainer.io's password:
Welcome to Alpine!

The Alpine Wiki contains a large amount of how-to guides and general
information about administrating Alpine systems.
See <http://wiki.alpinelinux.org/>.

You can setup the system with the command: setup-alpine

You may change this message by editing /etc/motd.

# cd /mnt/azfile/
# ls -l
total 0
-rwxrwxrwx    1 root     root             0 Apr 27 16:32 put-this-in-the-cloud.txt
# touch this-was-created-in-a-container.txt
# exit
Connection to jm-alpine-ssh-2.eastus.azurecontainer.io closed.
$ ls -l /Volumes/jondockerfileshare/
total 0
-rwx------  1 jon  staff  0 27 Apr 17:32 put-this-in-the-cloud.txt
-rwx------  1 jon  staff  0 27 Apr 18:32 this-was-created-in-a-container.txt
$
These are the basics of keeping state outside your container using locally mapped directories and Docker volumes. But when would you use a Docker volume over a locally mapped directory? The Docker documentation suggests that volumes are the preferred mechanism for persisting data generated by and used by Docker containers.
That said, bind mounts—mounting local file system resource—depend on the directory structure of the host machine. Docker is a convenient way of using content that would normally exist on your local environment anyway. The documentation states that volumes have some advantages over bind mounts:
- Volumes are easier to back up or migrate than bind mounts
- You can manage volumes using Docker CLI commands or the Docker API
- Volumes work on both Linux and Windows containers
- Volumes can be more safely shared among multiple containers
- Volume drivers let you store volumes on remote hosts or cloud providers, to encrypt the contents of volumes, or to add other functionality
- New volumes can have their content pre-populated by a container
A read-only volume is also a good way of packaging content that you want to ensure isn’t clobbered. Remember that if you mount a local directory as read-only, you can still damage the content from outside the container environment—for instance, by removing or changing files within the directory that was mounted on a container.
Conclusion
This article touched on using container storage, but it didn’t seem like we spoke much about the data science angle. We will explore this more in future articles, after we’ve covered the basics.
Let’s recap what we’ve learnt here:
- On the assumption that containers are disposable and should deal with minimal scope, we now understand how to retain state outside the container itself.
- We know three different ways of holding that state outside a container: local directories, Docker volumes, and with remotely mounted Azure storage.
- We can access that same storage on containers running in Azure. In short, cloud-based resource can access content that could be maintained from someone mounting that content locally.
What’s next
In the next part of this article, I’m going to extend the container, data persistence, and data science concept using multiple containers to create a more complex application and then move this to the cloud.
About the author
 Jon is a Microsoft Cloud Solution Architect specialising in Advanced Analytics & Artificial Intelligence.
With over 30 years of experience in understanding, translating and delivering leading technology to the market. He currently focuses on a small number of global accounts helping align AI and Machine Learning capabilities with strategic initiatives. He moved to Microsoft from IBM where he was Cloud & Cognitive Technical Leader and an Executive IT Specialist.
Jon has been the Royal Academy of Engineering Visiting Professor for Artificial Intelligence and Cloud Innovation at Surrey University since 2016, where he lectures on various topics from machine learning, and design thinking to architectural thinking.