
Windows Virtual Desktop pre-requisites – everything in the right place to enable you to deploy without errors
Windows Virtual Desktop is a newly announced capability for managing VDI and RDSH as a service from Azure. It went into public preview in March of 2019, with many successful deployments for testing purposes having been completed. However we have seen a large number of failures of the Azure Resource Manager deployment from a set of customers, all for very similar quite simple errors entered into the Azure portal deployment process, things like incorrect accounts, or lack of name resolution.
Hence this simple guide is designed to save you some time by avoiding common errors in the deployment process. There are a few pieces of information you need and it is possible to get this wrong. Hence this will clearly explain what prerequisites are required to be in place and where to get the relevant information and then where to exactly put these details into the Windows Virtual Desktop HostPool creation process in the Azure portal. This is to ensure the deployment process will complete successfully. This is not a full deployment guide, there is already existing full deployment instructions available.
This guide will enable to collect all the relevant pieces of prerequisite information and have them all in one place that you can then put back into the Azure portal at deployment time. In this guide you will either create and record or if already existing just record the information needed in the WVD deployment process and keep it in one place in Notepad to use later in the full deployment.
Use this in conjunction with the existing deployment guide from Microsoft docs.
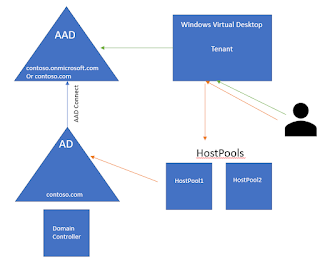
From a high level you will require the following items before you can deploy Windows Virtual Desktop
- An Azure Active Directory
- An Active Directory
- Azure Active Directory Connect
- An Azure Virtual Network updated with your DNS server, with line of sight of your AD DC’s
- An Azure subscription and its associated ID.
- A Windows Virtual Desktop tenant
Why do you need all of these?
- The Azure Active Directory is your identity provider in the cloud and users authenticate against AAD to get access to the Windows Virtual Desktop service
- When launching published Desktops and Applications – Windows still requires Active Directory authentication.
- Azure AD Connect is the tool that will provision accounts from AD to AAD to enable 1. above.
- The Virtual Machines all need to be located on a Virtual Network. That vNet needs access to Active Directory, that can either be located in Azure or on-premises as long as there is connectivity. When Azure deploys new VM’s it will join these VM’s to your Active Directory domain and as such the VM’s need to locate the Domain Controller via DNS, without this DNS server setting being set the VM’s have no name resolution for the local AD, and hence won’t be able to join the domain. If your AD Domain Controllers are on-prem then you will need some connectivity back to on-prem to access those DC’s, either VPN or ExpressRoute.
- It all runs in an Azure Subscription
- A tenant is required inside the WVD management service
The high level deployment process for a WVD hostpool and why you need these pre-requisites already in place is to automate all of the following actions:
- Deploy a Virtual Machine (or multiples) in a hostpool to host apps and desktops
- Join the Virtual Machine to your Active Directory
- Install the local WVD Client agents and join to the WVD hostpool specified
- Publish the default published desktop to the user specified.
1. So lets get item 1 – your Azure Active Directory Tenant ID.
If you don’t already have an AAD then you will need to create one. To do so follow this guide: https://docs.microsoft.com/en-us/azure/active-directory/fundamentals/active-directory-access-create-new-tenant
If you do have an AAD then we just need to copy the Azure Active Directory Tenant ID. To do this open the Azure Portal. On the left click on All Services
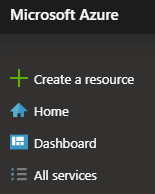
Either go down to the Identity section and select Azure Active Directory
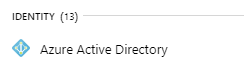
Alternatively in the Search field in the All Services section at the top of the blade start typing Azure Active Directory and the resulting list of services will reduce displaying AAD.
Once you have the AAD blade open, on the left go down to Properties and then on the right look for the Directory ID Field
Click on the copy button at the right of this fieldNow open Notepad and paste this in as Item 1.
Whilst you are in AAD create an admin account that will be used as the Windows Virtual Desktop admin account. Go back to the top on the left and Click on Users and click on + New User and create an account such as wvdadmin@contoso.onmicrosoft.com.
Copy this user ID into your Notepad file as Item 1.1
Notepad should look like this: 1. abc1-1a23-1234-1ab2-1234abc12abc
1.1 wvdadmin@contoso.onmicrosoft.com
2. Onto Item 2 – your Active Directory
If you don’t have AD already, the easiest way to deploy Active Directory in Azure is to use this Azure Resource Manager template: https://azure.microsoft.com/en-us/resources/templates/active-directory-new-domain/ (recommend you add an NSG and Just in Time Access).
Or alternatively deploy it manually on a Virtual Machine. Record the IP Address of your Domain Controller VM.
Once you have Active Directory deployed create an admin account that you can use in the WVD deployment process to automatically join the host pool VM’s that get created to this AD i.e. “domainjoin@contoso.com”. This account password has to conform to Azure password complexity reqirements as well as any local AD requirements. The Azure requirements means the password need to be a minimum of 12 and maximum of 128 characters. So ensure you set the password to be a minimum of 12 characters on top of your local AD requirements. Without this the Azure portal deployment will fail.
Go back to Notepad and enter your AD domain UPN for this admin user account in full as Item 2
You will also need an account in AD to test as a user logging into and launching an app from Windows Virtual Desktop. Create a user account in AD i.e. test1@contoso.com.
In section 3. below we deploy AAD Connect which will sync this account with AAD where it will in addition have the full UPN of test1@contoso.onmicrosoft.com.
Enter this account in Notepad as Item 2.1
Enter this account in Notepad as Item 2.1
Notepad should like this now:
1. abc1-1a23-1234-1ab2-1234abc12abc
1.1 wvdadmin@contoso.onmicrosoft.com
2. domainjoin@contoso.com
2.1 test1@contoso.onmicrosoft.com
3. Now we need to deploy Azure Active Directory Connect to provision your AD users up into AAD.
To do this follow this guide: https://docs.microsoft.com/en-us/azure/active-directory/hybrid/how-to-connect-install-express
During the install you will need an AAD global admin account and an AD admin account. For simplicity you can use Items 1.1 and 2 from your Notepad file.
Once completed AAD connect will provision your test account up into AAD, which we can later use for testing.
4. Now we need to update your Virtual Network with the IP address(es) of your AD domain controllers so that when new VM’s are placed on this vNet and they are attempted to be domain joined to your AD they can access the Domain Controller using DNS for local name resolution.
In the Azure portal go the Virtual Network that your domain controller was deployed onto. In the Settings section click on DNS Servers and enter the IP Address of your domain controller and click on Save above:

5. Finally lets grab your Azure Subscription ID.
Back in the Azure subscription open the Subscriptions blade:

Click on the Subscription you want to deploy your hostpools into. Then in the Overview section copy the Subscription ID

Paste this into your Notepad file as Item 3
Now your Notepad file should look like this:
1. abc1-1a23-1234-1ab2-1234abc12abc
1.1. wvdadmin@contoso.onmicrosoft.com
2. domainjoin@contoso.com
2.1. test1@contoso.onmicrosoft.com
3. 12345a125-1234-12a1-123af-123456abc123
If it does you have all the information you need and so you are now ready to follow the rather good Windows Virtual Desktop deployment documentation starting in the link below. Open this document and have these two documents open in to tabs side by side
If you follow the above guide accurately you will successfully deploy your first WVD hostpool. Below are the steps where you need to paste in the information from your Notepad file in to the relevant steps in the process stated in the guide above, follow both guides step by step.
1. In this document you are asked to provide consent for WVD to use your AAD.
From your Notepad file paste Item 1 into the “AAD Tenant GUID or name” field:

In the next section “Assign the TenantCreator application role to a user in your Azure Active Directory tenant” section you can use the user account in section 1.1 from Notepad.
In the next section “Create a Windows Virtual Desktop Preview tenant” section in the second PowerShell command:
New-RdsTenant -Name <TenantName> -AadTenantId <DirectoryID> -AzureSubscriptionId <SubscriptionID>
Replace <DirectoryID> with item 1. from Notepad and <SubscriptionID> with item 3, i.e.
New-RdsTenant -Name <TenantName> -AadTenantId abc4-5a45-4533-8ab4-8991abc98abc -AzureSubscriptionId 12345a125-1234-12a1-123af-123456abc123
The resulting Powershell output will conform the tenant name that has been created. Copy this in to item 4. in Notepad file – which should now look like:
1. abc1-1a23-1234-1ab2-1234abc12abc
1.1 wvdadmin@contoso.onmicrosoft.com
2. domainjoin@contoso.com
2.1 test1@contoso.onmicrosoft.com
3. 12345a125-1234-12a1-123af-123456abc123
4. “YourTenantName”
2. In the second stage: “Tutorial: Create a host pool with Azure Marketplace” which deploys the hostpool from within the Azure portal you will need to enter the remaining parts from Notepad. You are directed to the Azure portal and will deploy a Windows Virtual Desktop Host pool.
In the 1st section enter your test user UPN
In the first “Basics” section within “Default desktop users” enter item 2.1 from Notepad:

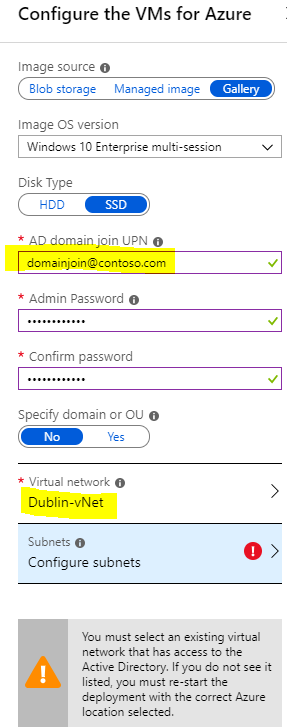
In the third “VM Settings” section enter your:
- AD admin account to do the VM domain join which is item 2. from your Notepad file.
- As well as entering the vNet that your AD domain controller is on that has the DNS server set correctly providing name resolution for the VM’s to then locate the Domain Controller to complete the domain join.
In the 4th “Windows Virtual Desktop” information section enter your:
- “Windows Virtual Tenant Name” – which is item 4 in your Notepad File
- “Windows Virtual Desktop Tenant RDS owner UPN” – which is item 1.1 in your Notepad file

Finish the remaining screens and the instructions from the main deployment guide and your WVD hostpool deployment will commence and if you have followed this pre-guide correctly will successfully complete.
The main guide will have the steps to test user access.
Should you have any additional issues creating your first Windows Virtual Desktop HostPool refer to the troubleshooting guide:
https://docs.microsoft.com/en-us/azure/virtual-desktop/troubleshoot-set-up-issues