Perfecting Continuous Delivery of NuGet packages for Azure Artifacts
In order to release software often and consistently, it is essential that software dependencies are managed using a good package management solution. Managing dependencies, if not planned well, can over a period of time become extremely difficult to maintain – especially due to difficulty in managing versions, testing of the packages and nested dependencies. With the increased focus from organisations to break monolithic applications into micro-services, teams have started to break their hard dependencies into manageable packages (NuGet, npm and others.)
Azure Artifacts is Microsoft’s solution to package management. Originally available as a separate extension on Visual Studio Marketplace, it is now pre-installed in Azure DevOps Services and Azure DevOps Server 2019, TFS 2018, and 2017.
Why this post
Setting up Continuous Integration and Delivery (CI/CD) for NuGet packages is something I’ve covered previously in this blog post and also in my recent book on Azure DevOps. There is also enough information about this in Microsoft docs.
However, I have seen most clients I have worked with struggle mainly after setting up CI/CD for their NuGet package. Without proper planning, managing and continuous delivery of NuGet packages become cumbersome.
Organisations are specifically interested to know:
- What branching strategy to use
- What will the developer workflow be and how will developers add fixes to already released NuGet packages
- What will their versioning strategy will be for NuGet packages in continuous integration scenarios
- What the typical build pipeline for NuGet packages looks like
- Within the organisation, how to ensure teams only consume stable NuGet packages and unstable packages are made available to few selected users for testing purposes.
This post tries to answer these questions and specifically shows how Azure Artifacts becomes an answer to all the above questions.
Refresher on setting up Azure Artifacts
If you have never used Azure Artifacts, here is a quick refresher on getting started.
Creating a feed
Setting up artifacts is easy. Head over to the Artifacts service and click on + New feed. You will be prompted with the screen below.

Ensure you also select the
Use packages from public sources through this feedoption. This will allow Azure Artifacts to cache your package dependencies in Azure Artifacts so that they are available even if your upstream sourcenpmjs.comornuget.orgis offline.
Feed settings
Once you create the feed, on the top right corner you will see the Feed Settings menu. Clicking that will take you to a page where you can configure additional settings.

On the Feed Settings screen you can configure retention policies for your packages, add additional upstream sources and more.
Branching strategy
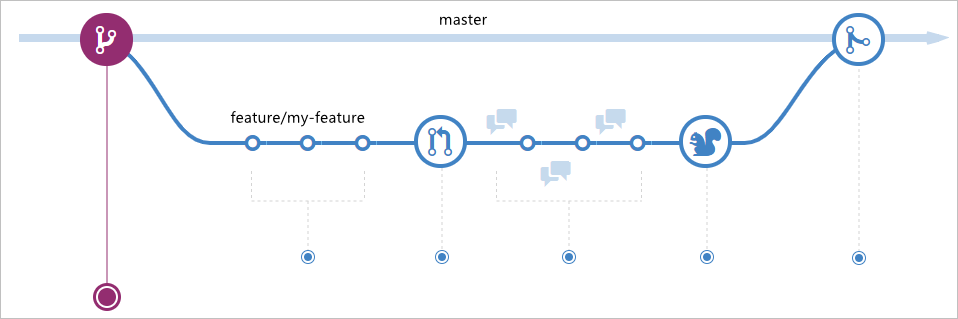
For NuGet packages, at least for our organisation, we decided to use GitHubFlow branching strategy. It is simple to understand and the idea is that you will always have a stable master branch, with all development carried out in feature branches and merged back to master.
For a GitHubFlow branching strategy to work effectively, teams have to agree on following rules:
masterbranch is always in a state that could be released.- Pull requests should not be merged to
masteruntil they are ready to go out.
This GitHubFlow branching strategy allows us to release stable NuGet packages from master with the assumption that we will always have a stable NuGet package. Any under-development NuGet packages from feature\* branches will still be published to Artifacts, but as you will see later in this article, it is only made available for other interested developers so that they consume, test and provide feedback.
Developer workflow
A typical developer workflow in our teams delivering NuGet packages is as below:

- Developer pulls the latest changes from the
masterbranch on to their local machine. - The developer then creates a
featurebranch frommaster. e.gfeature\my-awesome-feature - Makes the changes to the code and commits the changes in
featurebranch. - As soon as the commit is made and synced with Azure DevOps, Azure DevOps CI pipeline triggers.
- CI build creates the NuGet package, versions it (tag NuGet package
alpha) - Pushes the package to Artifacts.
- The developer now consumes the latest alpha NuGet package from Artifacts and tests it locally.
- Once the developer is satisfied, they are ready to make the pull request to merge the changes from the
featurebranch to the stablemasterbranch. - Makes PR (pull request) to
master, allowing others to validate and provide review comments if any. - Now CI build triggers for the
masterbranch. - CI build compiles the code and validates changes.
- Once the build is successful, the new NuGet package from master (without
alphatag) is pushed to the Artifacts feed.
Versioning Strategy
Packages are immutable – this means once you publish a particular version of a package to a feed, that version number is permanently reserved. You cannot upload a newer revision package with that same version number, or delete it and upload a new package at the same version.
Since NuGet packages are immutable, how you version your NuGet package becomes a very key thing to consider. Microsoft recommends that NuGet versions should ideally convey 3 pieces of information:
- the nature of the change,
- the risk of the change,
- and the quality of the package.

By using semantic versioning we can convey both nature (1) and risk of change (2). We use something known as a tag for conveying the quality of change (3).
It will be our practice that our NuGet packages follow versions in {major}.{minor}.{patch}-{tag} format.
majorversion when you make incompatible API changes,minorversion when you add functionality in a backwards-compatible manner, andpatchversion when you make backwards-compatible bug fixes.tagwill help us specify the quality of our changes, i.e if it is coming from thefeaturebranch, our NuGet package will have the tagalpha. For example:1.0.0-alpha001and if it is coming frommasterwe do not apply any tag.
Following semantic versioning notation requires developers to decide upfront what kind of changes they will be making (major, minor or a backwards-compatible change) to NuGet packages. In a CI scenario, we would like to automate this versioning. We will soon see how we do it in our pipeline.
Git versioning
We use the GitVersion tool to automatically follow the versioning strategy described above. The tool relies on a simple configuration file committed to the same repository as our NuGet code. This tool automatically determines the semantic version based on the commit history on the repository.
Configuration file
You can create a configuration (gitversion.yml) file using the gitversion init command. Our configuration is as below:
mode: Mainline
next-version: 1.0.0
branches:
 feature:
   tag: alpha
 master:
 tag: ''
ignore:
 sha: []
As you can probably guess from the configuration file above, we are using the Mainline versioning mode. We then specify that our initial version for this repository is 1.0.0. Using mainline mode will also ensure that patch version is incremented every merge to master.
Next, using the branches section, we specify that for feature branches we tag versions with alpha string and for master branch we don’t apply any additional tag (so that the packages from the master will just have versions like 1.0.1 for example).
For more information on installing and using the GitVersion tool from the command-line, refer to the documentation.
Manually updating versions
Although using the GitVersion tool allows us to automatically version our build and NuGet packages, developers need to override the version as they will decide whether to update the major or minor versions based on the change they are making. They can do so by using the following approach, and GitVersion respects these:
- Using commit messages – for example
- Adding
+semver: breakingor+semver: majorwill cause the major version to be increased. - Adding
+semver: featureor+semver: minoras a commit message will cause the minor version to be increased. - Similarly using
+semver: patchupdates the patch version.
- Adding
- Branch name
- If you create a branch with the version number in the branch name such as
release-1.2.0orfeature/1.0.1then GitVersion will take the version number from the branch name as a source.
- If you create a branch with the version number in the branch name such as
- Using git tags
- By tagging a commit, GitVersion will use that tag for the version of that commit, then increment the next commit automatically based on the increment rules for that branch
Marketplace Extension
This tool is available as an Azure DevOps pipeline extension. By installing this extension into your organisation you will be able to use this tool in your Azure pipelines.
Link to the extension: https://marketplace.visualstudio.com/items?itemName=gittools.gitversion
Build pipeline
Now that we know how our branching looks, and what our versioning strategy will be, it’s easy to create the build pipeline to do that in Azure DevOps.
One build pipeline for all branches
As you saw in the developer workflow above, we need to build and publish a NuGet package for both master and feature branches. Azure DevOps allows us to use the one build definition to build for both the branches. We do that by going to Triggers hub in the edit mode of the pipeline, then enable continuous integration. We also add Branch filters to include only master and feature/* branches. This will automatically trigger our build every time there is a commit in any of those branches.

Steps in our build pipeline
The CI pipeline for our .NET Core NuGet package, as well as the YAML content of the full pipeline, appears as follows:
pool:
  name: LabAgents

variables:
  BuildConfiguration: 'release'

steps:
- task: gittools.gitversion.gitversion-task.GitVersion@4
  displayName: GitVersion
  inputs:
    preferBundledVersion: false

- task: DotNetCoreInstaller@0
  displayName: 'Use .NET Core sdk 2.2.104'
  inputs:
    version: 2.2.104

- task: DotNetCoreCLI@2
  displayName: 'dotnet restore from feed'
  inputs:
    command: restore
    projects: '$(Parameters.projects)'
    vstsFeed: '168c2416-9cd1-4e62-e89vb-5665da67a44c'
    includeNuGetOrg: false
    versioningScheme: byBuildNumber

- task: DotNetCoreCLI@2
  displayName: 'dotnet build'
  inputs:
    projects: '$(Parameters.projects)'
    arguments: '--configuration $(BuildConfiguration) /p:Version=$(GitVersion.NuGetVersion)'
    versioningScheme: byBuildNumber

- task: DotNetCoreCLI@2
  displayName: 'dotnet pack'
  inputs:
    command: pack
    packagesToPack: '$(Parameters.projects)'
    nobuild: true
    versioningScheme: byEnvVar
    versionEnvVar: GitVersion.NuGetVersion

- task: DotNetCoreCLI@2
  displayName: 'dotnet nuget push'
  inputs:
    command: push
    publishVstsFeed: '168c2416-9cd1-4e62-e89vb-5665da67a44c'
    versioningScheme: byBuildNumber
Notice, we have added a GitVersion task (the first task in the YAML) to automatically version our build number (which uses
gitversion.yml) and again indotnet packtask (the fifth task in the YAML) to automatically version our NuGet packages using provided variableGitVersion.NuGetVersion.
Once you run the build, the versions will automatically be determined and applied.

Notice that commits from the feature branch have the tag alpha and builds on the master branch do not have any tag, as specified in the gitversion.yml file.
Ensure teams consume only stable NuGet packages
Another big challenge with traditional package management solutions is, as soon as you publish, the NuGet package is made available to everyone immediately. This requires consumers to understand semantic versioning and, based on the version number, figure out if something is a breaking change and whether to use the package. This also slows down the developers of the NuGet package as they have to now make sure packages are thoroughly tested before releasing to the public. Azure DevOps helps you to solve this with a concept called Views.
Views in Azure Artifacts
From Microsoft docs:
Views allows you to share package-versions that have been tested, validated, or deployed, but also hold back packages still under development and packages that didn’t meet a quality bar.
By default, Azure Artifacts provide 3 views: @local, @prerelease, and @release. The @local view is a special view and cannot be renamed.
Granular permission management for views
You can apply granular control on who has access to which views under Feed settings.
In our organisation, @local is available only to developers and architects. The @prerelease view is accessible only for testers/early adopters. Finally, packages in the @release view are available to all users in the organisation.
For more on security and permission management, refer to the documentation.
Delivering and promoting packages in views
The workflow of delivering packages using views is as below:
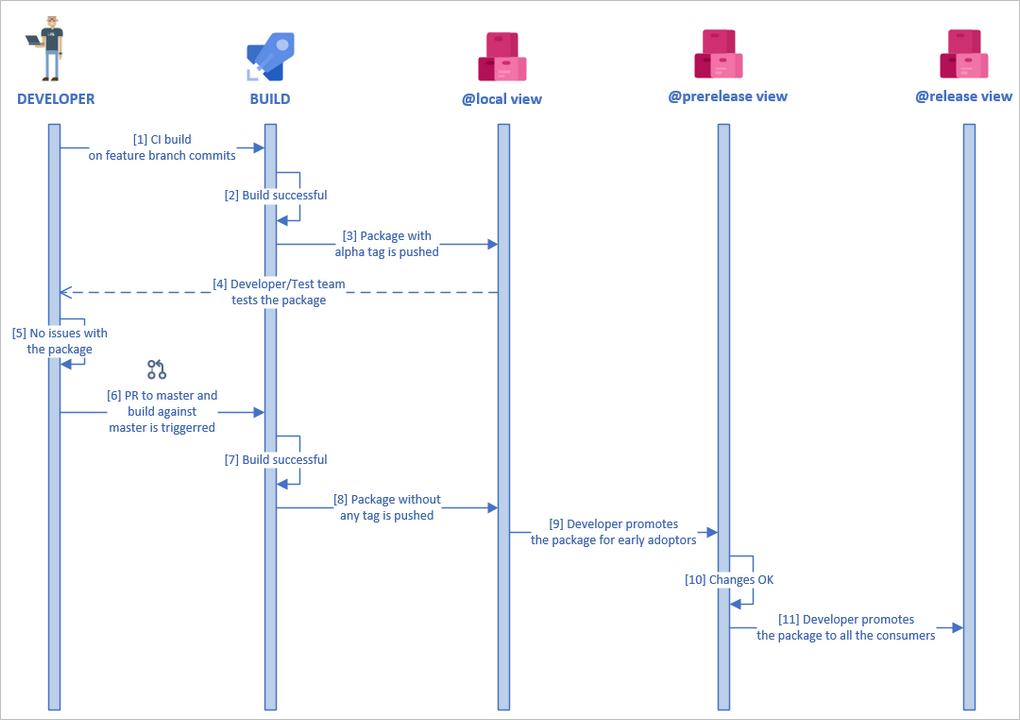
Hence, in our organisation, we publish both alpha packages (packages from feature branches) and non-alpha packages (packages from the master branch). That is,
- On successful completion of CI (from
featureandmasterbranches), the package is published to the@localfeed. Note, packages fromfeaturebranches have the special tagalpha, conveying the quality of the package. - When a package is ready for early adopters, developers select that package and its dependency graph and promote it to the
@prereleaseview. - When the package is deemed of sufficient quality to be released, we promote that package into the
@releaseview.
Conclusion
As you saw in this post, there are a lot of things to consider for faster delivery of NuGet packages in continuous integration scenarios. Azure Artifacts has lots of great features, such as upstream sources and views to help meet your needs. With the right branching and versioning strategy, you can set up continuous delivery with minimum human intervention so that you can deliver your features faster.
I hope this post helped you answer a few of the other things to consider while you plan to deliver your NuGet packages.
Further reading
- Best practices
- Secure and share packages using feed permissions
- Views on Azure DevOps Services feeds
- Upstream sources
About the Author
 Utkarsh Shigihalli is passionate about technology and has developed many tools and extensions over the years. Currently working for Avanade in the United Kingdom, he has experience in the areas of Azure, DevOps, Agile, and Architecture. Over the years he has worked for many top companies as an architect, independent consultant, and as a DevOps coach in India, the United States, Netherlands, and United Kingdom. He has been awarded as Microsoft Most Valuable Professional five times. He regularly writes at https://www.visualstudiogeeks.com and you can follow him on Twitter at @onlyutkarsh.