

Using Containers to run R/Shiny workloads in Azure: Part 4

In the parts one, two and three of this series, I described how to build containers using Dockerfiles, then how to share and access them from Azure. I then introduced data persistence using managed volumes and shared file systems, effectively developing locally with a globally accessible persistent state. Finally, I showed how to deploy multi-container applications using docker-compose.
In this part, we’ll move briefly away from Python to look at R together with Shiny as a dynamic reporting and visualisation capability pulling data from a Postgres database. R is very popular with a number of clients I work with, and they also have an interest in being able to move from on-premises environments to a containerised deployment.
I wrote this as a simple guide, because I’ve had a number of requests for guidance on how to test this exact pattern within their own Azure environments. As with previous parts to this series, I won’t be focusing on best practice at this point. I’m more concerned about showing more moving parts, each of which can act as learning points.
By the end of this blog, you’ll be able to create your own R/Shiny container that pulls data from an Azure Postgres service, and then access that container in a remote Azure deployment from a browser.
The first thing we’re going to do is to create a resource group to host everything. I’m going to call this rshiny-rg and host it in eastus.
$ az group create --name rshiny-rg --location eastus
{
    "id": "/subscriptions//resourceGroups/rshiny-rg",
    "location": "eastus",
    "managedBy": null,
     "name": "rshiny-rg",
    "properties": {
        "provisioningState": "Succeeded"
    },
    "tags": null,
    "type": null
}
Next, we’ll need to create a postgres database to hold some candidate data. Rather than manage our own Postgres server, I’m going to use Azure’s own Postgres service. First, create the Postgres server, provide it with an admin username and password, a server size and a version.
$ az postgres server create --resource-group rshiny-rg --name shiny-pg --location eastus --admin-user
jonadmin --admin-password [MyPassword] --sku-name B_Gen5_1 --version 9.6

{
    "administratorLogin": "jonadmin",
    .
    "fullyQualifiedDomainName": "shiny-pg.postgres.database.azure.com",
    .
    .
    "sslEnforcement": "Enabled",
    .
}
$
There are some initial security checks to ensure that you’re not using standard administrator names (e.g. admin), or non-trivial passwords. Keep a note of these, as you’ll need to use them later in this exercise.
Note that I used a very small basic server (B_Gen5_1) to host this. With the size of data being stored, and our performance expectations for this exercise, we only need a single core. It’s also very inexpensive – $0.03/hour at the time of writing this.
Note the fully qualified domain name for your server, because we’ll need it to connect later.
We also now need to create a firewall rule so we can interact with the server from an external environment. You will need to find out your IP address for this. This is the IP address that the internet thinks you have (not the one you might have on your machine). If you don’t know it, you can continue, and wait for the error message later and come back to this point.
$ az postgres server firewall-rule create --resource-group rshiny-rg --server shiny-pg --name AllowMyIP
--start-ip-address x.x.x.x --end-ip-address x.x.x.x
It should come back with a confirmation that this has been set up
{
    "endIpAddress": "x.x.x.x",
    "id": "/subscriptions//resourceGroups/rshiny-rg/providers/Microsoft.DBforPostgreSQL/servers/shiny-pg/firewallRules/AllowMyIP",
    "name": "AllowMyIP",
    "resourceGroup": "rshiny-rg",
    "startIpAddress": "x.x.x.x",
    "type": "Microsoft.DBforPostgreSQL/servers/firewallRules"
}
$
I happen to have a postgres client on my Mac, but if you don’t, you can get one from here. When I do this, it’s clear that I can now connect to the postgres server, and it provides a prompt to enter my password:
$ psql --host=shiny-pg.postgres.database.azure.com --port=5432 --username=jonadmin@shiny-pg --dbname=postgres

Password for user jonadmin@shiny-pg:
psql (11.5, server 9.6.14)
SSL connection (protocol: TLSv1.2, cipher: ECDHE-RSA-AES256-GCM-SHA384, bits: 256, compression: off)
Type "help" for help.

postgres=>
There are a couple of things to note here:
- Your username will be the name you provided earlier, followed by an @ and then your server name. In my case, the username is jonadmin@shiny-pg.
- You’re connecting to the external host over SSL. Therefore, your Postgres client needs to support that.
We need to create a database to hold our data and we’re going to use the Northwind database, which has more typically been used for Access and SQL Server. In this case, we’re going to use the same content for Postgres. There are a number of places to find this, but I found two files that gave me what I needed.
- northwind_ddl.sql creates the tables
- northwind_data.sql loads the sample data
Please look at the DDL and INSERT statements to ensure you’re happy to use them.
Let’s create the database:
postgres=> create database northwind;
CREATE DATABASE
postgres=>
You should be able to see that this exists by using the ‘\l’ command:

Now let’s connect to it using ‘\c’ followed by the database name:
postgres=> \c northwind;
psql (11.5, server 9.6.14)
SSL connection (protocol: TLSv1.2, cipher: ECDHE-RSA-AES256-GCM-SHA384, bits: 256, compression: off)
You are now connected to database "northwind" as user "jonadmin@shiny-pg".
northwind=>
And now let’s create the schema and load the content. I placed the northwind_ddl.sql and northwind_data.sql files in the same directory where I executed my psql command. I can therefore import the DDL commands using the ‘\i’ command, and then import the data the same way. Note that the data import will take a bit more time to complete.
northwind=> \i northwind_ddl.sql
SET
.
.
SET
DROP TABLE
.
.
DROP TABLE
CREATE TABLE
.
.
CREATE TABLE
northwind=>

northwind=> \i northwind_data.sql
SET
.
.
SET
INSERT 0 1
.
.
INSERT 0 1
northwind=> \q
$
When it’s done, you can quit using ‘\q’.
Now we’ll create a containerised R/Shiny server. We’ll initially do this on our local machine and then move that entire container to the cloud. I’ll use a very simple application that takes the input from some sliders that provides a tabular output and a histogram based on those values. This is going to be dynamic, so when the sliders are moved, the data on the screen will also update. Let’s look at the files we’re using:
r-shiny/
├── App
│    ├── global.R
│    ├── server.R
│    └── ui.R
└── Dockerfile
Within the r-shiny directory, we have a Dockerfile, and a sub-directory called App, which contains the actual Shiny application.
The application is composed of three parts:
1. A globals.R file defines libraries, our database connection details and some dynamic SQL queries based on slider values.
library(RPostgreSQL)
library(DT)
library(plotly)
library(rjson)
library(pool)

pool <- dbPool(
    drv = dbDriver("PostgreSQL", max.con = 100),
    dbname = "northwind",
    host = "shiny-pg.postgres.database.azure.com",
    user = "jonadmin@shiny-pg",
    password = “[Your Password Here]”,
    idleTimeout = 3600000,
    minSize = 5
)

freight_maxmin <- c(round(dbGetQuery(pool, "SELECT MAX(freight), MIN(freight) from orders;"), 2))
order_id_maxmin <- c(dbGetQuery(pool, "SELECT MAX(order_id), MIN(order_id) from orders;"))
2. A server.R file that refreshes the tabular data and a histogram on changes to the sliders
function(input, output, session) {
    output$table <- DT::renderDataTable({
        SQL <- paste(
                     "SELECT order_id, customer_id, order_date, freight from orders ",
                     "WHERE order_id BETWEEN ?oid_min AND ?oid_max AND freight BETWEEN ?min and ?max;",
                     sep=" ")
        query <- sqlInterpolate(ANSI(), SQL,
                            oid_min = input$order_id_selector[1], oid_max = input$order_id_selector[2],
                            min = input$freight_selector[1], max = input$freight_selector[2])
        outp <- dbGetQuery(pool, query)
        ret <- DT::datatable(outp)
        return(ret)
    })

    output$distPlot <- renderPlot({
        SQL <- paste(
                     "SELECT freight from orders ",
                     "WHERE order_id BETWEEN ?oid_min and ?oid_max and freight BETWEEN ?min and ?max;",
                     sep=" ")

        histQry <- sqlInterpolate(ANSI(), SQL,
                              oid_min = input$order_id_selector[1], oid_max = input$order_id_selector[2],
                              min = input$freight_selector[1], max = input$freight_selector[2])
        histOp <- dbGetQuery(pool, histQry)

        freight_cost <- histOp$freight
        bins <- seq(min(freight_cost), max(freight_cost), length.out = 11)
        hist(freight_cost, breaks = bins, col = 'darkgray', border = 'white')
   })
}
3. A ui.R file describes the user interface composed of two slider inputs, a panel for the tabular output, and a histogram showing the distribution of freight costs.
fluidPage(
    sidebarLayout(
        sidebarPanel(
            sliderInput("order_id_selector","Select Order ID",
                min = order_id_maxmin$min,
                max = order_id_maxmin$max,
                value = c(order_id_maxmin$min, order_id_maxmin$max), step = 1),
        sliderInput("freight_selector","Select Freight Ranges",
                min = freight_maxmin$min,
                max = freight_maxmin$max,
                value = c(freight_maxmin$min, freight_maxmin$max), step = 1)
        , plotOutput("distPlot", height=250)

    ), mainPanel(
        DT::dataTableOutput("table")
    )
  )
)
Now let’s look at our Dockerfile:
FROM rocker/shiny-verse:latest

RUN apt-get update && apt-get install -y \
    sudo \
    pandoc \
    pandoc-citeproc \
    libcurl4-gnutls-dev \
    libcairo2-dev \
    libxt-dev \
    libssl-dev \
    libssh2-1-dev

RUN R -e "install.packages(c('shinydashboard','shiny', 'plotly', 'dplyr', 'magrittr', 'RPostgreSQL', 'DT', 'rjson', 'pool'))"
RUN R -e "install.packages('gpclib', type='source')"
RUN R -e "install.packages('rgeos', type='source')"
RUN R -e "install.packages('rgdal', type='source')"

COPY ./App /srv/shiny-server/App

EXPOSE 3838

RUN sudo chown -R shiny:shiny /srv/shiny-server

CMD ["/usr/bin/shiny-server.sh"]
We start from a base image of rocker/shiny-verse. After installing some software as well as some R libraries, we then copy our application code from the local App directory to the /srv/shiny-server/App directory. This means that we’ll be able to access this from the App directory within the browser. We expose port 3838 and then start our shiny server.
First build the container image.
$ docker build -t r-shiny r-shiny

Sending build context to Docker daemon 6.656kB
Step 1/10 : FROM rocker/shiny-verse:latest
---> 1d686b061097
.
.
.
Step 9/10 : RUN sudo chown -R shiny:shiny /srv/shiny-server
---> Running in 1b84bf06dfd2
Removing intermediate container 1b84bf06dfd2
---> 474a71119ccf
Step 10/10 : CMD ["/usr/bin/shiny-server.sh"]
---> Running in 98f5a8d6240a
Removing intermediate container 98f5a8d6240a
---> 6032d43c7703
Successfully built 6032d43c7703
Successfully tagged r-shiny:latest
$
With the container image built, we can now start it.
$ docker run --rm -d -p 3838:3838 r-shiny
8485ff49a982f479acb279359c15311fc61c9e27b277e597f3a57220bdd856e4
$
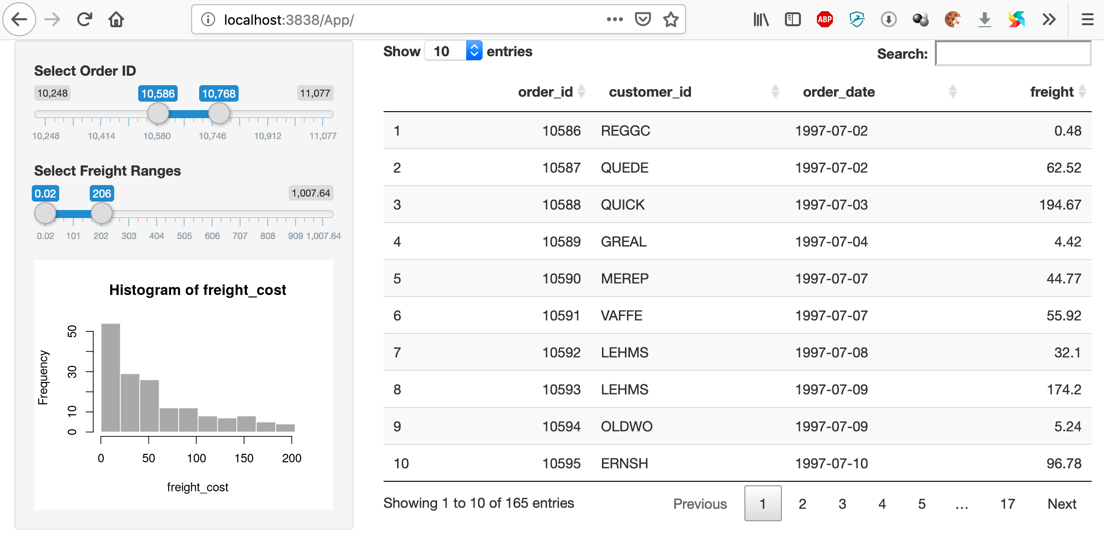
If I now go to a browser page, pointing at http://localhost:3838/App, I see the following:
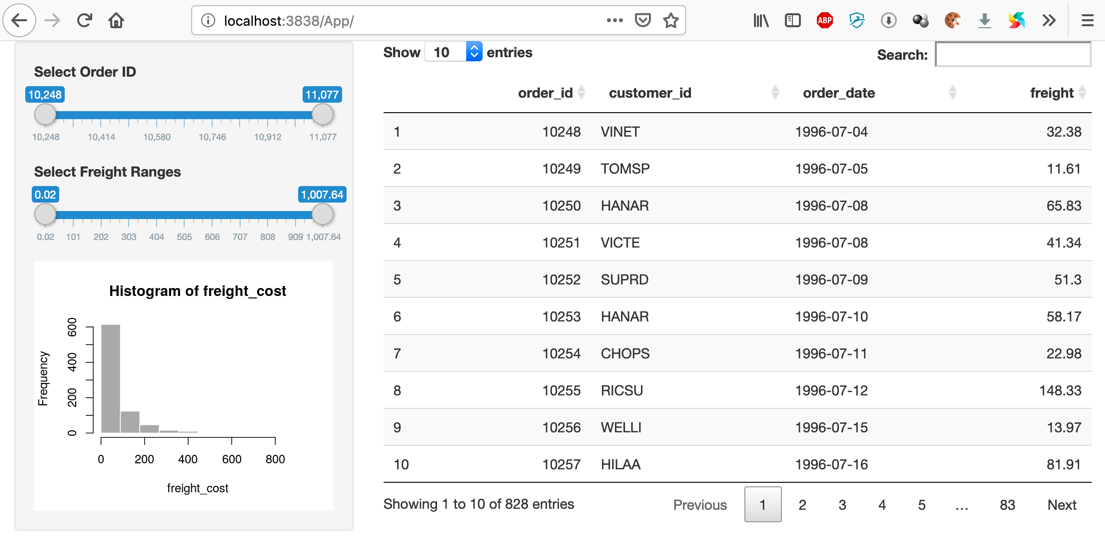
This shows every order in our database, but we can also play with the sliders in the panel on the left, which dynamically changes the content of interest, showing both different orders and a different histogram of freight costs. Note that this is a very simple application with no error checking. So, if you play with the values, there will be times when the data returned is insufficient to provide histogram data. Ignore any errors and try other ranges.
But we’re not finished yet. While the data sits in Azure, the container is still running on my laptop and I’d like everything to be held in Azure so that it is accessible to multiple people.
Let’s first create a container repository. Note the loginServer. You’ll need this later.
$ az acr create --resource-group rshiny-rg --name jmshinyreg --sku Basic --admin-enabled

{
"adminUserEnabled": true,
.
"loginServer": "jmshinyreg.azurecr.io",
.
"tags": {},
"type": "Microsoft.ContainerRegistry/registries"
}
Now tag the container image we just built against our Azure repository. This allows us to push it to the cloud.
$ docker tag r-shiny jmshinyreg.azurecr.io/shiny:1.0
$ docker images
REPOSITORY TAG IMAGE ID CREATED SIZE
r-shiny latest 250764631cac 29 minutes ago 1.91GB
jmshinyreg.azurecr.io/shiny 1.0 250764631cac 29 minutes ago 1.91GB
Log in to Azure Container Registry and push the tagged image to it. Then confirm that the image is there by querying the repository
$ az acr login --name jmshinyreg
Login Succeeded
$
$ docker push jmshinyreg.azurecr.io/shiny:1.0
The push refers to repository [jmshinyreg.azurecr.io/shiny]
54a8dd859e33: Pushed
a43915702c3c: Pushed
.
.
.
1fe356c64d3b: Pushed
e2a8a00a83b2: Pushed
1.0: digest: sha256:df221659fee38be8930b7740a903c4cdc7c61173f2d65da8fe786e0af5497ca5 size: 3268
$

$ az acr repository list --name jmshinyreg --output table
Result
--------
shiny
$
In Part 1 of this series, I shared a containerised Linux host through ssh. Now we’re exposing a browser-based application. In order to allow containers to be created, we’ll need a service principle. The following script creates this for us and provides us with credentials. Modify the values of ACR_NAME and SERVICE_PRINCIPAL_NAME. I used jmshinyreg and jon-shiny-sp for mine.
#!/bin/bash

# Modify for your environment.
# ACR_NAME: The name of your Azure Container Registry
# SERVICE_PRINCIPAL_NAME: Must be unique within your AD tenant
ACR_NAME="jmshinyreg"
SERVICE_PRINCIPAL_NAME=jm-shiny-sp

# Obtain the full registry ID for subsequent command args
ACR_REGISTRY_ID=$(az acr show --name $ACR_NAME --query id --output tsv)

# Create the service principal with rights scoped to the registry.
# Default permissions are for docker pull access. Modify the '--role'
# argument value as desired:
# acrpull: pull only
# acrpush: push and pull
# owner: push, pull, and assign roles
SP_PASSWD=$(az ad sp create-for-rbac --name http://$SERVICE_PRINCIPAL_NAME --scopes $ACR_REGISTRY_ID --role acrpull --query password --output tsv)
SP_APP_ID=$(az ad sp show --id http://$SERVICE_PRINCIPAL_NAME --query appId --output tsv)

# Output the service principal's credentials; use these in your services and
# applications to authenticate to the container registry.
echo "Service principal ID: $SP_APP_ID"
echo "Service principal password: $SP_PASSWD"
When I run this, I’m returned a secure principle ID and a password. I’ve obscured mine for obvious reasons, but you will need these for later, so make a copy.
Service principal ID: 6xxxxxxx-xxxx-xxxx-xxxx-xxxxxxxxxxx2
Service principal password: 6xxxxxxx-xxxx-xxxx-xxxx-xxxxxxxxxxxf
Now let’s create and deploy a container, which I’ve call rshiny. I’ve given it a relatively unique name jm-shiny-svr, which will form part of the fully qualified name later.
$
az container create --resource-group rshiny-rg --name rshiny --image jmshinyreg.azurecr.io/shiny:1.0 --cpu 1 --registry-login-server jmshinyreg.azurecr.io --dns-name-label jm-shiny-svr --ports 3838 --registry-username 4xxxxxxxx-xxxxx-xxxxx-xxxxx-xxxxxxxxxxxx1 --registry-password fxxxxxxxx-xxxxx-xxxxx-xxxx-xxxxxxxxxxx5
{
.

.
}
$
The container’s fully qualified domain name is part of that JSON response, but you can also find the fully qualified DNS name for your new container using the following:
$ az container show --resource-group rshiny-rg --name rshiny --query ipAddress.fqdn
"jm-shiny-svr.eastus.azurecontainer.io"
$
So, let’s go to the container, which is now running in the cloud. Remember that you need to reference port 3838, and that the shiny application is underneath the App directory.
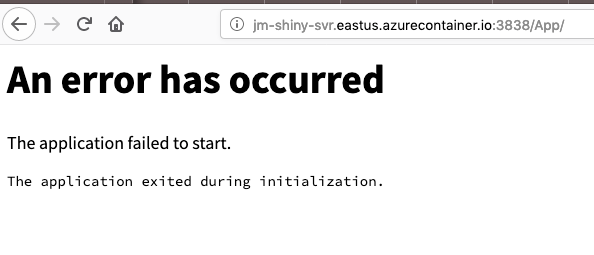
What happened? Fortunately, we can understand this in a little more detail using the az container logs command.
$ az container logs --resource-group rshiny-rg --name rshiny

.
.
.

[2019-08-26T09:20:22.819] [INFO] shiny-server - Error getting worker: Error: The application exited during initialization.
Error in postgresqlNewConnection(drv, ...) :
RS-DBI driver: (could not connect jonadmin@shiny-pg@shiny-pg.postgres.database.azure.com:5432 on dbname "northwind": FATAL: no pg_hba.conf entry for host "40.76.197.161", user "jonadmin", database "northwind", SSL on
FATAL: SSL connection is required. Please specify SSL options and retry.
)
Calls: runApp ... -> -> postgresqlNewConnection
Execution halted
It seems that because the container can’t reach the Postgres server, the application failed. This is easy to address by simply providing a firewall rule to allow entry to the IP address referenced in the error log.
$ az postgres server firewall-rule create --resource-group rshiny-rg --server shiny-pg --name AllowMyIP --start-ip-address 40.76.197.161 --end-ip-address 40.76.197.161
{
"endIpAddress": "40.76.197.161",
"id": "/subscriptions//resourceGroups/rshiny-rg/providers/Microsoft.DBforPostgreSQL/servers/shiny-pg/firewallRules/AllowMyIP",
"name": "AllowMyIP",
"resourceGroup": "rshiny-rg",
"startIpAddress": "40.76.197.161",
"type": "Microsoft.DBforPostgreSQL/servers/firewallRules"
}
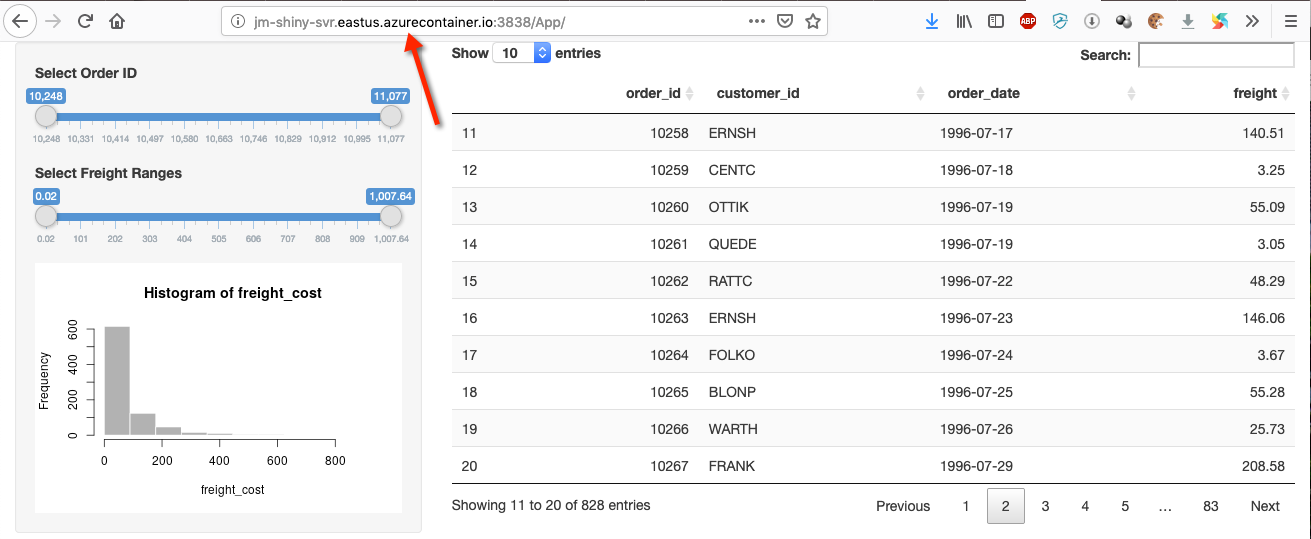
If you now refresh the page, you should see a working app.
Once you’ve finished playing with this, you may now like to clear up your environment by removing the resource group holding your Postgres database, and container repository.
$ az group delete --name rshiny-rg
Conclusion
This concludes the fourth part of our series. We diverted from a pure Python approach and touched on containerising R payloads. In addition, we started integrating with PaaS services such as Postgres and looked at some of the implications including security.
There is still more to focus on in this series including being able to scale containers out using capabilities such as Kubernetes. In addition, I’ll demonstrate how to integrate Cognitive services and start considering the operationalisation of the data science pipeline.