

Backup your data lake using Azure Data Factory – Metadata Copy activity

Most organisations leverage the disaster recovery options available to them on Azure to ensure they are properly protected in case of a data center outage. Depending on their requirements, they can choose among ZRS, GZRS, or GRS & RA-GRS. More details are available here.
However, none of these options protect against data deletion. Indeed, if records are accidentally deleted, that deletion is replicated. To protect against such events, customers should consider backing up their data lake. As of today, Azure Data Lake Gen 2 does not have native support for this kind of backup.
Azure Data Factory (ADF) is one of many technical options for a custom backup solution. In this blog post, we’ll walk you through how to leverage ADF pipelines for full and incremental backups of your data lake on Azure. Keeping in mind the size of most enterprise data lakes, we’ll leverage the Metadata-driven copy task in Azure Data Factory (currently in preview), to build large-scale data loading pipelines. More details on the Metadata-driven copy task are available here.
Let’s proceed with a scenario that requires an incremental backup every day and a full back up on the last day of every month. We assume you are familiar with ADF. If not, you can find some learning resources here.
Prerequisites
- One Azure SQL Database to host the metadata table for the ADF metadata Task.
- A linked Service in ADF with a successful connection to the database.
- Source and Sink Azure Data Lake Gen 2 resources with storage contributor permissions at the minimum.
- Linked services to the source and sink storage account(s).
Generate the ADF pipelines
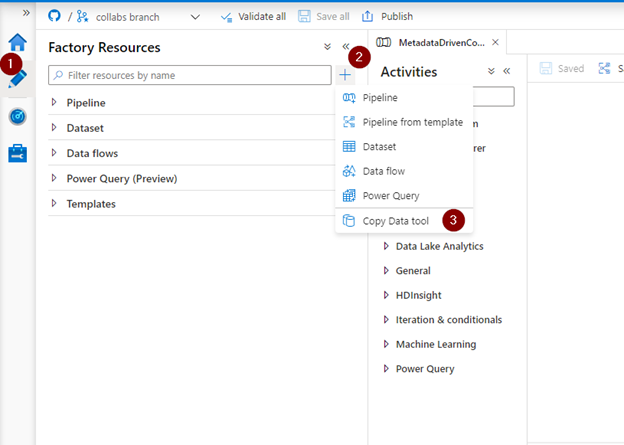
In the ADF Author hub, launch the Copy Data Tool as shown below.
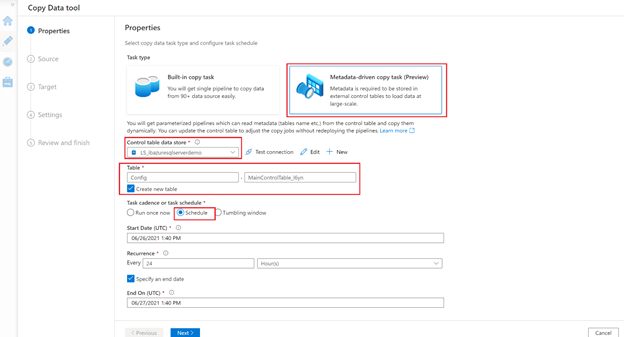
1. In the properties page, select the Metadata-driven copy task type. You will be prompted to select a linked service to host the control table. The control table will be used to maintain metadata for the copy activity – the source storage account, the source container, the target storage account, etc. – and can be created in a Azure SQL DB or Synapse Analytics instance. Note that during the preview, you might need to apply minor changes to the script generated to create the table in Synapse. For this walkthrough, we’ll use an Azure SQL Database to host the meta data properties.
- Choose an existing linked service or create a new one to the Azure SQL Database. After you select the linked service, new text boxes will appear for the schema and the name of the control table.
- Select an existing table or create a new one by checking on the Create new table option.
- Specify the task cadence or task schedule and provide appropriate values.
- Click on Next to move to the next step
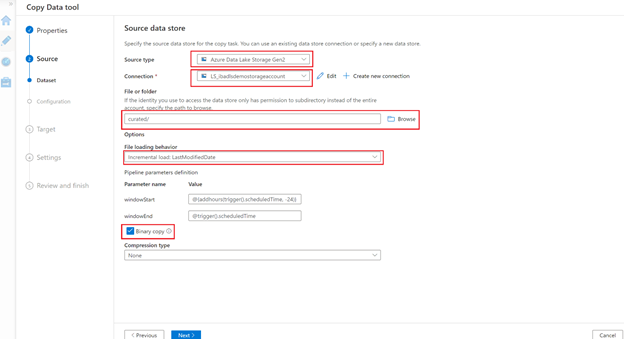
2. Now we’ll provide the connection details of our data source.
- Many source types are supported. In our case, we’ll choose Azure Data Lake Storage Gen 2.
- Select an existing linked service to the source storage or create a new one.
- Click on the Browse button to select the container and/or folder you want to backup.
- As mentioned above, we create a full backup once a month and an incremental backup on a daily basis. Select Incremental Load for the File loading behaviour. This will generate an entry in the control table for the incremental load. We’ll manually create another entry for the full load.
- As this is a backup, we do not need to read the content of the files, so we’ll select a Binary copy behaviour.
- Select Next.
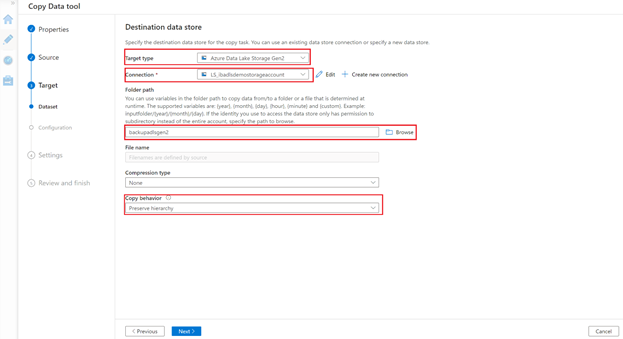
3. In the Destination data store page, specify the properties of the target storage account.
- Choose the destination target type as Azure Data Lake Storage Gen2.
- Select an existing linked service to the target storage or create a new one.
- Click on the Browse button to select the backup container.
- Select the ‘Preserve Hierarchy’ copy behaviour to keep the folder structure ‘as-is’ from source to sink.
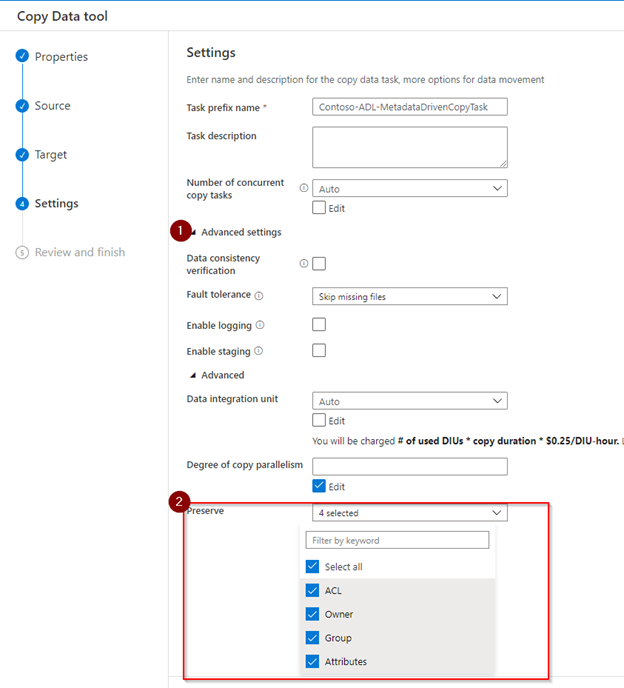
4. Provide the Task Prefix name on the Settings step. Under Advanced Settings, you can select options like Data Consistency Verification, Fault Tolerance, Preserving the ACLs and many more.
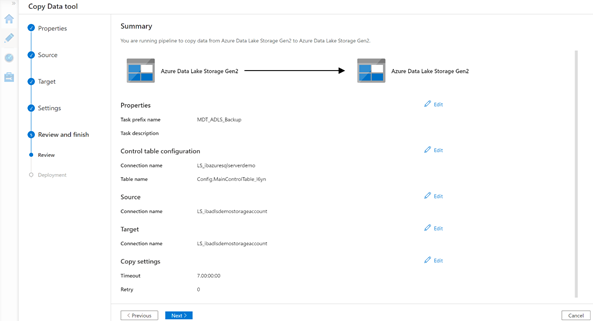
5. Review and validate your set up in the summary page and make sure it all looks good, then proceed by clicking Next.
6. In the Deployment step, the following are created:
- The ADF pipelines for the backup.
- Source, target and control datasets.
- The SQL script to create the control tables and insert the parameters for the incremental load.
Copy the SQL script and run against the Azure SQL database (the same database we used as the control table store) using your favourite client tool – Management Studio, Azure Data Studio or even the Query Editor option in the Azure portal. You also have the option to download the script, if needed.

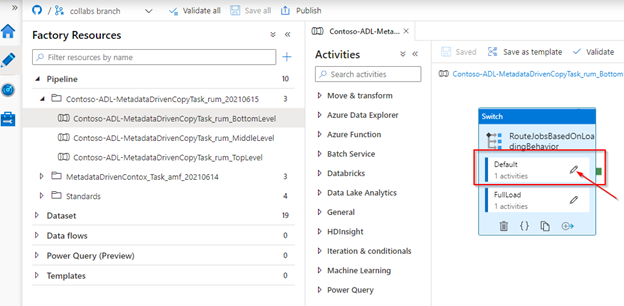
Go back to the authoring hub in ADF to view the generated pipelines and datasets.
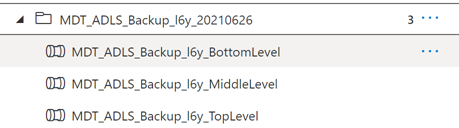
As you can see, three pipelines are generated:
- Top level Pipeline: <Task_Prefix_Name>_TopLevel
This pipeline counts the total number of objects (tables etc.) to be copied in this run, determines the number of sequential batches based on the maximum allowed concurrent copy task instances, and then executes another pipeline to copy different batches sequentially.
- Middle level Pipeline: Task_Prefix_Name>_MiddleLevel
This pipeline copies one batch of objects. The objects belonging to this batch will be copied in parallel.
- Bottom level pipeline: MetadataDrivenCopyTask_xxx_ BottomLevel
This pipeline copies objects from one group. The objects belonging to this group will be copied in parallel.
Updates on the generated artifacts
The incremental load for an ADLS data source is not yet supported as part of the Metadata Driven Copy Task. To make this work, we will tweak the ADF pipelines a little and create a stored procedure in the Azure SQL Database.
Stored procedure
The stored procedure will update the modifiedDatetimeStart attribute of the CopySourceSettings column with the pipeline trigger time, after each run. That way, the next time you execute the ADF pipeline, it will only copy files created or modified since the last run.
If, for any reason, you want to rerun the pipeline from a specific date, you can manually update the modifiedDatetimeStart in the control table.
CREATE PROCEDURE [dbo].[Update_modifiedDatetimeStart]
@modifiedDatetimeStartDate nvarchar(max),
@Id int
    AS
UPDATE <Your Control table>
    SET CopySourceSettings=JSON_MODIFY(CopySourceSettings,'$.modifiedDatetimeStart', @modifiedDatetimeStartDate) WHERE Id = @Id
ADF pipelines
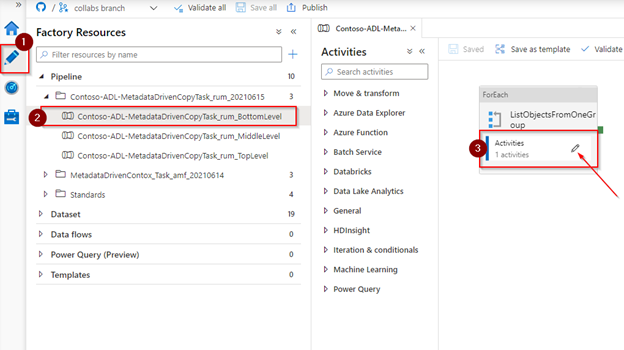
Open the xxx_ BottomLevel pipeline. Drill down on the ForEach activities. A Switch activity decides when to do a full load and default (incremental load).
Incremental load
Select the Default Activity as we need to make changes to the incremental load.
Add a new Stored procedure activity after the copy activity. Keep the default link between the activity (OnSuccess).
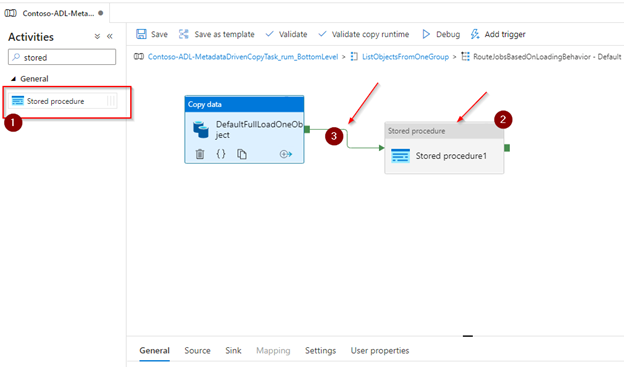
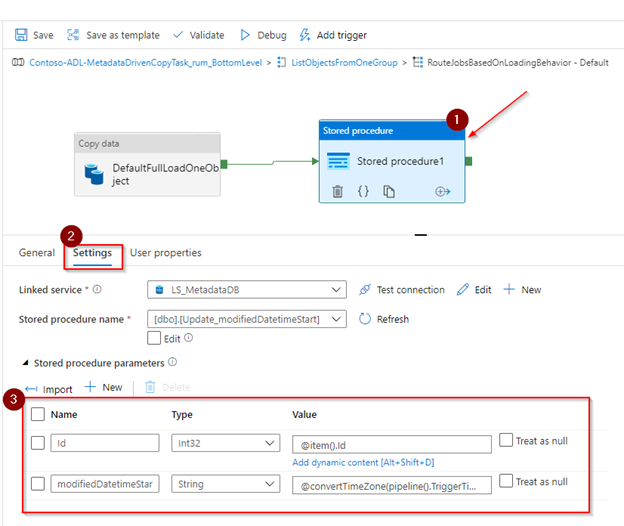
Select the ‘Stored Procedure’ activity.
- In the activity settings, specify the link service to the Azure SQL database and select the [dbo].[Update_modifiedDatetimeStart] previously created.
- Click on Import to retrieve the stored procedure parameters. Fill in the parameters with the below values:
- Id: @item().Id
- modifiedDatetimeStartDate: @convertTimeZone(pipeline().TriggerTime,’UTC’, ‘Eastern Standard Time’)
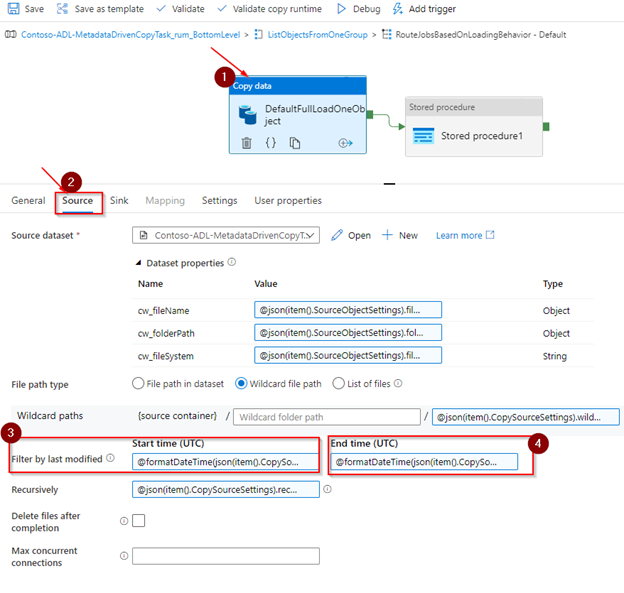
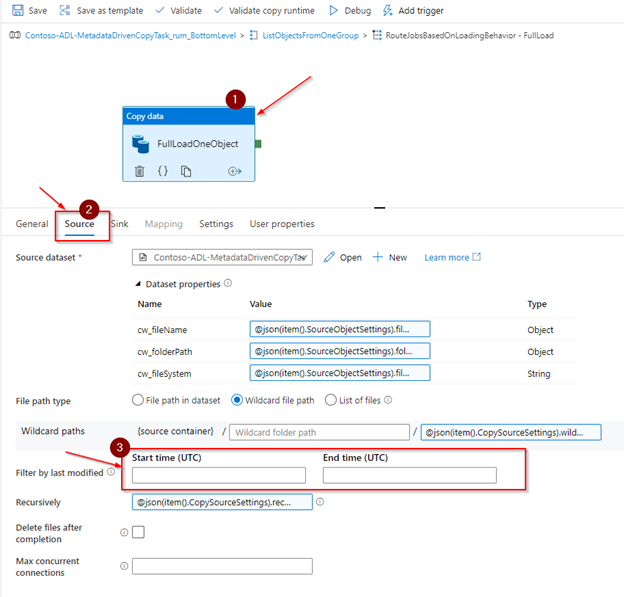
Next, select the ‘Copy data’ activity. In the source tab, update the start date and the end date of the ‘Filter by last modified’ property as follows:
-
- Start Time (UTC): @formatDateTime(json(item().CopySourceSettings).modifiedDatetimeStart)
- End Time (UTC): @formatDateTime(json(item().CopySourceSettings).modifiedDatetimeEnd)
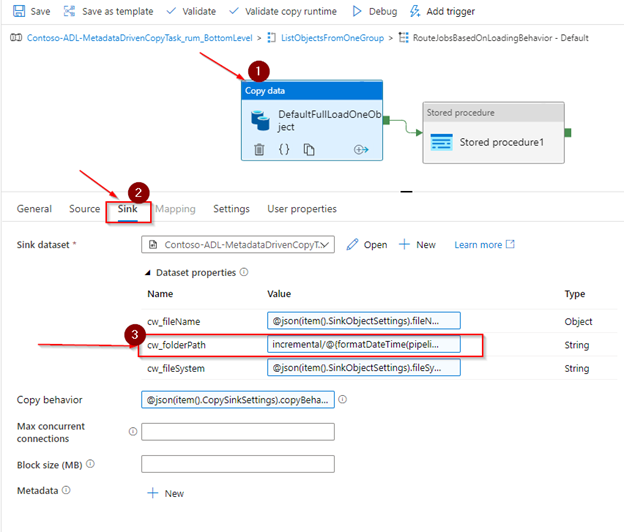
In the sink tab, update the folderPath property as follows:
-
- cw_folderPath: incremental/@{formatDateTime(pipeline().TriggerTime,’yyyy’)}/@{formatDateTime(pipeline().TriggerTime,’MM’)}/@{formatDateTime(pipeline().TriggerTime,’dd’)}
The tweaks for the incremental load are now complete.
Full load
Now go back and edit the FullLoad ‘Copy data’ activity. The purpose of the FullLoad is to ensure the entire storage account and the account in the source is backed up and to specify the target folder hierarchy:

In the source tab, make sure both the start date and the end date of the ‘Filter by last modified’ are blank.
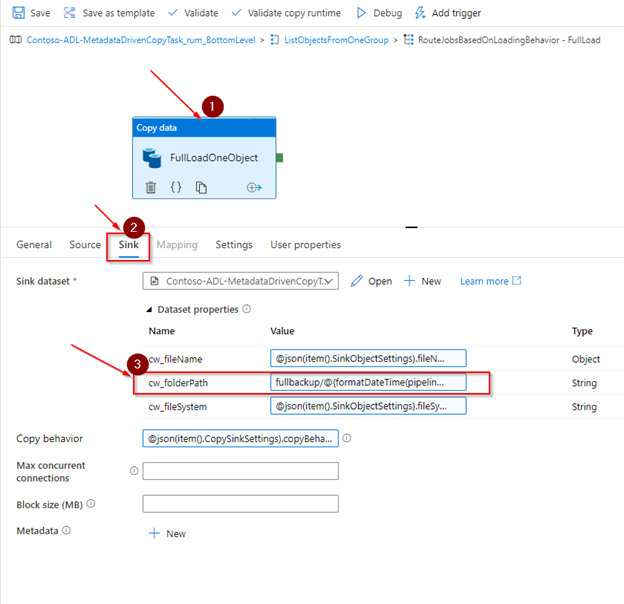
In the sink tab, update the folderPath property as follows:
-
- cw_folderPath: fullbackup/@{formatDateTime(pipeline().TriggerTime,’yyyy’)}/@{formatDateTime(pipeline().TriggerTime,’MM’)}
Create and schedule the triggers.
We now need to create 2 triggers, one each for the full and incremental backups.
To create a trigger, click on Add trigger > New/Edit
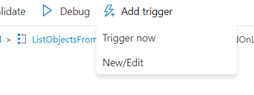
In the Add triggers panel that opens up, select New in the Choose trigger drop down.
Trigger for the Full Backup
This will initiate the full backup of the source container(s) on the last day of the month, irrespective of the number of days in each month. Create the trigger as shown below.

Trigger for the Incremental Backup
This will copy only the new and edited files from the source since the previous run. The incremental backup in this example will run once a day to copy relevant files from the source container(s) to destination container(s). Create this trigger as shown below.
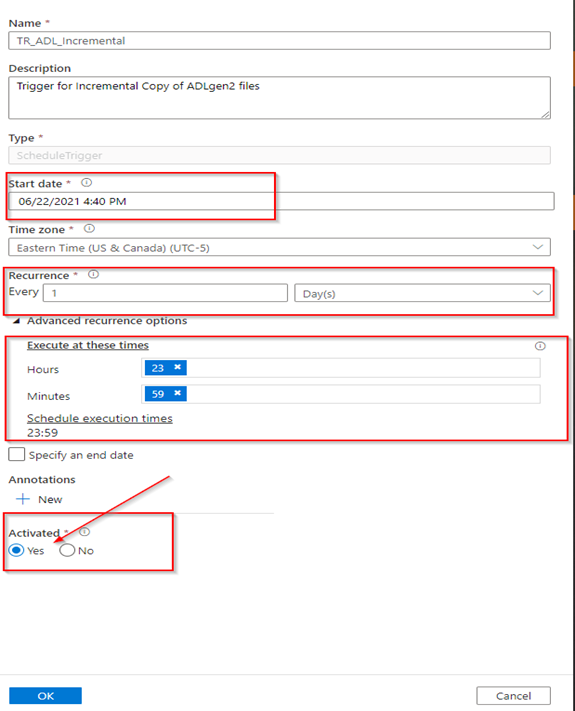
Remember to set the Activated status to ‘Yes’ for both Triggers created.
Control table – Incremental load record
Using your favourite client tool, connect to the Azure SQL database and run a select statement on the control table. As mentioned above, only one record was created as part of the generated script. That record contains the properties of the incremental load.
When you execute the ADF pipeline (), the lookup activity filters on the trigger name:
SELECT count(*) as count FROM @{pipeline().parameters.MainControlTableName}
where TopLevelPipelineName='@{pipeline().Pipeline}' and TriggerName like '%@{pipeline().TriggerName}%'
Perform the following updates:
- Make a copy of the current row in the table and insert it as a second row in the table.
- In the newly inserted row, look up the columns “TriggerName” and “DataLoadingBehaviorSettings” and change the contents as below:
Column “TriggerName”:
[            "Sandbox",            "< Name of your Incremental Trigger >"        ]
Column “DataLoadingBehaviorSettings”:

{            "dataLoadingBehavior": "Default"        }
After completing these steps, the content of the new row in the metadata table should look similar to:

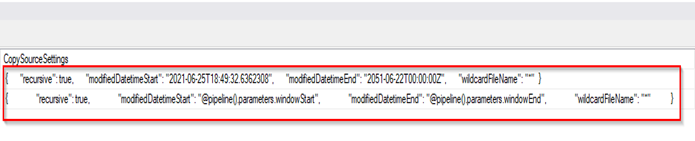
Finally, in the newly inserted row, look up the column “CopySourceSettings” and change the entries in the column as follows:
- modifiedDatetimeStart: <Datetime for initial start of Pipeline. e.g., 2021:06:25T18:00:00>
- modifiedDatetimeEnd: <Datetime for deactivate Pipeline from running. e.g., 2090:06:25T18:00:00>
After completing the updates, the column should look like below:
This completes the setup for the backups.
About the authors
Issagha Ba is a Principal Cloud Solution Architect with the Microsoft Customer Success Unit and drives large scale and deep technical engagements with customers. Issagha has a wealth of experience on the Azure data platform and analytics.
Athulya Ramamoorthy is a Cloud Solution Architect with Microsoft, focusing on Data and Analytics, and enjoys helping customers innovate on Azure. Athulya also has a keen interest in using technology to drive sustainability.
Volkan Civelek has extensive experience on Data, AI and Cloud systems. He’s currently helping high priority global customers at Microsoft. Data architecture for Scalability and High Availability are his passion.
Abiodun Olatunji is a Senior Cloud Solution Architect with the Microsoft Customer Success Unit. He focuses on Big Data & Analytics workloads and drives large scale technical engagements with various global customers. He has deep experience in various Azure Data Services including Azure Synapse, SQL, Purview, Stream Analytics, Data Factory, and Data Lake.