

Building Scalable Data Science Applications using Containers – Part 5

Welcome to the fifth part of this blog series around using containers for Data Science. In parts one, two, three, and four, I covered a number of building blocks that we’ll use here. If this is the first blog you’ve seen, it’s worth skimming the first four parts, or even going back and progressing through them. I make a number of assumptions about your familiarity with Docker, storage, and multi-container applications, covered in these previous blogs.
The objective of this blog is to:
- Build a common data science pattern using multiple components that will be held in containers.
- Provide some considerations for scalability and resilience.
- Use this as the foundation for an Azure Kubernetes Service deployment in a subsequent post.
This blog will not always demonstrate good data science practice; I’d rather focus on exposing patterns that are worth being aware of that help provide a catalyst for learning. There are many other sources for performance optimisation, and architectural robustness, but this requires a broader level of understanding than I assume in this article. However, I will usually point out when poor practice is being demonstrated.
For example, some performance patterns that aren’t ideal – the database in the diagram below is a bottleneck and will constrain performance. The remit of this blog is to slowly build on core principles, show how to work with them and use these as a basis for further understanding.
This will be a two-part post. In the first part, we will build the environment locally using docker-compose and make some observations about limitations. In the second, we will migrate the functionality across to Azure Kubernetes Service.
We’ll use a simple image classification scenario requiring a number of technical capabilities. These form a simple process that classifies a pipeline of images into one of 10 categories.
The scenario we’ll be building assumes many typical project constraints:
- We have no control of how many or how fast the images arrive.
- The classification model has been pretrained.
- Every image must be classified. In other words, we cannot just ignore errors or crashes.
- We need to record classification results in a resilient data store.
- As we can’t control our incoming workload, we need to scale our classification as required – up to accommodate throughput, or down to control costs.
- We will monitor throughput, performance, and accuracy to allow us to scale our resource and in potentially detect statistical drift.

The overall application is outlined in the diagram above. We want to provide some resilience; For example, a failed categorisation due to a crashed process will be retried. At this stage we won’t provide a highly available database, or an event queue with automatic failover, but we may consider this when we move it to Kubernetes.
Let’s begin
We’ll hold our application under a single directory tree. Create the containers directory, and then beneath that, create four sub directories named postgres, python, rabbitmq and worker.
$ mkdir -p containers/postgres/ containers/python/ containers/rabbitmq/ containers/worker
$ tree containers

containers/
├── postgres
├── python
├── rabbitmq
└── worker
Create Your Persistent storage
Containers are designed to be disposable processes and stateless. We’ll need to ensure that whenever a container terminates, its state can be remembered. We’ll do that using Docker volumes for persistent storage. As our overall architecture diagram shows, we’ll need this for Postgres, RabbitMQ and to hold our images.
Create the docker volumes and then confirm they’re there.
$ docker volume create scalable-app_db_data         # for Postgres
scalable-app_db_data
$ docker volume create scalable-app_image_data      # to hold our images
scalable-app_image_data
$ docker volume create scalable-app_mq_data         # for Rabbit data
scalable-app_mq_data
$ docker volume create scalable-app_mq_log          # for Rabbit logs
scalable-app_mq_log
$ docker volume ls
DRIVER              VOLUME NAME
local               scalable-app_db_data
local               scalable-app_image_data
local               scalable-app_mq_data
local               scalable-app_mq_log
$
Load the Source Images
I’ve used a publicly available set of images for classification – the classic CIFAR data set. Data sets are often already post-processed to allow for easy inclusion into machine learning code. I found a source that has them in jpg form, which can be downloaded here.
We’ll first clone the CIFAR image repository, then load those images into a volume using a tiny alpine container and show that they have been copied to the persistent volume. We’ll also use this volume as part of the process to queue and categorise each image. Note that in the text below, you can refer to a running container by the prefix of its identity if it is unique. Hence ‘343’ below refers to the container with an ID uniquely beginning with ‘343’.
$ mkdir images
$ cd images
$ git clone https://github.com/YoongiKim/CIFAR-10-images.git
Cloning into 'CIFAR-10-images'...
remote: Enumerating objects: 60027, done.
remote: Counting objects: 100% (60027/60027), done.
remote: Compressing objects: 100% (37/37), done.
remote: Total 60027 (delta 59990), reused 60024 (delta 59990), pack-reused 0
Receiving objects: 100% (60027/60027), 19.94 MiB | 2.75 MiB/s, done.
Resolving deltas: 100% (59990/59990), done.
Checking out files: 100% (60001/60001), done.
$
$ docker run --rm -itd -v scalable-app_image_data:/images alpine
343b5e3ad95a272810e51ada368c1c6e070f83df1c974e88a583c17462941337
$
$ docker cp CIFAR-10-images 343:/images
$ docker exec -it 343 ls -lr /images/CIFAR-10-images/test/cat | head
total 4000
-rw-r--r--    1 501      dialout        954 Dec 22 12:50 0999.jpg
-rw-r--r--    1 501      dialout        956 Dec 22 12:50 0998.jpg
-rw-r--r--    1 501      dialout        915 Dec 22 12:50 0997.jpg
-rw-r--r--    1 501      dialout        902 Dec 22 12:50 0996.jpg
-rw-r--r--    1 501      dialout        938 Dec 22 12:50 0995.jpg
-rw-r--r--    1 501      dialout        957 Dec 22 12:50 0994.jpg
-rw-r--r--    1 501      dialout        981 Dec 22 12:50 0993.jpg
-rw-r--r--    1 501      dialout        889 Dec 22 12:50 0992.jpg
-rw-r--r--    1 501      dialout        906 Dec 22 12:50 0991.jpg
$ docker stop 343
343
The Queueing Service
We’ll process images by adding them to a queue and letting worker processes simply take them from the queue. This allows us to scale our workers and ensure some resilience around the requests. I’ve chosen RabbitMQ as it’s very easy to use and accessible from many programming languages.
To create the RabbitMQ service, create a Dockerfile in the containers/rabbitmq directory with the following:
FROM rabbitmq:3-management

EXPOSE 5672
EXPOSE 15672
Now go into that directory and build it:
$ docker build -t rabbitmq .
Sending build context to Docker daemon  14.85kB
Step 1/3 : FROM rabbitmq:3-management
3-management: Pulling from library/rabbitmq
.
.
.
Digest: sha256:e1ddebdb52d770a6d1f9265543965615c86c23f705f67c44f0cef34e5dc2ba70
Status: Downloaded newer image for rabbitmq:3-management
---> db695e07d0d7
Step 2/3 : EXPOSE 5672
---> Running in 44098f35535c
Removing intermediate container 44098f35535c
---> 7406a95c39b3
Step 3/3 : EXPOSE 15672
---> Running in 388bcbf65e3f
Removing intermediate container 388bcbf65e3f
---> db76ef2233d1
Successfully built db76ef2233d1
Successfully tagged rabbitmq:latest
$
Now start a container based on that image:
$ docker run -itd  -v "scalable-app_mq_log:/var/log/rabbitmq" -v "scalable-app_mq_data:/var/lib/rabbitmq" --name "rabbitmq" --hostname rabbitmq -p 15672:15672 -p 5672:5672 rabbitmq
f02ae9d41778968ebcd2420fe5cfd281d9b5df84f27bd52bd23e1735db828e18
$
If you open up a browser and go to localhost:15672, you should see the following:
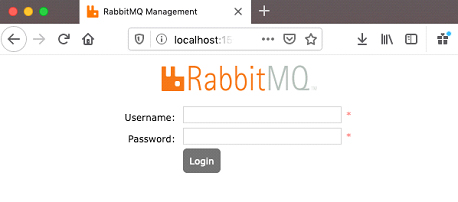
Log in with username guest and password guest, and you should see something like the following:
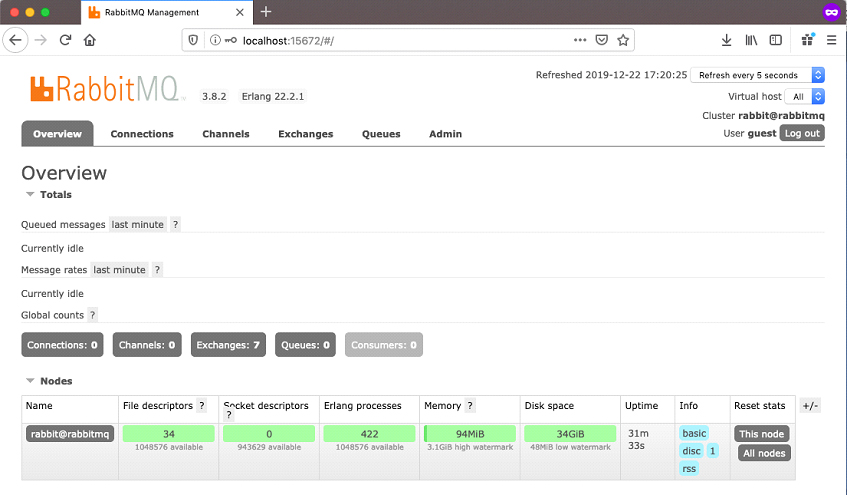
This will allow us to monitor queues.
Go to the containers/python directory and create a new file called fill_queue.py. The code below finds a list of all the images to be categorised and adds it to our queue.
I start at the mounted directory of images, and do a tree walk finding every image (ending in png, jpg, or jpeg). I use the location in the full path to define the expected category is (fNameToCategory), and build up an array of JSON payloads.
I then connect to the Rabbit Server. Note that in this case, that HOSTNAME is defined as your Docker host’s IP address – in this case, the Docker host’s ‘localhost’, because the python container has a different localhost than the RabbitMQ container.
I declare a new channel, and queue and publish each IMGS entry as a separate message.
There is a debugging print to show the number of images. If all goes well, you shouldn’t see this as it will scroll off the screen. Hopefully, you see thousands of messages showing progress.
#!/usr/bin/env python
import pika
import sys
import os
import json

ROOT="/images"
rLen = len(ROOT)
classes = ('airplane', 'automobile', 'bird', 'cat', 'deer', 'dog', 'frog', 'horse', 'ship', 'truck')
HOSTNAME="<Enter your Docker host’s IP address>"

# Determine the expected category by parsing the directory (after the root path)
def fnameToCategory(fname):
    for c in classes:
        if (fname.find(c) > rLen):
            return (classes.index(c))
    return -1 # This should never happen

IMGS=[]
for root, dirs, files in os.walk(ROOT):
    for filename in files:
        if filename.endswith(('.png', '.jpg', '.jpeg')):
            fullpath=os.path.join(root, filename)
            cat = fnameToCategory(fullpath)
            data = {
                "image" : fullpath,
                "category": cat,
                "catName": classes[cat]
            }
            message = json.dumps(data)
            IMGS.append(message)

connection = pika.BlockingConnection(pika.ConnectionParameters(host=HOSTNAME))
channel = connection.channel()

channel.queue_declare(queue='image_queue', durable=True)

print("Number of Images = ", len(IMGS))

for i in IMGS:
    channel.basic_publish( exchange='', routing_key='image_queue', body=i,
        properties=pika.BasicProperties( delivery_mode=2,  )
    )
    print("Queued ", i)

connection.close()
In the same containers/python directory, create a Dockerfile for your python engine:
FROM python:3.7-alpine

# Add core OS requirements
RUN apk update && apk add bash vim

# Add Python Libraries
RUN pip install pika

ADD  fill_queue.py /
Now build the Docker image:
$ docker build -t python .
Sending build context to Docker daemon   27.8MB
Step 1/4 : FROM python:3.7-alpine
---> 459651397c21
Step 2/4 : RUN apk update && apk add bash vim
---> Running in dc363417cf12
.
.
.
Successfully installed pika-1.1.0
Removing intermediate container b40f1782f0c1
---> 35891fccb860
Step 4/4 : ADD  fill_queue.py /
---> 17cd19050b21
Successfully built 17cd19050b21
Successfully tagged python:latest
$
Now, run the container, mounting the volume containing our images and executing our script:
$ docker run --rm -v scalable-app_image_data:/images  -it python python /fill_queue.py

Number of Images =  60000
Queued  {"image": "/images/CIFAR-10-images/test/dog/0754.jpg", "category": 5, "catName": "dog"}
Queued  {"image": "/images/CIFAR-10-images/test/dog/0985.jpg", "category": 5, "catName": "dog"}
.
.
.
.
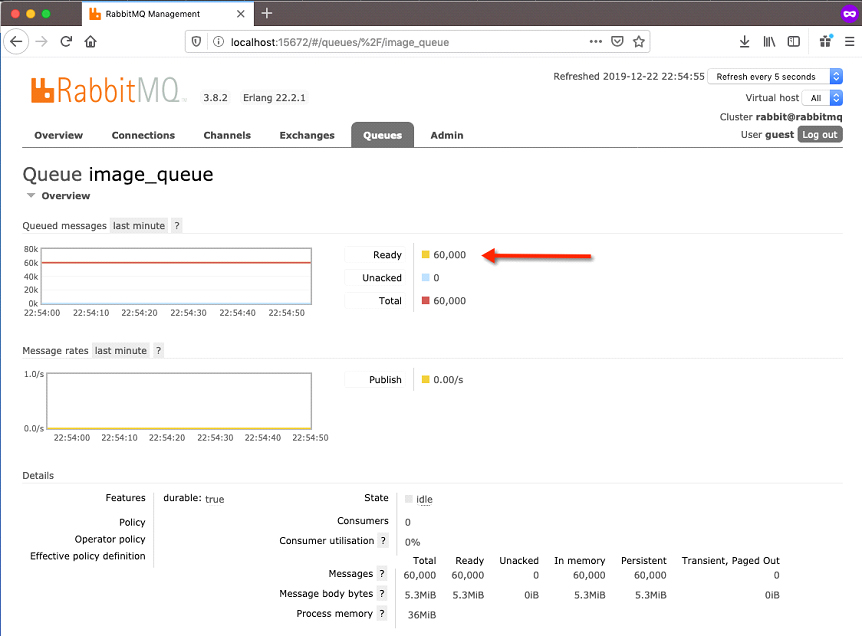
While this is running, you should see the queued messages increase until it reaches 60,000.
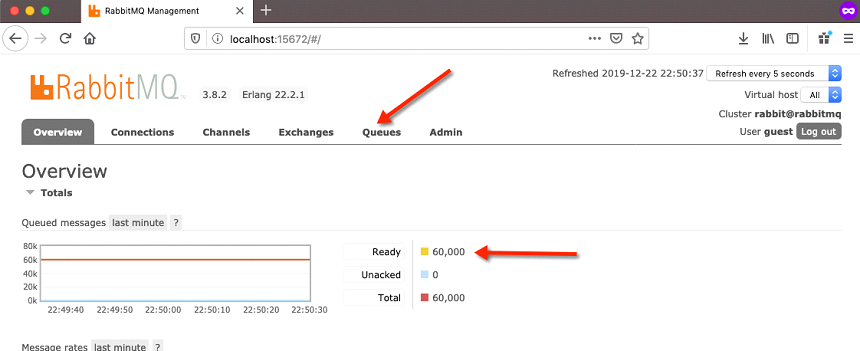
Now click on the ‘Queues’ link in the RabbitMQ management console, and you will see that those messages are now in the ‘image_queue‘ queue waiting to be requested.
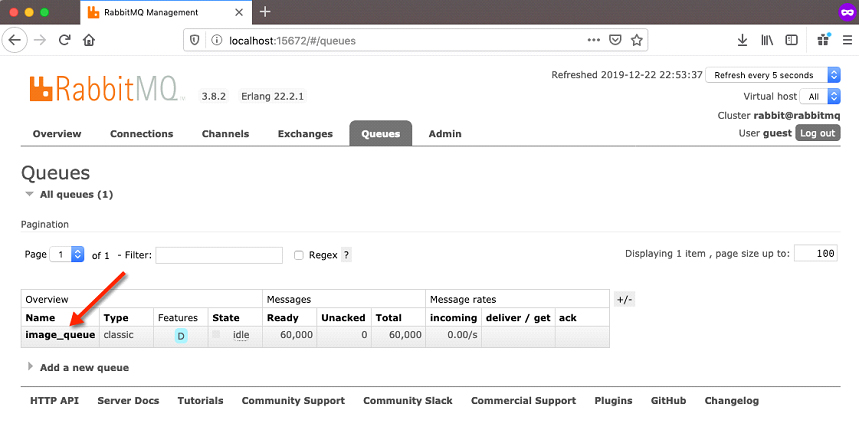
If you now click on the image_queue link, you’ll get a more detailed view of activity within that queue.
Providing a Database Store
Now provision the database environment, which will simply record categorisation results.
In the containers/postgres directory, create a Dockerfile containing the following:
FROM postgres:11.5

COPY pg-setup.sql /docker-entrypoint-initdb.d/

EXPOSE 5432

CMD ["postgres"]
In the same directory, create a file called pg-setup.sql containing the following:
CREATE TABLE CATEGORY_RESULTS (
    FNAME         VARCHAR(1024) NOT NULL,
    CATEGORY      NUMERIC(2) NOT NULL,
    PREDICTION    NUMERIC(2) NOT NULL,
    CONFIDENCE    REAL);
And build the Postgres container image:
$ docker build -t postgres .
Sending build context to Docker daemon  4.096kB
Step 1/4 : FROM postgres:11.5
---> 5f1485c70c9a
Step 2/4 : COPY pg-setup.sql /docker-entrypoint-initdb.d/
---> e84511216121
.
.
.
Removing intermediate container d600e2f45564
---> 128ad35a028b
Successfully built 128ad35a028b
Successfully tagged postgres:latest
$
Start the Postgres service. Note that here we’re mounting a docker volume to hold the persistent data when the container terminates.
$ docker run --name postgres --rm -v scalable-app_db_data:/var/lib/postgresql/data -p 5432:5432 -e POSTGRES_PASSWORD=password -d postgres
dfc9bbffd83de9bca35c54ed0d3f4afd47c0d03f351c87988f827da15385b4e6
$
If you now connect to the database, you should see that a table has been created for you. This will contain our categorisation results. Note, the password in this case is ‘password’ as we specified in the POSTGRES_PASSWORD environment variable when starting the container.
$ psql -h localhost -p 5432 -U postgres
Password for user postgres:
psql (11.5)
Type "help" for help.

postgres=# \d
            List of relations
 Schema |       Name       | Type  |  Owner
--------+------------------+-------+----------
 public | category_results | table | postgres
(1 row)

postgres=# \d category_results
                Table "public.category_results"
   Column   |          Type           | Collation | Nullable | Default
------------+-------------------------+-----------+----------+---------
 fname      | character varying(1024) |           | not null |
 category   | numeric(2,0)            |           | not null |
 prediction | numeric(2,0)            |           | not null |
 confidence | real                    |           |          |
The Classification Process
The final function will request something off the queue, classify it, and record a result. This is the worker process and uses a pretrained CIFAR model from Gluon together with our pika library that we used to add to the RabbitMQ queue. One design principle for this application is that we should be able to scale up the number of classifiers to support demand. This is possible because the queue is accessible by many workers simultaneously. The workers request messages in a round-robin fashion, meaning that the process can be parallelised to increase throughput.
In your containers/worker directory, create the following Dockerfile:
FROM ubuntu

RUN apt-get update
RUN apt-get install -y python3 python3-pip

RUN pip3 install --upgrade mxnet gluoncv pika
RUN pip3 install psycopg2-binary

# Add worker logic necessary to process queue items
ADD  worker.py /

# Start the worker
CMD ["python3", "./worker.py" ]
Also create a file called worker.py with the following content:
#!/usr/bin/env python

from mxnet import gluon, nd, image
from mxnet.gluon.data.vision import transforms
from gluoncv import utils
from gluoncv.model_zoo import get_model
import psycopg2
import pika
import time
import json

def predictCategory(fname):
    img = image.imread(fname)

    class_names = ['airplane', 'automobile', 'bird', 'cat', 'deer', 'dog', 'frog', 'horse', 'ship', 'truck']

    transform_fn = transforms.Compose([
        transforms.Resize(32), transforms.CenterCrop(32), transforms.ToTensor(),
        transforms.Normalize([0.4914, 0.4822, 0.4465], [0.2023, 0.1994, 0.2010])
    ])
    img = transform_fn(img)
    net = get_model('cifar_resnet110_v1', classes=10, pretrained=True)

    pred = net(img.expand_dims(axis=0))
    ind = nd.argmax(pred, axis=1).astype('int')
    print('The input picture is classified as [%s], with probability %.3f.'%
        (class_names[ind.asscalar()], nd.softmax(pred)[0][ind].asscalar()))
    return ind.asscalar(), nd.softmax(pred)[0][ind].asscalar()

def InsertResult(connection, fname, category, prediction, prob):
    count=0
    try:
        cursor = connection.cursor()

        qry = """ INSERT INTO CATEGORY_RESULTS (FNAME, CATEGORY, PREDICTION, CONFIDENCE) VALUES (%s,%s,%s,%s)"""
        record = (fname, category, prediction, prob)
        cursor.execute(qry, record)

        connection.commit()
        count = cursor.rowcount

    except (Exception, psycopg2.Error) as error :
        if(connection):
            print("Failed to insert record into category_results table", error)

    finally:
        cursor.close()
        return count

#
# Routine to pull message from queue, call classifier, and insert result to the DB
#
def callback(ch, method, properties, body):
    data = json.loads(body)
    fname = data['image']
    cat = data['category']
    print("Processing", fname)
    pred, prob = predictCategory(fname)
    if (logToDB == 1):
        count = InsertResult(pgconn, fname, int(cat), int(pred), float(prob))
    else:
        count = 1  # Ensure the message is ack'd and removed from queue

    if (count > 0):
        ch.basic_ack(delivery_tag=method.delivery_tag)
    else:
        ch.basic_nack(delivery_tag=method.delivery_tag)

logToDB=1    # Set this to 0 to disable storing data in the database

pgconn = psycopg2.connect(user="postgres", password="password",
                host="<Your host IP>", port="5432", database="postgres")

connection = pika.BlockingConnection(pika.ConnectionParameters(host=’<Your host IP>’))
channel = connection.channel()

channel.queue_declare(queue='image_queue', durable=True)
print(' [*] Waiting for messages. To exit press CTRL+C')

channel.basic_qos(prefetch_count=1)
channel.basic_consume(queue='image_queue', on_message_callback=callback)

channel.start_consuming()
Let’s pick this apart a little. After importing the required libraries, I define a function predictCategory that takes as an argument, a filename identifying an image to classify. This then uses a pretrained model from the gluon library, and returns a classification, and a classification confidence.
The next function InsertResult writes a single record into the database containing the path of the image being processed, the category it should have been, what category it was predicted to be, and a prediction confidence.
The final function is a callback function that pulls these together. It deconstructs the message’s JSON payload, calls the function to categorise the image, and then calls the function recording the result. If there are no functional errors, then we’ll acknowledge (basic_ack) receipt of the message and it will be removed from the queue. If there are functional errors, then we’ll do a basic_nack, and place the message back on the queue. If there is another worker available, then it can take it, or we can retry it later. This ensures that if a worker process dies or is interrupted for some reason, that everything in the queue can eventually be processed.
There is also a variable logToDB, which you can set to 0 or 1 to disable or enable logging to the database. It might be useful to see whether the database is a significant bottleneck by testing performance with and without logging.
I create a connection to the database, a connection to RabbitMQ using the host’s IP address, and a channel using the image_queue queue. Once again, be aware that the hosts IP address will reroute any message requests to the underlying container hosting our RabbitMQ service.
I then wait on messages to appear forever, processing queue items one by one.
$ docker build -t worker .
Sending build context to Docker daemon  5.632kB
Step 1/6 : FROM ubuntu
---> 94e814e2efa8
Step 2/6 : RUN apt-get update
---> Running in 3cbb2343f94f
.
.
.
Step 6/6 : ADD  worker.py /
---> bc96312e6352
Successfully built bc96312e6352
Successfully tagged worker:latest
$
We can start a worker to begin the process of categorising our images.
$ docker run --rm -itd -v scalable-app_image_data:/images worker
061acbfcf1fb4bdf43b90dd9b77c2aca67c4e1d012777f308c5f89aecad6aa00
$
$ Docker logs 061a
[*] Waiting for messages. To exit press CTRL+C
Processing /images/CIFAR-10-images/test/dog/0573.jpg
Model file is not found. Downloading.
Downloading /root/.mxnet/models/cifar_resnet110_v1-a0e1f860.zip from https://apache-mxnet.s3-accelerate.dualstack.amazonaws.com/gluon/models/cifar_resnet110_v1-a0e1f860.zip...
6336KB [00:04, 1374.69KB/s]
The input picture is classified as [dog], with probability 0.998.
Processing /images/CIFAR-10-images/test/dog/0057.jpg
The input picture is classified as [dog], with probability 0.996.
Processing /images/CIFAR-10-images/test/dog/0443.jpg
The input picture is classified as [deer], with probability 0.953.
.
.
Clearly, it’s not great practice to use a training set as part of a testing process. However, we’re not measuring model effectiveness and accuracy here. We’re simply seeking to understand how to categorise many thousands of images with a scalable approach, so actually any images will do no matter where they came from. The first thing the worker does is download a pretrained model. There’s no need to train it. In your own environment, you may consider doing something similar by using the latest stable model to support the data being tested. It then takes an item from the queue, categorises it, removes it from the queue, and progresses to the next item.
If we now query the database, it’s clear that the worker has been busy:
$ psql -h localhost -p 5432 -U postgres
Password for user postgres:
psql (11.5)
Type "help" for help.

postgres=# select * from category_results ;
                   fname                   | category | prediction | confidence
-------------------------------------------+----------+------------+------------
 /images/CIFAR-10-images/test/dog/0826.jpg |        5 |          5 |   0.999194
 /images/CIFAR-10-images/test/dog/0333.jpg |        5 |          5 |   0.992484
.
.
.
Let’s look at the queue itself:
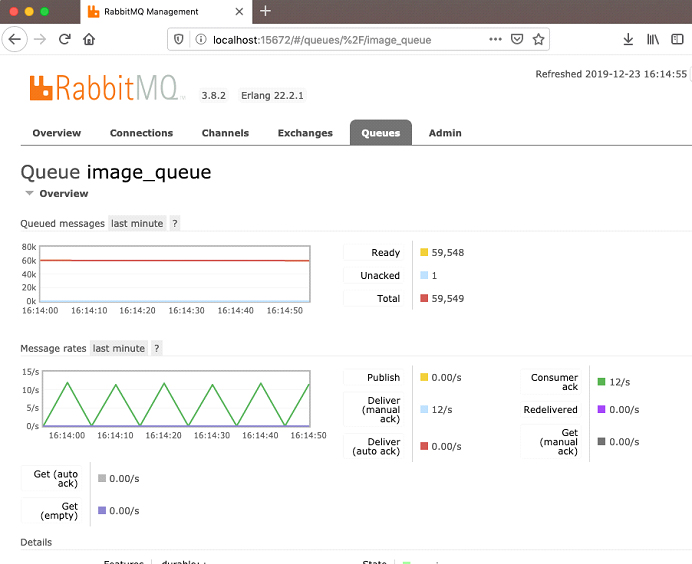
As you can see, there is a processing rate of 12 requests per second. Let’s kick off a couple more workers:
$ for w in 1 2 ; do docker run --rm -itd -v scalable-app_image_data:/images worker; done
ee1732dd3d4a1abcd8ab356262603d8a24523dca237ea1102c3a953c86a221bf
a26c14a28b5605345ed6d09cd4d21d2478d34a8ce22668d0aac37a227af21c3e
$
Look at the queue again:
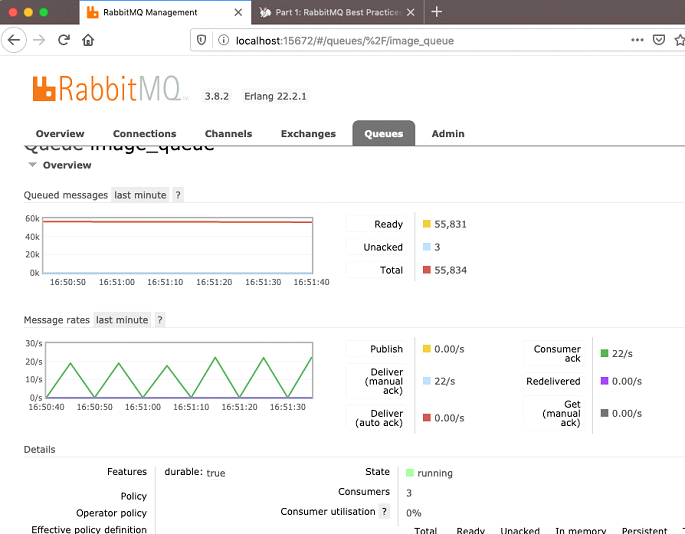
And now the ack rate has increased to 22 per second. You might at this point be thinking that increasing containers here is the next logical step. However, you shouldn’t expect linear scalability. RabbitMQ has its own bottlenecks, as does the database and the python code. There are many public resources that discuss improving RabbitMQ performance including the use of prefetch counts clustering, reduced queue size, multiple queues, or using CPU affinity. For that matter, changing the code to use threads, parallelise certain functions, or even removing the durable flag are also likely to help. This article isn’t going to focus on any of those, so I’ll leave it to you to do your own research on what works for your code and scenarios. One other thing you might like to try at some point is to use RabbitMQ clusters with an HA-Proxy load balancer, which may improve your performance. A non-Docker example can be found here.
In any case, let’s convert what we have into a multi-container application using docker-compose. We can then use that as the basis for a Kubernetes environment.
$ tree containers

containers/
├── postgres
│   ├── Dockerfile
│   ├── pg-setup.sql
├── python
│   ├── Dockerfile
│   ├── fill_queue.py
├── rabbitmq
│   └── Dockerfile
└── worker
    ├── Dockerfile
    └── worker.py
We can convert all the work done so far into fewer steps with docker-compose and a couple of scripts. In the directory holding the containers directory, create a new file called docker-compose.yml:
version: '3'

services:
    sa_postgres:
        build: containers/postgres
        ports:
            - "5432:5432"
        volumes:
            - scalable-app_db_data:/var/lib/postgresql/data
        environment:
            - POSTGRES_PASSWORD=password

    sa_rabbitmq:
        build: containers/rabbitmq
        hostname: rabbitmq
        ports:
            - 5672:5672
            - 15672:15672
        volumes:
            - scalable-app_mq_log:/var/log/rabbitmq
            - scalable-app_mq_data:/var/lib/rabbitmq

    sa_worker:
        build: containers/worker
        depends_on:
            - sa_postgres
            - sa_rabbitmq
        volumes:
            - scalable-app_image_data:/images
        restart: always
# number of containers?

volumes:
    scalable-app_db_data:
    scalable-app_image_data:
    scalable-app_mq_data:
    scalable-app_mq_log:
Now Build the composite application:
$ docker-compose build
Building sa_postgres
Step 1/4 : FROM postgres:11.5
---> 5f1485c70c9a
Step 2/4 : COPY pg-setup.sql /docker-entrypoint-initdb.d/
---> 2e57fe31a9ab
Step 3/4 : EXPOSE 5432
---> Running in 6f02f7f92a19
Removing intermediate container 6f02f7f92a19
.
.
.
Before you start the composite application, make sure you do a ‘docker ps -a’ to see the currently running containers and stop/remove them. When that’s done, start the application and specify how many worker containers you want to service the queue.
$ docker-compose up -d --scale sa_worker=2
Creating network "scalable-app_default" with the default driver
Creating volume "scalable-app_scalable-app_db_data" with default driver
Creating volume "scalable-app_scalable-app_image_data" with default driver
Creating volume "scalable-app_scalable-app_mq_data" with default driver
Creating volume "scalable-app_scalable-app_mq_log" with default driver
Creating scalable-app_sa_python_1   ... done
Creating scalable-app_sa_postgres_1 ... done
Creating scalable-app_sa_rabbitmq_1 ... done
Creating scalable-app_sa_worker_1   ... done
Creating scalable-app_sa_worker_2   ... done
.
.
There are a couple of things to note here. First, there is now a network shared between all containers, so we won’t have to refer to our host network within the code. We can now change our hostnames to refer to our other containers. Secondly, when we start and stop our application, everything is brought up together, or if needed, in an order to support dependencies. Lastly, the constituent volumes and images are created with names that are prefixed by the application name, which helps identify how they’re used, and helping remove conflict with other resources.
Let’s bring the service down and make those changes.
$ docker-compose down
Stopping scalable-app_sa_worker_2   ... done
Stopping scalable-app_sa_worker_1   ... done
Stopping scalable-app_sa_rabbitmq_1 ... done
Stopping scalable-app_sa_postgres_1 ... done
Removing scalable-app_sa_worker_2   ... done
Removing scalable-app_sa_worker_1   ... done
Removing scalable-app_sa_rabbitmq_1 ... done
Removing scalable-app_sa_postgres_1 ... done
Removing scalable-app_sa_python_1   ... done
Removing network scalable-app_default
(base) JLIEM-SB2:containers jon$
In the containers/worker/worker.py file, make the following changes to your host identifiers:
.
.
logToDB=1    # Set this to 0 to disable storing data in the database

pgconn = psycopg2.connect(user="postgres", password="password",
                          host="sa_postgres", port="5432", database="postgres")

connection = pika.BlockingConnection(pika.ConnectionParameters(host='sa_rabbitmq'))
channel = connection.channel()
.
.
In your containers/python/fill_queue.py file, change your hostname:
HOSTNAME="sa_rabbitmq"
And restart again:
$ docker-compose up -d --scale sa_worker=2
Creating network "scalable-app_default" with the default driver
Creating volume "scalable-app_scalable-app_db_data" with default driver
Creating volume "scalable-app_scalable-app_image_data" with default driver
Creating volume "scalable-app_scalable-app_mq_data" with default driver
Creating volume "scalable-app_scalable-app_mq_log" with default driver
Creating scalable-app_sa_python_1   ... done
Creating scalable-app_sa_postgres_1 ... done
Creating scalable-app_sa_rabbitmq_1 ... done
Creating scalable-app_sa_worker_1   ... done
Creating scalable-app_sa_worker_2   ... done
.
.
You can now populate the message queue with images to process. The following script mounts the image volume on a temporary container, copies the images to the volume, and then starts a process to populate the queue.
# clone the CIFAR images, if they're not already there
if [ ! -d "CIFAR-10-images" ]; then
    git clone https://github.com/YoongiKim/CIFAR-10-images.git
fi

# Start a small container to hold the images
CID=$(docker run --rm -itd -v scalable-app_scalable-app_image_data:/images alpine)
echo "Copying content to container $CID:/images"

# Copy the content
docker cp CIFAR-10-images $CID:/images
docker stop $CID

docker run --rm -v scalable-app_scalable-app_image_data:/images  -it python python /fill_queue.py
And as expected, we can see that the queue is both being populated and being processed by the worker nodes that are sitting in the background.

Conclusions
This post outlined how to containerise a multi-component application reflecting a typical data science classification process. It ingests images and provides a scalable mechanism for classifying them and recording the results. As mentioned, the focus here is not on good data science practice, or good containerisation practice but to reflect on options available to support learning around containerisation with a data science frame of reference.
This post will be used as a foundation for the next part in this series, which will be to convert it to use Kubernetes and PaaS services.
About the author
 Jon is a Microsoft Cloud Solution Architect specialising in Advanced Analytics & Artificial Intelligence with over 30 years of experience in understanding, translating and delivering leading technology to the market. He currently focuses on a small number of global accounts helping align AI and Machine Learning capabilities with strategic initiatives. He moved to Microsoft from IBM where he was Cloud & Cognitive Technical Leader and an Executive IT Specialist.
Jon has been the Royal Academy of Engineering Visiting Professor for Artificial Intelligence and Cloud Innovation at Surrey University since 2016, where he lectures on various topics from machine learning, and design thinking to architectural thinking.