Building Scalable Data Science Applications using Containers – Part 6
Welcome to the sixth part of this blog series around using containers for Data Science. In parts one, two, three, four, and five, we provided a number of building blocks that we’ll use here. If this is the first blog you’ve seen, it may be worth skimming the first five parts, or going back and progressing through them. We make a number of assumptions about your familiarity with Docker, storage, and multi-container applications, which were covered previously.
In this article we convert the previous docker-compose application (part five) to one that capitalises on a Kubernetes approach – scalability, resilience, predefined configuration packages with Helm etc.
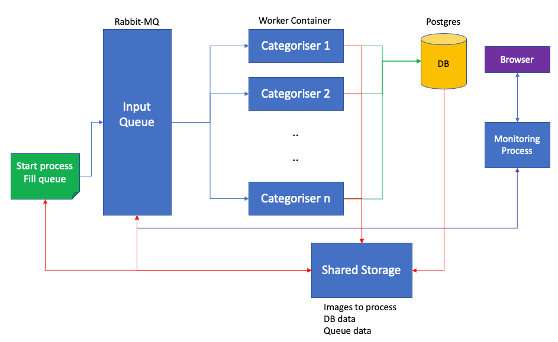
Reviewing the previous Docker approach’s structure, almost everything sits in a container mounting shared storage.
Kubernetes brings a different dimension to how you might consider a solution, and our approach builds on this. In this article, we won’t stretch the bounds of what Kubernetes can do, but we will show how to take an existing containers-based application, and slowly migrate that capability to cloud services with Kubernetes used as an orchestration engine.
This is the revised architecture.
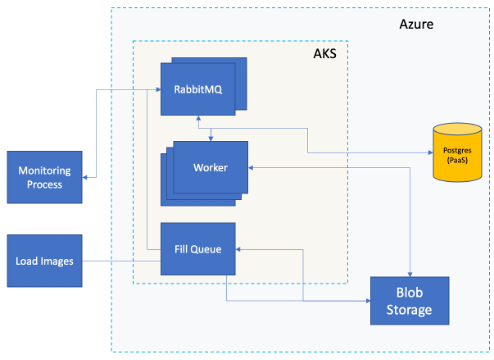
Things to note about this:
- The processing capability sits in Kubernetes, so you can scale out and up as needed.
- This is a very simple scenario, so we won’t need capabilities such as load balancers, private networking, GPUs or sophisticated security approaches.
- We replaced the database container with a Postgres PaaS service. This allows us to take advantage of default scaling and resiliency patterns built into Azure.
- We use Blob storage instead of container volumes. For a Docker Compose application, or local container approach, volumes make sense. However, blob storage is performant, resilient, flexible in terms of security patterns, and we can share that resource across multiple components.
We won’t use hard-coded passwords and host names etc within our source as we did in the previous instalment, but we will use configurable variables. This is still less secure than it could be as environment variable values are still visible within Kubernetes configuration files. A more secure approach might use Azure Key Vault and say CSI Secrets. However, we want to minimise the length of this blog rather than be distracted by container security. The CSI Secrets link should clarify how to apply this yourself if you need.
For the purposes of this blog, we assume that:
- You have the Azure CLI installed in your environment.
- You have the Kubernetes CLI installed in your environment.
- You have Helm installed in your environment.
- You have azcopy installed in your environment.
Let’s Begin
All the code for this tutorial can be downloaded here.
We’ll hold our application under a single directory tree. Create the aks directory, and then beneath that, create sub-directories called containers/iload, and containers/worker.
As with the previous instalment, we will use the same classic CIFAR images set for our testing. There is a GitHub source that has them in jpg form, which can be downloaded here.
Go into your aks directory and clone the repo. You should see something like the following:
$ cd aks

$ git clone https://github.com/YoongiKim/CIFAR-10-images.git
Cloning into 'CIFAR-10-images'...
remote: Enumerating objects: 60027, done.
remote: Total 60027 (delta 0), reused 0 (delta 0), pack-reused 60027
Receiving objects: 100% (60027/60027), 19.94 MiB | 16.28 MiB/s, done.
Resolving deltas: 100% (59990/59990), done.
Updating files: 100% (60001/60001), done.

$ tree -L 1 .
aks
├── CIFAR-10-images
└── containers

2 directories
Blob Storage and your image
Previous, we used container volumes. In this case, we’ll use blob storage and all containers will reference the same content. Copy the script below into a file called initialprep.sh. Modify the first three lines to refer to the names of an Azure Resource Group, Storage Account, and Blob Container. It will create those resources and upload all the CIFAR images to the Storage Container. If you already have a resource group, storage Account and Storage Container, feel free to remove the lines that do the create.
RGNAME=”rg-cifar”
STG=”cifarimages”
CON=”cifarstorage”
EXPIRES=$(date --date='1 days' "+%Y-%m-%d")
IMAGEDIR=”CIFAR-10-images”

# Create environment
az group create -l uksouth -n $RGNAME
az storage account create --name $STG --resource-group $RGNAME --location uksouth --sku Standard_ZRS # Create Storage Account
az storage container create --account-name $STG --name $CON --auth-mode login # Create your storage container

ACCOUNTKEY=$(az storage account keys list --resource-group $RGNAME --account-name $STG | grep -i value | head -1 | cut -d':' -f2 | tr -d [\ \"])

# Generate a temporary SAS key
SAS=$(az storage container generate-sas --account-key $ACCOUNTKEY --account-name $STG --expiry $EXPIRES --name $CON --permissions acldrw | tr -d [\"])

# Determine your URL endpoint
STGURL=$(az storage account show --name $STG --query primaryEndpoints.blob | tr -d [\"])
CONURL="$STGURL$CON"

# Copy the files to your storage container
azcopy cp "$IMAGEDIR" "$CONURL?$SAS" –recursive
When we run this, you should see the resource creation followed by the upload to the repository.
$ initialprep.sh
{
    "id": "/subscriptions/f14bca45-bd2d-42f2-8a45-1248ab77ba72/resourceGroups/rg-cifar2",
    "location": "uksouth",
    "managedBy": null,
    "name": "rg-cifar2",
    "properties": {
        "provis

Job 8b0ccc36-2050-0a44-496e-c09d979f3169 summary
Elapsed Time (Minutes): 0.8001
Number of File Transfers: 60025
Number of Folder Property Transfers: 0
Total Number of Transfers: 60025
Number of Transfers Completed: 60025
Number of Transfers Failed: 0
Number of Transfers Skipped: 0
TotalBytesTransferred: 83127418
Final Job Status: Completed
Database Storage
The previous container-only approach used a Postgres container to record results. Azure provides resilient, scalable services, which are easily configurable, so there’s no need to build our own. Let’s provision one of those services and refer to it later.
Below you can see how to list available Postgres SKU types, where the format is (Model_Generation_Cores), so a Basic single core Gen 5 server would be “B_Gen5_1”.
$ az postgres server list-skus -l uksouth | grep -i id

    "id": "Basic",
        "id": "B_Gen5_1",
        "id": "B_Gen5_2",
    "id": "GeneralPurpose",
        "id": "GP_Gen5_2",
        "id": "GP_Gen5_4",
        "id": "GP_Gen5_8",
        "id": "GP_Gen5_16",
        "id": "GP_Gen5_32",
        "id": "GP_Gen5_64",
    "id": "MemoryOptimized",
        "id": "MO_Gen5_2",
        "id": "MO_Gen5_4",
        "id": "MO_Gen5_8",
        "id": "MO_Gen5_16",
        "id": "MO_Gen5_32",
Choose the smallest server available. We’ll allocate a basic single core server with 50GB of storage. At the time of writing, this cost around £25/month but we could also have chosen much less expensive SQL-DB server for around £5/month with 2GB of storage, but we’d need to change your SQL slightly. We’ve changed as little as necessary from our previous instalment of this blog, but feel free to make your own optimisations.
Here you can see that I’m provisioning a database called cifardb with an administrator name of ‘jon’ and a password of ‘P@ssw0rd123’, It also returns the fully qualified domain name of the server (cifardb.postgres.database.azure.com).
By default, Postgres denies access to all services. You can define private networks to ensure very granular access within and from outside Azure. In this case, we’ll provide default access to any Azure service (e.g. Kubernetes). Note, that this does not provide access to any external public endpoint.
$ az postgres server create --resource-group rg-cifar --name cifardb --location uksouth --admin-user jon --admin-password "P@ssw0rd123" --sku-name B_Gen5_1 --storage-size 51200
Checking the existence of the resource group 'rg-cifar'...
{
.
.
    "administratorLogin": "jon",
    "password": "P@ssw0rd123",
.
    "fullyQualifiedDomainName": "cifardb.postgres.database.azure.com",
.
}
$

# Allow Azure services (e.g. Kubernetes) to access this
$ az postgres server firewall-rule create --resource-group rg-cifar --server-name cifardb --name "AllowAllLinuxAzureIps" --start-ip-address "0.0.0.0" --end-ip-address "0.0.0.0"

{
    "endIpAddress": "0.0.0.0",
.
    "startIpAddress": "0.0.0.0",
    "type": "Microsoft.DBforPostgreSQL/servers/firewallRules"
}
The Kubernetes Cluster
We’re now at the stage where the components to be added are containers. Where we previously used Docker, we’ll now run them on a Kubernetes cluster. The purpose of this article is not to focus on everything Kubernetes. Rather, give a simple example of running Data Science services on Azure Kubernetes.
There are many publicly available guides to understanding the fundamentals of Kubernetes, as well as the Azure approach to implementing it. Microsoft has a set of modules that will introduce you to many of the concepts here.
Create a file called aks.sh containing the following, and place this within the aks directory. Replace the Resource Group, AKS Server Name and Azure Container Repository names with your choices.
RGNAME=rg-cifar
AKSNAME=cifarcluster
ACRNAME=jmcifaracr

# Create an AKS cluster with default settings
az aks create -g $RGNAME -n $AKSNAME --kubernetes-version 1.19.11

# Create an Azure Container Registry
az acr create --resource-group $RGNAME --name $ACRNAME --sku Basic

# Attach the ACR to the AKS cluster
az aks update -n $AKSNAME -g $RGNAME --attach-acr $ACRNAME
What this does is create a Kubernetes cluster and a Container Registry and then gives the cluster permission to pull images from the registry. Execute that script.
$ aks.sh
{
.
    "kubernetesVersion": "1.19.11",
.
    "networkProfile": {
        "dnsServiceIp": "10.0.0.10",
.
}
Now we’ll let our local Kubernetes CLI environment (e.g. laptop / desktop) connect to our Azure Kubernetes cluster and confirm that we can see services running.
$ az aks get-credentials --name cifarcluster --resource-group rg-cifar

$ kubectl get services -A

NAMESPACE   NAME                           TYPE        CLUSTER-IP    EXTERNAL-IP PORT(S)       AGE
default     kubernetes                     ClusterIP   10.0.0.1      <none>      443/TCP       27d
kube-system healthmodel-replicaset-service ClusterIP   10.0.243.143  <none>      25227/TCP     27d
kube-system kube-dns                       ClusterIP   10.0.0.10     <none>      53/UDP,53/TCP 27d
kube-system metrics-server                 ClusterIP   10.0.133.242  <none>      443/TCP       27d
This shows the cluster running and that we can control it from our local environment.
Sense Check
Let’s confirm where we are in the overall process.
- We created an Azure environment to run our application.
- We allocated some Azure storage and uploaded 60,000 images.
- We created an Azure (Postgres) database.
- We set up a Kubernetes environment to run our application.
The final part is to add the application. The key thing to consider with this new approach is that where previously we built all the services, a cloud platform allows us to take advantage of commodity capabilities that are already designed to be scalable and resilient. Looking at the diagram of the cloud version of this application, there are three components outstanding, and each of these uses containers.
- The RabbitMQ service to queue requests.
- A process to add new image requests to the queue.
- A process to take a request off the queue, categorise it and record the result.
The Queue Process
The next component in our solution is the queueing mechanism. Previously, we built a RabbitMQ container to manage our requests. We’ll do the same here, but not with a Dockerfile. We could, but let’s show you an alternative approach using Helm. Helm is a Kubernetes package manager that allows you to install and configure applications very easily. We could achieve the same by building our own container, but Helm makes the process trivial, and there are many ready-made applications available. The documentation for installing RabbitMQ using Helm can be found here, but the two lines below are all I needed to get RabbitMQ installed and running in my environment.
$ helm repo add bitnami https://charts.bitnami.com/bitnami
$ helm install rabbitmq bitnami/rabbitmq

.
.
Credentials:
    echo "Username : user"
    echo "Password : $(kubectl get secret --namespace default rabbitmq -o jsonpath="{.data.rabbitmq-password}" | base64 --decode)"
    echo "ErLang Cookie : $(kubectl get secret --namespace default rabbitmq -o jsonpath="{.data.rabbitmq-erlang-cookie}" | base64 --decode)"
.
.
.
To Access the RabbitMQ AMQP port:
    echo "URL : amqp://127.0.0.1:5672/"
    kubectl port-forward --namespace default svc/rabbitmq 5672:5672
To Access the RabbitMQ Management interface:
    echo "URL : http://127.0.0.1:15672/"
    kubectl port-forward --namespace default svc/rabbitmq 15672:15672
There is some interesting information to note here:
- You can delete the same deployment using ‘helm delete rabbitmq’
- It provided you with a means of finding out default credentials if you didn’t provide them as part of the initial configuration.
- The ‘port forward’ command shown here allows you to access the RabbitMQ service contained in your Azure container, from your local browser, and a local IP address. You will see later that there is actually no external IP exposed in this environment. This elegantly provides you with a means of interacting with your service.
$ echo "Username : user"
Username : user
$ echo "Password : $(kubectl get secret --namespace default rabbitmq -o jsonpath="{.data.rabbitmq-password}" | base64 --decode)"
Password : 7TrP8KOVdC
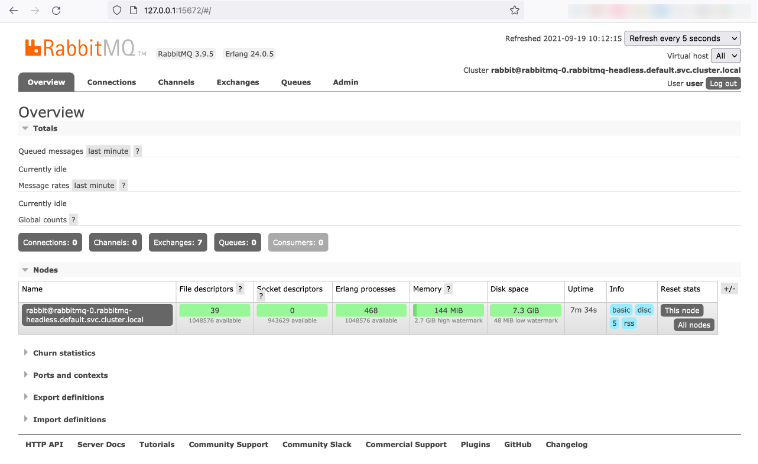
We’ll need these credentials in a minute. In the meantime, let’s see what was deployed in our environment:
$ kubectl get services
NAME                TYPE        CLUSTER-IP     EXTERNAL-IP PORT(S)                     AGE
kubernetes          ClusterIP   10.0.0.1       443/TCP                                 27d
rabbitmq            ClusterIP   10.0.180.137   5672/TCP,4369/TCP,25672/TCP,15672/TCP   15m
rabbitmq-headless   ClusterIP   None           4369/TCP,5672/TCP,25672/TCP,15672/TCP   15m

$ kubectl get pods
NAME         READY   STATUS    RESTARTS   AGE
rabbitmq-0   1/1     Running   0          16m
As there is no external IP address, use the port forward command and let’s interact with RabbitMQ.
$ kubectl port-forward --namespace default svc/rabbitmq 15672:15672 &
[1] 88032
Forwarding from 127.0.0.1:15672 -> 15672
Forwarding from [::1]:15672 -> 15672
If we now add the credentials extracted earlier, we can see our running RabbitMQ environment.
The Initial Load
This process performs two functions. First, it connects to our Postgres environment and creates the CATEGORY_RESULTS table if it doesn’t already exist, and then it queues all the images that were uploaded to the storage account earlier so they can be classified. In this example we’re running this as a one-off, but you could also take a more sophisticated approach using a location argument for daily, or ad-hoc batches of images.
Go into the containers/iload directory and create a file called iload.py containing the following:
#!/usr/bin/env python
import sys, os, json, pika
import psycopg2
from azure.storage.blob import ContainerClient

# Get Environment Vars
RMQ_USER=os.environ["RMQ_USER"] # RabbitMQ Username
RMQ_PASS=os.environ["RMQ_PASS"] # RabbitMQ Password
RMQ_HOST=os.environ["RMQ_HOST"] # RabbitMQ Hostname
SQL_HOST=os.environ["SQL_HOST"] # SQL Hostname
SQL_DB=os.environ["SQL_DB"] # SQL Database
SQL_USER=os.environ["SQL_USER"] # SQL Username
SQL_PASS=os.environ["SQL_PASS"] # SQL Password
STG_ACNAME=os.environ["STG_ACNAME"] # Storage Account Name
STG_ACKEY=os.environ["STG_ACKEY"] # Storage Account Key

# Set up database table if needed
cmd = """
                CREATE TABLE IF NOT EXISTS CATEGORY_RESULTS (
                FNAME VARCHAR(1024) NOT NULL,
                CATEGORY NUMERIC(2) NOT NULL,
                PREDICTION NUMERIC(2) NOT NULL,
                CONFIDENCE REAL);
      """
pgconn = psycopg2.connect(user=SQL_USER, password=SQL_PASS,
                host=SQL_HOST, port="5432", database=SQL_DB)
cur = pgconn.cursor()
cur.execute(cmd)
cur.close()
pgconn.commit()

# Load all images in defined storage account
CONNECTION_STRING="DefaultEndpointsProtocol=https" + \
    ";EndpointSuffix=core.windows.net" + \
    ";AccountName="+STG_ACNAME+";AccountKey="+STG_ACKEY
ROOT="/CIFAR-10-images" # This is where the images are held
container = ContainerClient.from_connection_string(CONNECTION_STRING, container_name="cifar")

rLen = len(ROOT)
classes = ('airplane', 'automobile', 'bird', 'cat', 'deer', 'dog', 'frog', 'horse', 'ship', 'truck')

# Determine the expected category by parsing the directory (after the root path)
def fnameToCategory(fname):
    for c in classes:
        if (fname.find(c) > rLen):
            return (classes.index(c))
    return -1 # This should never happen

IMGS=[]
blob_list = container.list_blobs()
for blob in blob_list:
    if blob.name.endswith(('.png', '.jpg', '.jpeg')):
        cat = fnameToCategory(blob.name)
        data = {"image" : blob.name, "category": cat, "catName": classes[cat]}
        message = json.dumps(data)
        IMGS.append(message)
print("Number of Images to add to queue = ", len(IMGS))

# Now write them into the queue
credentials = pika.PlainCredentials(RMQ_USER, RMQ_PASS)
parameters = pika.ConnectionParameters(RMQ_HOST, 5672, '/', credentials)
connection = pika.BlockingConnection(parameters)
channel = connection.channel()
channel.queue_declare(queue='image_queue', durable=True)

for i in IMGS:
    channel.basic_publish( exchange='', routing_key='image_queue', body=i,
        properties=pika.BasicProperties(delivery_mode=2,)
    )
    print("Queued ", i)

connection.close()
As with the previous version of this application, the script extracts all image names in our storage location and adds them to a queue to be classified. The first key difference with this version is that our images aren’t stored in a container’s local disk, but in an Azure storage account so we’ll need our blob storage credentials.
The second thing to note is that we’re using environment variables within the code. This means that the script can refer to customised and changing services without a need to continually modify the code. You can use the same code against different data sources, queues, or storage accounts.
In the containers/iload directory create a file called Dockerfile containing the following.
FROM ubuntu

RUN apt-get update
RUN apt-get install -y python3 python3-pip

RUN apt-get update && apt-get install -y poppler-utils net-tools vim
RUN pip install azureml-sdk
RUN pip install azureml-sdk[notebooks]
RUN pip install azure.ai.formrecognizer
RUN pip install azure.storage.blob
RUN pip install jsonify
RUN pip install pika
RUN pip install psycopg2-binary

ADD iload.py /

CMD ["python3", "./iload.py" ]
This simply defines a container with Python installed, and relevant libraries to access Azure storage, Postgres, and RabbitMQ.
Within that directory, build the container, and then we’ll then move it to our Azure Container Registry.
$ docker build -t iload .
.
.
=> writing image sha256:4ef19e469755572da900ec15514a4a205953a457c4f06f2795b150db3f2b11eb
=> naming to docker.io/library/iload
Now we’ll log in to our Azure Container Registry, tag our local image against a target image in the remote repository, and then push it to Azure. We’ll also confirm that it is there, by doing an Azure equivalent of a docker images (az acr repository list…). Note that we are prefixing the image tag with the name of the Azure Container Registry (jmcifaracr.azurecr.io).
# Login to the Azure Container Repository
$ az acr login -n rg-cifar -n jmcifaracr
Login Succeeded

$ docker tag iload jmcifaracr.azurecr.io/iload:1.0

$ docker images
REPOSITORY                    TAG      IMAGE ID       CREATED          SIZE
iload                         latest   4ef19e469755   32 minutes ago   1.23GB
jmcifaracr.azurecr.io/iload   1.0      4ef19e469755   32 minutes ago   1.23GB

$ docker push jmcifaracr.azurecr.io/iload:1.0
The push refers to repository [jmcifaracr.azurecr.io/iload]
6dfdee2e824f: Pushed
e35525d1f4bf: Pushed
.
.
4942a1abcbfa: Pushed
1.0: digest: sha256:e9d606e50f08c682969afe4f59501936ad0706c4a81e43d281d66073a9d4ef28 size: 2847

$ az acr repository list --name jmcifaracr --output table
Result
--------
Iload
We’re almost there.
Kubernetes has a number of ways of executing workload. The two we’re interested in specifically are deployments and jobs. The key difference is that a job is executed once, whereas a deployment is expected to remain operational, and if anything happens to the process, then Kubernetes will attempt to keep that resource operational. In other words, if a container dies, then it will be restarted.
For the iload process, we only want this to load our 60,000 images and then terminate. We don’t want to load the images, and restart the container, only to load them again, and again etc. To run this job, we’ll provide a configuration file containing the job details and submit it to Kubernetes.
In the containers/iload directory, create a file called iload-job.yml with the following:
apiVersion: batch/v1
kind: Job
metadata:
    name: iload
spec:
    template:
        spec:
            containers:
            - name: iload
                image: jmcifaracr.azurecr.io/iload:1.0
                imagePullPolicy: Always
                env:
                    - name: RMQ_USER
                      value: "user"
                    - name: RMQ_PASS
                      value: "7TrP8KOVdC"
                    - name: RMQ_HOST
                      value: "rabbitmq"
                    - name: SQL_HOST
                      value: "cifardb.postgres.database.azure.com"
                    - name: SQL_DB
                      value: "postgres"
                    - name: SQL_USER
                      value: "jon@cifardb.postgres.database.azure.com"
                    - name: SQL_PASS
                      value: "P@ssw0rd123"
                    - name: STG_ACNAME
                      value: "cifarimages"
                    - name: STG_ACKEY
                      value: "xxxxxxxxxxxxxxxx"
                resources:
                    requests:
                      cpu: 500m
                      memory: 512Mi
                    limits:
                      cpu: 500m
                      memory: 512Mi
           restartPolicy: Never
Let’s spend some time looking at this.
The job is going to process the images just uploaded to the container repository. All variables in the script are defined here. We could run this using different values and keep our source code stable. We are using the RabbitMQ and Postgres credentials shown earlier. In addition, we’re referencing our blob storage key and container derived earlier.
Note that the passwords are shown here in clear text, and ideally, we would use something like Azure Key Vault where none of this information is visible. You might consider a more secure approach using CSI Secrets, where none of this information is exposed outside of the container.
If we kick off that job using kubectl, you will see it being deployed, and a pod created. Once the job completes, you can also see that the container logs show the job’s progress.
$ kubectl apply -f iload-job.yml
job.batch/iload created

$ kubectl get pods
NAME READY STATUS RESTARTS AGE
iload-gpgqg 1/1 Running 0 41s
rabbitmq-0 1/1 Running 0 159m

$ kubectl get jobs
NAME COMPLETIONS DURATION AGE
iload 1/1 62s 17m

$ kubectl logs iload-gpgqg
.
.
.
Queued {"image": "CIFAR-10-images/train/truck/4992.jpg", "category": 9, "catName": "truck"}
Queued {"image": "CIFAR-10-images/train/truck/4993.jpg", "category": 9, "catName": "truck"}
Queued {"image": "CIFAR-10-images/train/truck/4994.jpg", "category": 9, "catName": "truck"}
Queued {"image": "CIFAR-10-images/train/truck/4995.jpg", "category": 9, "catName": "truck"}
Queued {"image": "CIFAR-10-images/train/truck/4996.jpg", "category": 9, "catName": "truck"}
Queued {"image": "CIFAR-10-images/train/truck/4997.jpg", "category": 9, "catName": "truck"}
Queued {"image": "CIFAR-10-images/train/truck/4998.jpg", "category": 9, "catName": "truck"}
Queued {"image": "CIFAR-10-images/train/truck/4999.jpg", "category": 9, "catName": "truck"}
If you return to the RabbitMQ dashboard, you will see the queue contents increase from zero to 60,000 items. At its peak, the job added around 3,500 requests per second.

The final component in our application is the worker process. Its role is to take an item off the queue, classify it, and then record accuracy of predictions.
Go into the containers/worker directory and create a file called worker.py containing the following:
#!/usr/bin/env python

from mxnet import gluon, nd, image
import mxnet as mx
from mxnet.gluon.data.vision import transforms
from gluoncv import utils
from gluoncv.model_zoo import get_model
import psycopg2
import pika, time, os, json
from azure.storage.blob import ContainerClient

import cv2
import numpy as np

# Get Environment Vars
RMQ_USER=os.environ["RMQ_USER"] # RabbitMQ Username
RMQ_PASS=os.environ["RMQ_PASS"] # RabbitMQ Password
RMQ_HOST=os.environ["RMQ_HOST"] # RabbitMQ Hostname
SQL_HOST=os.environ["SQL_HOST"] # SQL Hostname
SQL_DB=os.environ["SQL_DB"] # SQL Database
SQL_USER=os.environ["SQL_USER"] # SQL Username
SQL_PASS=os.environ["SQL_PASS"] # SQL Password
STG_ACNAME=os.environ["STG_ACNAME"] # Storage Account Name
STG_ACKEY=os.environ["STG_ACKEY"] # Storage Account Key
LOGTODB=os.environ["LOGTODB"] # Log data to Database?

# Location of Images on blob storage
CONNECTION_STRING="DefaultEndpointsProtocol=https" + \
    ";EndpointSuffix=core.windows.net" + \
    ";AccountName="+STG_ACNAME+";AccountKey="+STG_ACKEY

container = ContainerClient.from_connection_string(CONNECTION_STRING, container_name="cifar")

class_names = ['airplane', 'automobile', 'bird', 'cat', 'deer', 'dog', 'frog', 'horse', 'ship', 'truck']
net = get_model('cifar_resnet110_v1', classes=10, pretrained=True)

transform_fn = transforms.Compose([
        transforms.Resize(32), transforms.CenterCrop(32), transforms.ToTensor(),
        transforms.Normalize([0.4914, 0.4822, 0.4465], [0.2023, 0.1994, 0.2010])
    ])

def predictCategory(fname):
    blob_client = container.get_blob_client(fname)
    imgStream = blob_client.download_blob().readall()
    img = mx.ndarray.array(cv2.imdecode(np.frombuffer(imgStream, np.uint8), -1))
    img = transform_fn(img)

    pred = net(img.expand_dims(axis=0))
    ind = nd.argmax(pred, axis=1).astype('int')
    print('%s is classified as [%s], with probability %.3f.'%
        (fname, class_names[ind.asscalar()], nd.softmax(pred)[0][ind].asscalar()))
    return ind.asscalar(), nd.softmax(pred)[0][ind].asscalar()

def InsertResult(connection, fname, category, prediction, prob):
    count=0
    try:
        cursor = connection.cursor()
        qry = """ INSERT INTO CATEGORY_RESULTS (FNAME, CATEGORY, PREDICTION, CONFIDENCE) VALUES (%s,%s,%s,%s)"""
        record = (fname, category, prediction, prob)
        cursor.execute(qry, record)

        connection.commit()
        count = cursor.rowcount

    except (Exception, psycopg2.Error) as error :
        if(connection):
            print("Failed to insert record into category_results table", error)
    finally:
        cursor.close()
        return count

# Routine to pull message from queue, call classifier, and insert result to the DB
def callback(ch, method, properties, body):
    data = json.loads(body)
    fname = data['image']
    cat = data['category']
    pred, prob = predictCategory(fname)
    if (LOGTODB == 1):
        count = InsertResult(pgconn, fname, int(cat), int(pred), float(prob))
    else:
        count = 1 # Ensure the message is ack'd and removed from queue

    if (count > 0):
        ch.basic_ack(delivery_tag=method.delivery_tag)
    else:
        ch.basic_nack(delivery_tag=method.delivery_tag)

pgconn = psycopg2.connect(user=SQL_USER, password=SQL_PASS,
                          host=SQL_HOST, port="5432", database=SQL_DB)
credentials = pika.PlainCredentials(RMQ_USER, RMQ_PASS)
parameters = pika.ConnectionParameters(RMQ_HOST, 5672, '/', credentials)
connection = pika.BlockingConnection(parameters)

channel = connection.channel()

channel.queue_declare(queue='image_queue', durable=True)
print(' [*] Waiting for messages. To exit press CTRL+C')

channel.basic_qos(prefetch_count=1)
channel.basic_consume(queue='image_queue', on_message_callback=callback)

channel.start_consuming()
The main function of this hasn’t changed since the previous version of this instalment. It takes a request from the queue, containing an image’s physical location, and its expected category returning a predicted category and a confidence value. It also stores these values in a database if desired.
Like the iload process, the key differences here are as follows:
- The configuration is based on environment variables, where previously they were hard coded.
- The images are stored in blob storage, and not on local disk.
We also added the ability to log results depending on the value of an environment variable, so you might want to play with this to determine the performance impact of logging.
In the containers/worker directory create a file called Dockerfile containing the following.
FROM ubuntu

RUN apt-get update
RUN apt-get install -y python3 python3-pip

RUN pip3 install --upgrade mxnet gluoncv pika
RUN pip3 install psycopg2-binary

RUN pip install azureml-sdk
RUN pip install azureml-sdk[notebooks]
RUN pip install azure.ai.formrecognizer
RUN pip install azure.storage.blob
RUN pip install opencv-python

ARG DEBIAN_FRONTEND=noninteractive
RUN apt-get install ffmpeg libsm6 libxext6 -y

# Add worker logic necessary to process queue items
ADD worker.py /

# Start the worker
CMD ["python3", "./worker.py" ]
Again, this is relatively straight forward. You build a container with the requisite Azure, Python, RabbitMQ, and machine learning libraries installed.
As with the iload process, you need to build a local container, tag it against a target image in the Azure Container Registry and then push it to Azure.
$ docker build -t worker .
.
.
=> [12/12] ADD worker.py
/

=> exporting to
image

=> => exporting
layers

=> => writing image
sha256:9716e1e98687cfc3dd5f66640e441e4aa24131ffb3b3bd4c5d0267a06abcc802

=> => naming to
docker.io/library/worker

$ docker tag worker jmcifaracr.azurecr.io/worker:1.0
$ docker images
REPOSITORY                     TAG      IMAGE ID       CREATED              SIZE
worker                         latest   9716e1e98687   About a minute ago   2.24GB
jmcifaracr.azurecr.io/worker   1.0      9716e1e98687   About a minute ago   2.24GB
iload                          latest   4ef19e469755   3 hours ago          1.23GB
jmcifaracr.azurecr.io/iload    1.0      4ef19e469755   3 hours ago          1.23GB

$ docker push jmcifaracr.azurecr.io/worker:1.0
The push refers to repository [jmcifaracr.azurecr.io/worker]
.
.

$ az acr repository list --name jmcifaracr --output table
Result
--------
iload
worker
Now we need to provide a deployment file for the worker process. This defines how it is run within Kubernetes.
In the containers/worker directory, create a file called worker-deployment.yml containing the following:
apiVersion: apps/v1
kind: Deployment
metadata:
    name: worker
spec:
    replicas: 1
    selector:
        matchLabels:
            app: worker
    template:
        metadata:
            labels:
                app: worker
        spec:
            containers:
            - name: worker
                image: jmcifaracr.azurecr.io/worker:1.0
                imagePullPolicy: Always
                env:
                    - name: RMQ_USER
                      value: "user"
                    - name: RMQ_PASS
                      value: "7TrP8KOVdC"
                    - name: RMQ_HOST
                      value: "rabbitmq"
                    - name: SQL_HOST
                      value: "cifardb.postgres.database.azure.com"
                    - name: SQL_DB
                      value: "postgres"
                    - name: SQL_USER
                      value: "jon@cifardb.postgres.database.azure.com"
                    - name: SQL_PASS
                      value: "P@ssw0rd123"
                    - name: STG_ACNAME
                      value: "cifarimages"
                    - name: STG_ACKEY
                      value: “xxxxxxxx”
                    - name: LOGTODB
                      value: "1"
                resources:
                    requests:
                        cpu: 100m
                        memory: 128Mi
                    limits:
                        cpu: 150m
                        memory: 128Mi
Let’s spend a bit of time going through this as well.
First, this is a deployment, and it ensures that there is always a defined number of replicas (or pods in this case) running. This configuration uses a single pod, but when we increase this number later, you’ll see how it affects the environment and performance. Second, each pod is allocated an amount of memory and CPU. Some processes are memory intensive, and others compute centric. You can decide how much to dedicate to each pod type.
Let’s deploy that container and evaluate the performance.
$ kubectl apply -f worker-deployment.yml
deployment.apps/worker created

$ kubectl get deployments
NAME     READY   UP-TO-DATE   AVAILABLE   AGE
worker   1/1     1            1           52s

$ kubectl get pods
NAME                      READY   STATUS      RESTARTS   AGE
iload-gpgqg               0/1     Completed   0          110m
rabbitmq-0                1/1     Running     0          4h29m
worker-5df6cb8cb7-qnwtq   1/1     Running     0          54s
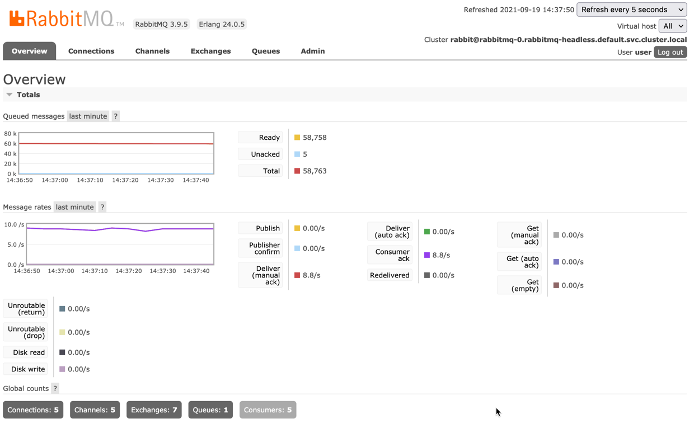
You can see that there is an active deployment and a single worker running. This is the view from the RabbitMQ dashboard – 1.8 requests on average per second.

Increase the number of parallel workers to 5 by modifying the replica count in the worker-deployment.yml file and redeploying it. You will then have 5 pods. Each worker takes a request from the queue, performs the image classification, and writes the content to Postgres.
$ kubectl apply -f worker-deployment.yml
deployment.apps/worker configured

$ kubectl get deployments
NAME     READY   UP-TO-DATE   AVAILABLE   AGE
worker   1/1     1            1           52s

$ kubectl get pods
NAME                      READY   STATUS      RESTARTS   AGE
iload-gpgqg               0/1     Completed   0          112m
rabbitmq-0                1/1     Running     0          4h32m
worker-5df6cb8cb7-flqp4   1/1     Running     0          51s
worker-5df6cb8cb7-hsl2p   1/1     Running     0          51s
worker-5df6cb8cb7-qnwtq   1/1     Running     0          3m32s
worker-5df6cb8cb7-v9t6p   1/1     Running     0          51s
worker-5df6cb8cb7-x4dt4   1/1     Running     0          51s
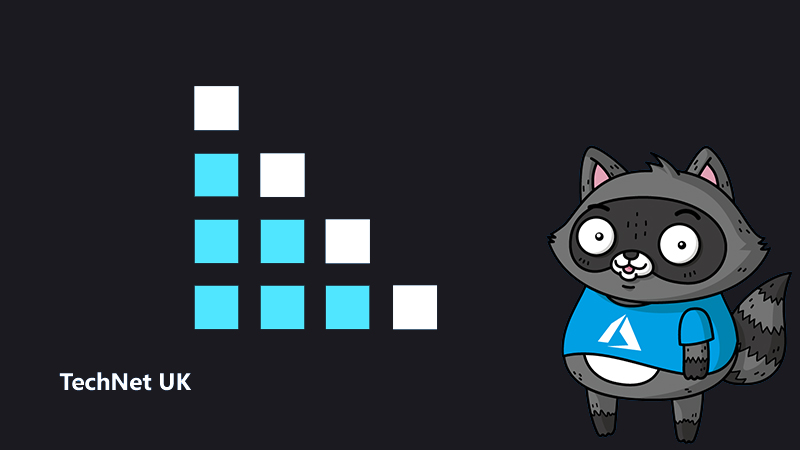
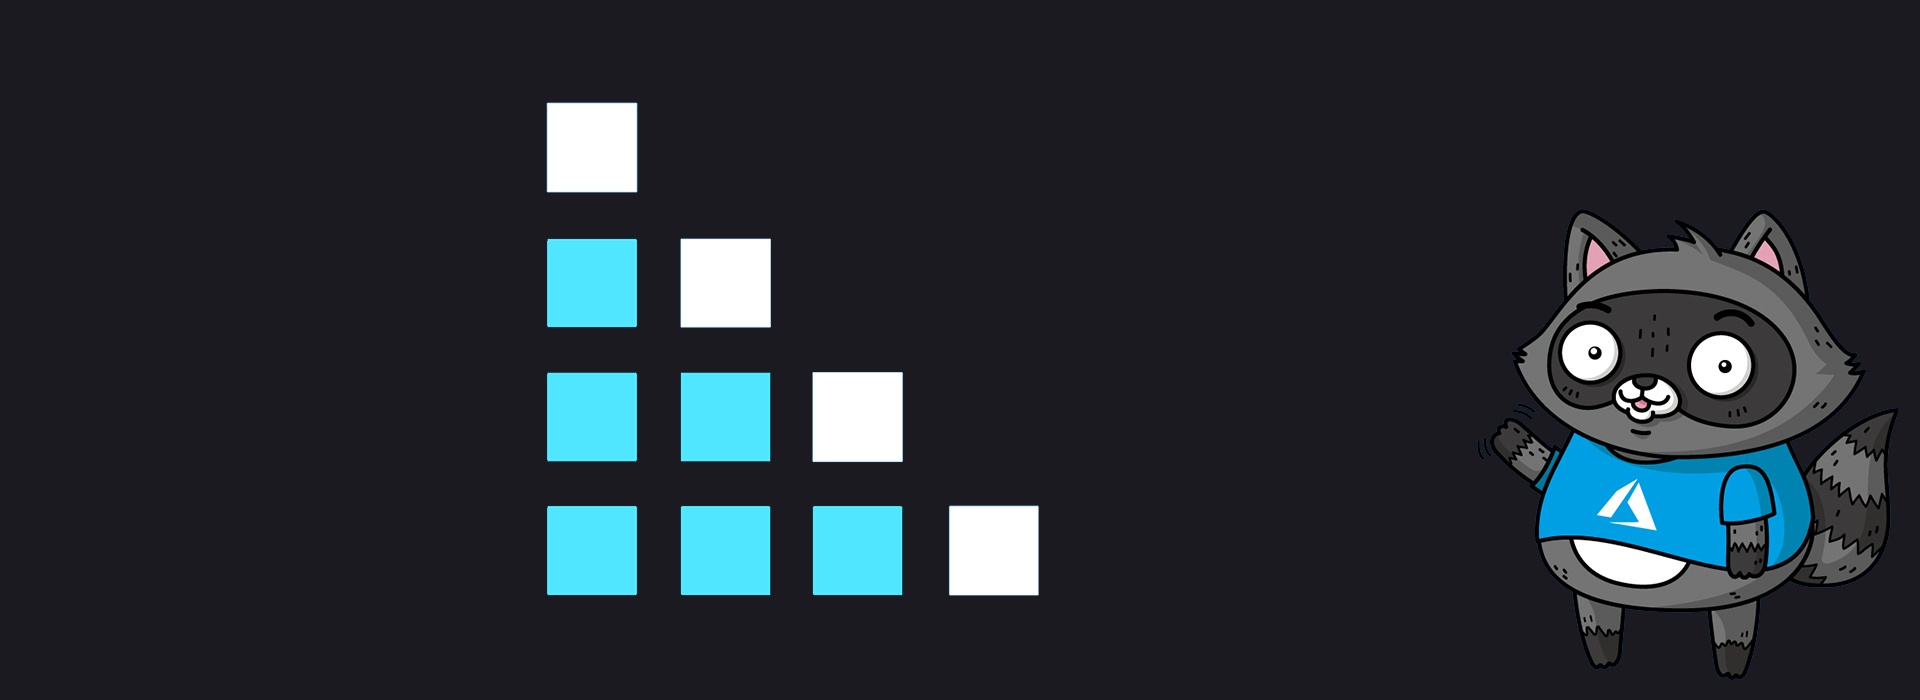
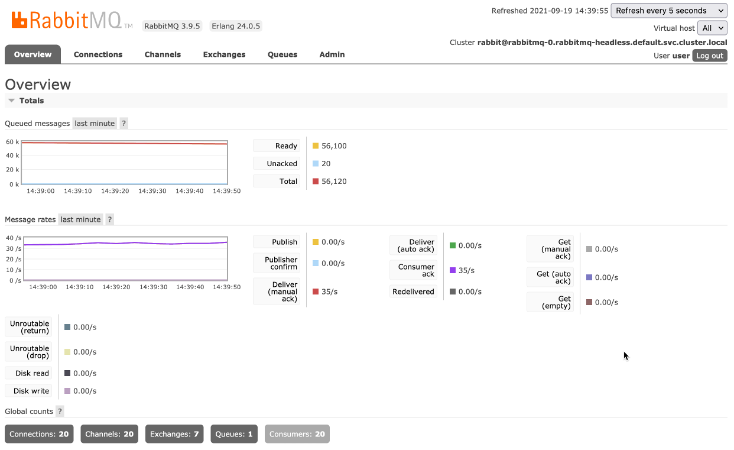
Performance has now increased to an average of 8.8 requests per second.
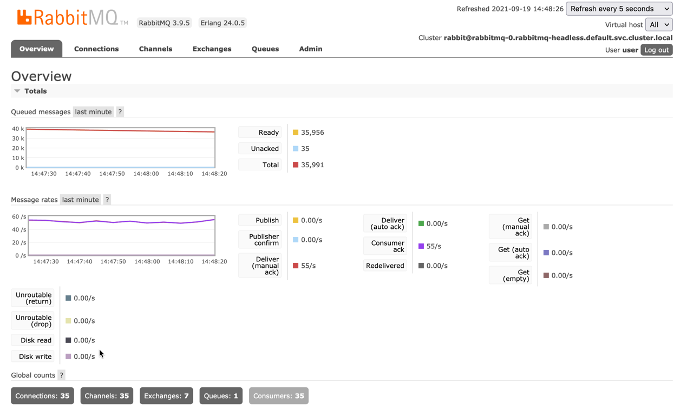
Here is a view of performance after increase the replica count even further to 20 (35 requests per second).
And then 35 workers (55 requests per second).
This isn’t linear scalability, nor is it an invitation to simply increase the number of workers to 500. Each Kubernetes node has a limited amount of physical resource. During our tests, we achieved 70 requests per second after playing with how much memory and CPU were allocated to each pod. This is an exercise for you to consider with your own workloads. What should be understood though, is that you can scale your service as needed with the underlying Kubernetes architecture to support that. More pods, nodes, clusters etc as needed.
Conclusions and Considerations
This article showed how to take an existing multi-container Docker application and migrate it to the Azure Kubernetes Service. Where possible, commodity PaaS capabilities were considered (database, storage etc.). We also showed how to use a publicly available configuration using Helm.
The previous instalment of this blog solely used containers writing the results to Postgres. We did the same here, but there’s nothing to suggest a need to immediately query the results. If this were performance critical, we might consider writing the results to a file, and then batch uploading those to a database at some point for analysis – much more efficient.
Our application is tiny, and arguably too small to justify an entire Kubernetes environment. However, a Kubernetes environment normally runs many different applications simultaneously within private networks, using well defined security, performance monitoring, and with much more flexibility in terms of scalability and cost optimisation. Since you are only charged for the Kubernetes environment not the number of pods, you can run as many or as few applications as you like in that environment subject to capacity.
You might also want to consider adding a node pool for GPU nodes that will dramatically change your performance where your applications are able to use a service’s underlying GPU. More information can be found here.
The articles in this series have focused on the basics of containers on Azure to address some data science patterns with an assumed current interest in on-premises containers to deliver data science solutions.
We haven’t considered the use of MLOps where you might approach machine learning and data science with the same rigour, governance, and outcome transparency offered to software development. It hasn’t considered the use of Azure Machine Learning where you might want to replace some of your historical code with PaaS machine learning capabilities, and optimised compute.
Future instalments may look at these, incorporating your containers with these prebuilt Azure capabilities.
Note: If you’ve finished this tutorial and created a specific resource group to try it, then you may want to remove it to ensure you’re no longer being charged for resources that are no longer needed.
About the authors
 Jon is a Microsoft Cloud Solution Architect specialising in Advanced Analytics & Artificial Intelligence with over 30 years of experience in understanding, translating and delivering leading technology to the market. He currently focuses on a small number of global accounts helping align AI and Machine Learning capabilities with strategic initiatives. He moved to Microsoft from IBM where he was Cloud & Cognitive Technical Leader and an Executive IT Specialist.
Jon has been the Royal Academy of Engineering Visiting Professor for Artificial Intelligence and Cloud Innovation at Surrey University since 2016, where he lectures on various topics from machine learning, and design thinking to architectural thinking.
 Mark has worked at Microsoft for five and a half years with a focus on helping customers adopt cloud native technologies. Before Microsoft, he spent around twenty years in the financial services industry, primarily at major UK banks, where he worked in various roles across operations, engineering and architecture. He loves discovering new technologies, learning them in depth and teaching others.