
Cross-tenant data ingestion without whitelisting IP addresses with Azure Synapse Pipelines/Azure Data Factory
While general guidance suggests operating under the same tenant, there are instances where, for various reasons, it’s not possible. In this blog, we’ll provide guidance for situations where organisations cannot operate under one tenant due to specific constraints or requirements. Such companies may operate independently and have their own Azure tenant, subscription, and potentially have deployed their resources in separate regions.
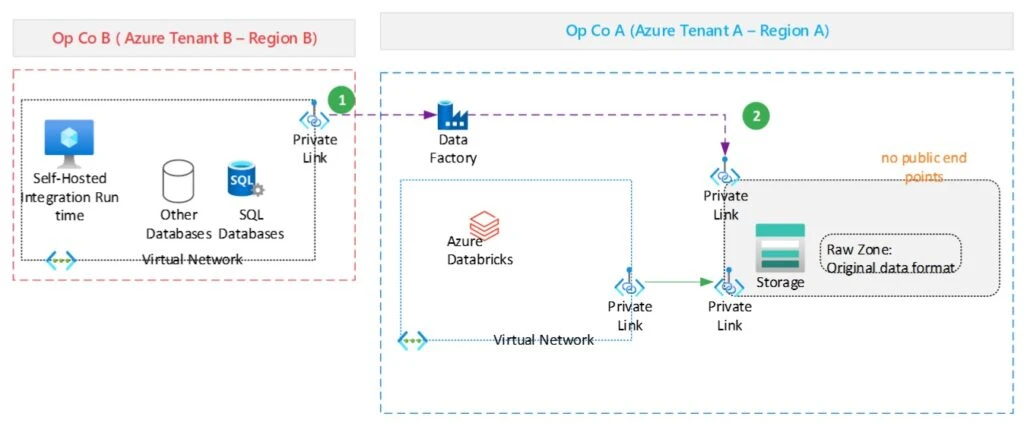
While waiting for in-place data sharing to be available, the requirement is for Operating Company A (OpCo A) to ingest data from Operating Company B (OpCoB) into their Data Lake Gen2 storage for further processing by Azure Databricks or Synapse Spark pools. Security is top of mind for these companies, so the firewall is enabled in the storage account to manage access control for the public endpoint. The development team in OpCo A completed the implementation of their ADF pipelines to ingest data from OpCo B, using a self-hosted integration runtime and by whitelisting the IP address of the virtual machine in the ADLS Gen2 storage account set up by OpCo A. The team, however, did not get approval from the security team to move to production because whitelisting the IP address of the Self Hosted Integration Runtime in their ADLS Gen2 storage account is against their security policies.
We’ll detail the solution we recommended to OpCo A in the next paragraph, to securely ingest data from OpCo B without having to whitelist any IP addresses, and also ensuring that no traffic goes through the public Internet. We’ll use Azure Data Factory to illustrate the approach, but the process is similar if you are instead using Synapse Pipelines. For this example, we assume you’re already familiar with Azure Data Factory or Synapse Pipelines.
Cross-tenant data ingestion with Private Links (No IP Whitelisting)
To ingest data across tenants without using a SHIR or whitelisting an IP address using ADF, you will have to create your Azure Data Factory with a managed virtual network (vNet) and create an Azure-managed integration runtime in that vNet. To access the source and target storage accounts you will need to create managed private endpoints to each storage account, as the firewalls of the storage accounts will block public network access. If you’re using Synapse pipelines, you will have to create the Synapse Workspace in a managed virtual network.
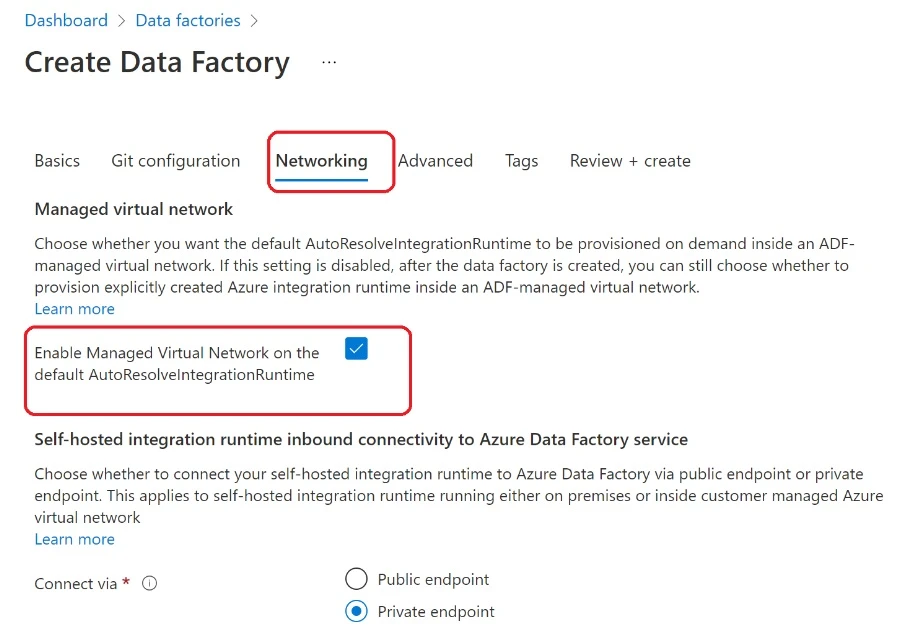
Create Azure Data Factory in Azure Manage Virtual Network
As mentioned above, you will need to enable the Azure managed vNet while creating your Data Factory. This needs to be done during its creation, as you will not be able to add a managed vNet to an existing ADF. To enable the managed virtual network while creating the ADF, check the “Enable Managed Virtual Network on the default AutoResolveIntegrationRuntime” option in the Network tab.
Create private endpoints to the source and target storage accounts
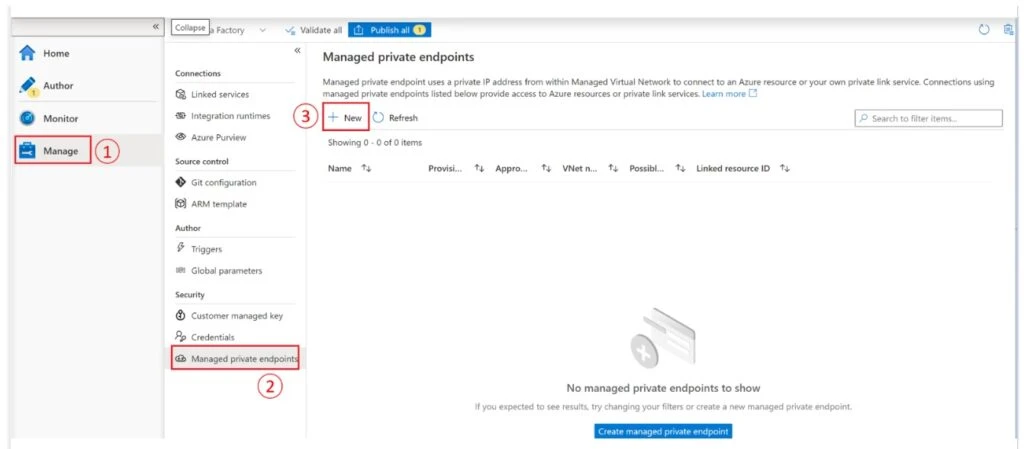
We assume that the Data Factory is in the same tenant as the source (OpCo A). Open your Data Factory and go to the “Manage” hub and select “Managed private endpoints”. Select “New” to create your managed private endpoint. You can also click on “Create Managed private endpoints”.
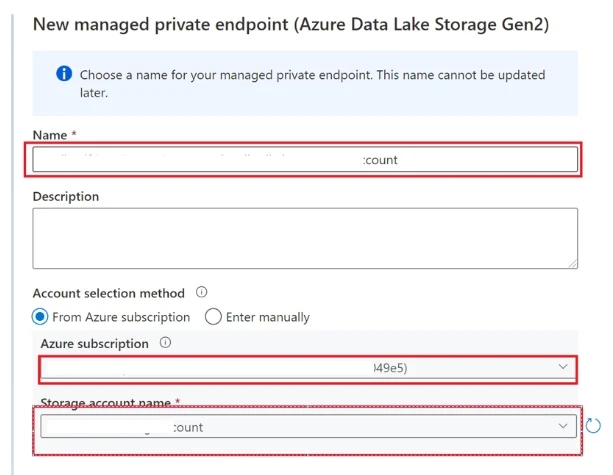
In the new window, select Azure Data Lake Storage Gen2 and click on the Continue button. Enter a name for the private endpoint and provide the details of the source storage account before clicking on create.
After a few minutes, the status of the private endpoint creation will change to “Succeeded”. However, the approval state will show as “Pending” until the owner of the storage account approves the private endpoint.

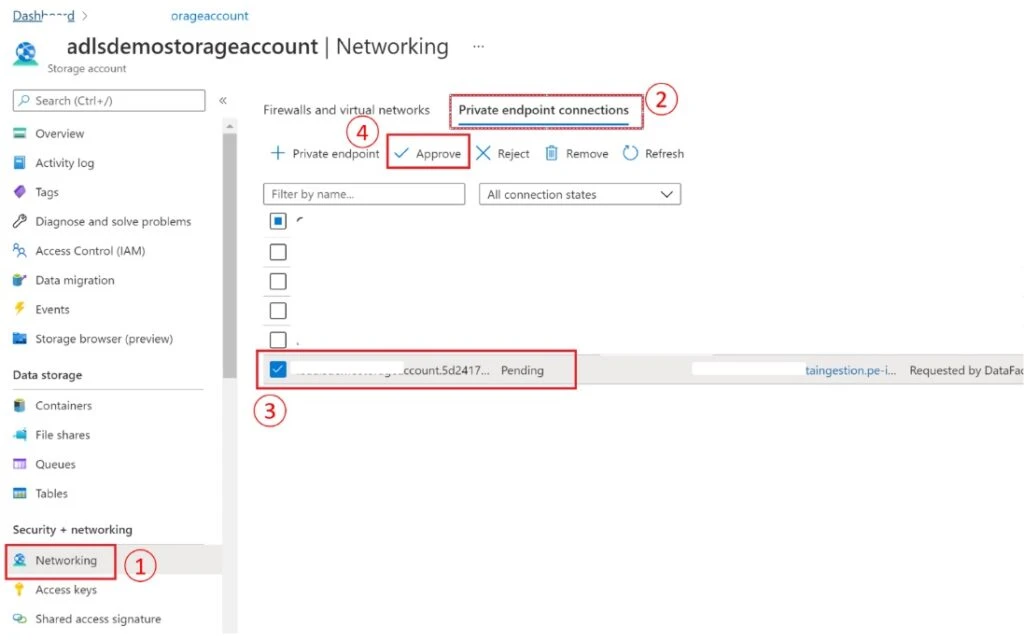
To approve the private endpoint, go to the Security and Networking section of the storage account and select Networking, then the Private Endpoint tab. Hit the refresh button if the private endpoint you created from ADF doesn’t appear with a pending status.
Select the private endpoint and click on the “Approve” button.
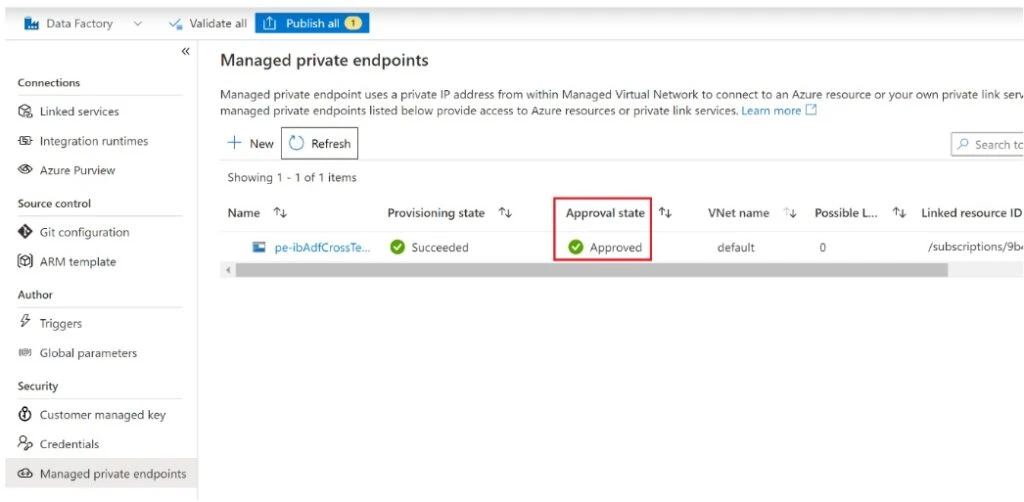
After few minutes, if you refresh the managed private endpoint window, you will see that the “Approval status” has been updated to Approved.
The next step is to create a private endpoint to the target. The approach will be slightly different as the target storage account is in a different tenant.
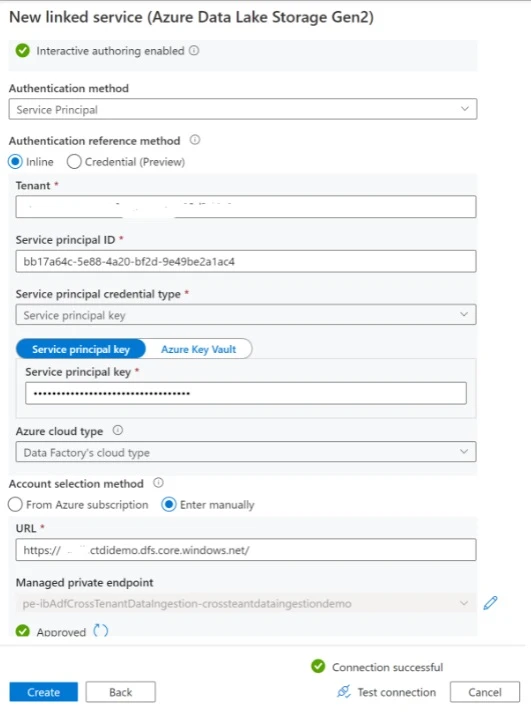
In the managed private endpoint menu, click on the New button. Enter the name of this new private endpoint and, in the account selection method, choose “Enter manually”.
Provide the resource ID of the target storage account. You can find the resource ID by selecting the endpoint’s property in the settings section. The rest of the process remains the same as when the Data Factory and the storage account were in the same tenant.

Create the Linked Services and Authentication methods
Source Linked Service
There are no specific considerations for the creation of the source linked service, as it’s in the same tenant as the Data Factory. Refer to this documentation if you need more details.
Target Linked Service
The target storage account and the Data Factory are not in the same tenant. That means there are some considerations to make regarding authentication methods:
- Managed Identity authentication is not supported for cross tenant scenarios.
- Service Principal is supported, however there are some considerations and settings to apply to the service principal.
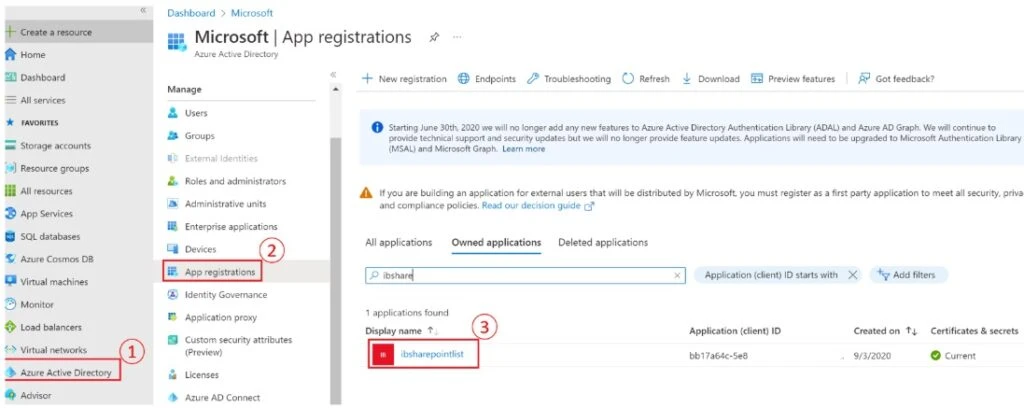
- Make sure you update you service principal to cross-tenant. To set the service principal to cross-tenant, in the Azure Active Directory menu, select App Registrations and search for your service principal. In this example, create the service principal in OpCo A tenant.
Select Authentication in the new page and check the Accounts in any organisational directory (any Azure AD directory – Multitenant) box.
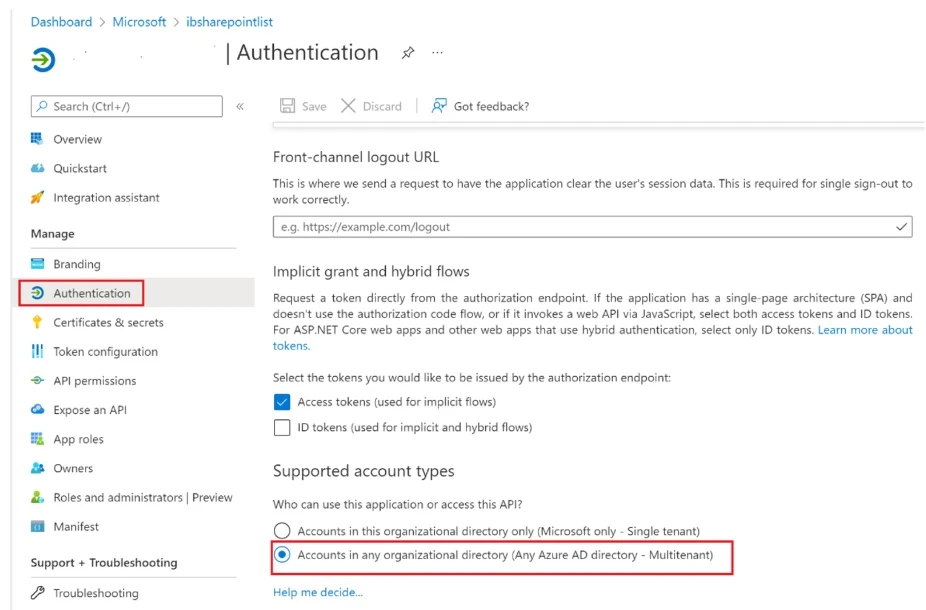
Important: Make sure you have specified a redirect URL in the web section on this page. You can also specify a localhost default value.

After the configuration above, you need to request approval from the target tenant to allow the service principal to exist in their tenant. The admin of the target can go to the below URL to approve the request:
https://login.microsoftonline.com/{tenant-id}/adminconsent?client_id={client-id}
Note that the tenant-id is the tenant ID of the target tenant and the client_id is the client ID of the service principal.
After this setup, you can authenticate to the target storage account using service principal. Ensure that the service principal (that was created in OpCo A) has been granted read/write access to the target storage account (e.g. OpCo B).
Alternatively, you can authenticate using access keys and making sure that they are stored in Azure Key Vault. More details on how to configure and access the credentials store in Data Factory’s Key Vault are available here.
Create the Datasets
There are no additional considerations for the creation of datasets.
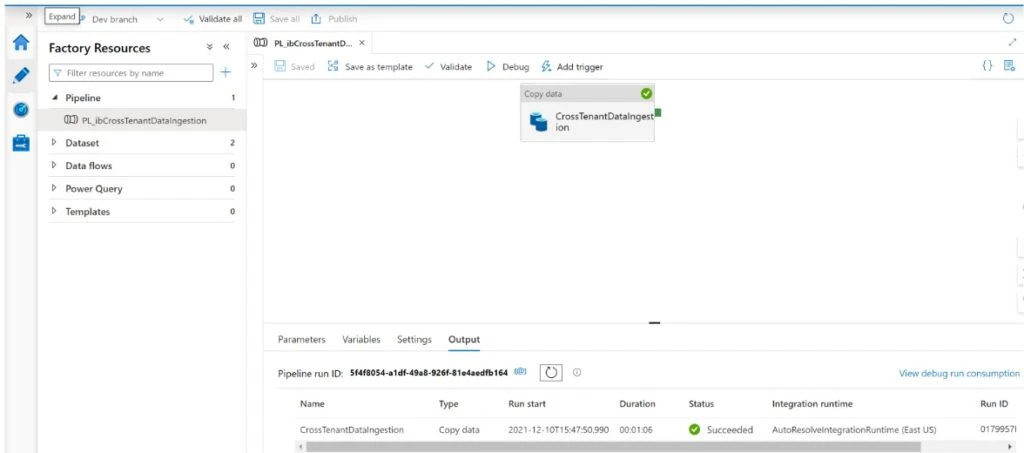
Create a pipeline with a copy activity
Create a pipeline the same way you would create one if the source and the target were in the same tenant.
About the authors
Issagha is a Principal Cloud Solution Architect with the Microsoft Customer Success Unit and drives large scale and deep technical engagements with customers. Issagha has a wealth of experience on the Azure data platform and analytics.
Kalai is a Senior Cloud Solution Architect with the Microsoft Customer Success Unit and drives progressive modernisation and delivering disruptive value for large scale and deep technical engagements in the Media and Entertainment industry.
Marvin is a Cloud Solution Architect within a global Microsoft unit called Customer Architecture team. With his deep technical, hands-on experience across various industries, he is not only guiding customers towards a successful architectural design, but also leading the successful implementation of platforms and solutions.