
Earlier this year, GoDataDriven deployed a large Cloudera Enterprise (CDH + Cloudera Manager) cluster on Microsoft Azure for one of the busiest and largest European airports. This two-part series, written by Alexander Bij and Tünde Alkemade,and republished with permission, includes information about use-case, design, and deployment.
In the Part 1, we discussed some information about the use case, the design and some basic information about Microsoft Azure. We showed some options for installing Cloudera on Azure and what best practices we saw when installing a distributed system on Azure. In Part 2 below , we will elaborate further on the gaps we saw between our client requirements and the Cloudera template and we will show how we modified the Cloudera template to fulfill our requirements.
Cloudera-Azure template introduction
Editor’s Note: If you read the first part of this post or you know what the Cloudera-Azure template can do, you may decide to skip this introduction.
Cloudera provides an ARM template which installs an Apache Hadoop cluster, including OS and network tuning and Hadoop configuration tuning. The template can be found on GitHub. There is also an Azure VM image built and maintained by Cloudera that is used during deployment. This image is available on the Azure Marketplace. Out-of-the-box features of the template:
- Create a Resource Group for all the components
- Create VNet and subnets
- Create availability sets. Place masters and workers in different availability sets
- Create security groups
- Create Masternode and Workernode instances using the Cloudera QuickStart VM Image (CentOS image built and maintained by Cloudera). The template automatically uses Azure DS14 machines, which are the only machine types recommended and supported by Cloudera for Hadoop installations
- For each host a Premium Storage account is created
- Add disks to the machines, format and mount the disks (10 data disks of 1TB per node)
- Set up forward/reverse lookup between hosts using /etc/hosts file
- Tune Linux OS and network configurations like disable SELinux, disable IPtables, TCP tuning parameters, disable huge pages
- Set up time synchronization to an external server (NTPD)
- Set up Cloudera Manager and the database used by the Cloudera Manager
- Set up Hadoop services using the Cloudera Python API
The template also has a disadvantage: it is meant to start up a cluster, but you cannot create extra data nodes and add them to the cluster. The template does not provision a gateway machine for you.
Summary of template modifications
After analyzing the gaps, we decided to use the template but modify some parts to be able to install everything that we need. We decided to use the Cloudera-Azure template to provision the network, set up the machines, configure the OS and install Cloudera Manager. Then we used Cloudera Manager (so not the Cloudera-Azure template) to install the CDH cluster. We did it like this, because in this way we can get the machines that we want and afterward add them to the cluster. When additional nodes are required, we would be able to do this using the same template.
We made the following modifications to the original template:
- Creation of the virtual network with a separate template. This allows us to change the number of subnets and make a site2site VPN connection. The Cloudera template was modified to use an existing VNet and subnet
- Setting-up the DNS component of the Active Directory for the machines to do forward and reverse lookup
- Adding the HTTPS ports to the security groups, because when using TLS for Cloudera Manager different ports are being used
- Disabling IPv6
- Use the time server provided by the client
- Decreasing the number of data disks per node
- Installing Hadoop components ourselves to increase control over what goes where. Also, the template does not support the integration of Hadoop with the Active Directory, so we did this manually
- Add a new node type to the template to deploy a gateway node
How the template works
In order to change the template, first we had to understand how the template works.
 When you deploy using the marketplace you interact with the
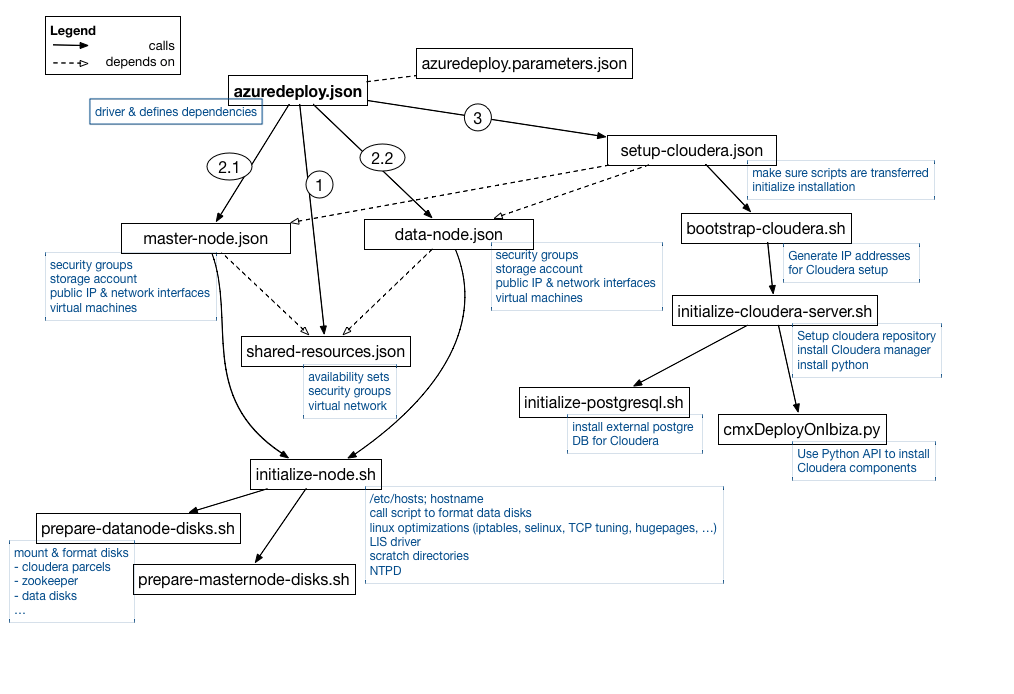
 azuredeploy.parameters.json through the UI as this is the file where the parameters are specified. This file is read by the main template file azuredeploy.json which defines the dependencies between the elements of the template file.
First of all the template creates the virtual network, security groups and availability sets. This is done in shared-resouces.json.
After deployment of these resources we can start creating the virtual machines, calling master-node.json and data-node.json in parallel. These scripts set up the specific security groups for masters and data nodes, create the storage accounts (one per node), set up the network interfaces and define the public IPs. Also the machines are created, and then the initialize-node.sh script is called. In this script:
- hosts file is set up
- selinux is disabled
- iptables is disabled
- hugepages are disabled
- NTPD is configured and started
- The Linux Integration Service driver is installed. This is a set of drivers that enable synthetic device support in supported Linux virtual machines under Hyper-V
- Scratch directories are created
- Based on the node type the disks scripts are called (
prepare-datanode-disks.shorprepare-masternode-disks.sh)
What the disks scripts do
These scripts prepare the machines with specific OS based tuning and calling prepare-datanode-disks.sh or prepare-masternode-disks.sh. They format and mount the different disks. For the DataNode the 10 data disks are mounted and another disk is created for the Cloudera parcels.
On the master nodes, a disk is created for the Cloudera parcels, another disk is created for the external PostgreSQL DB, another disk for the ZooKeeper process, and another disk for the Quorum Journal manager process.
After these scripts complete, we can start installing Cloudera on the machines. The setup-cloudera.json is called, initializing the installation by calling bootstrap-cloudera.sh. This script gathers the private IPs which should be used by the installation and then calls initialize-cloudera-server.sh. This script only runs on the first master node, which will be the Cloudera Manager server. We need to install some specific packages here, including Python to install the Hadoop daemons and of course the cloudera-scm-server. Initialize-cloudera-server.sh then calls the database installation script (initialize-postgresql.sh), which installs a PostgreSQL database for the Cloudera Manager related services (like activity monitor, service management, etc.) and also a separate database for Apache Hive metastore. This separate database is used to store the schemas of the tables for Hive and Apache Impala (incubating). (Remember ,with Hive and Impala the data itself resides in HDFS, only the schemas are saved in a relational DB.)
After the database is installed, Cloudera Manager is started and as a last step the cmxDeployOnIbiza.sh script is called on the first masternode to install all the Hadoop daemons on different hosts. It’s using Python to instruct Cloudera Manager though the Rest API to deploy the various components.
Now you should have a running cluster. If you run the template in ‘Production’ mode you would get a Cloudera CDH 5.4.x installation, where the different Hadoop daemons would be placed on nodes in the following way:
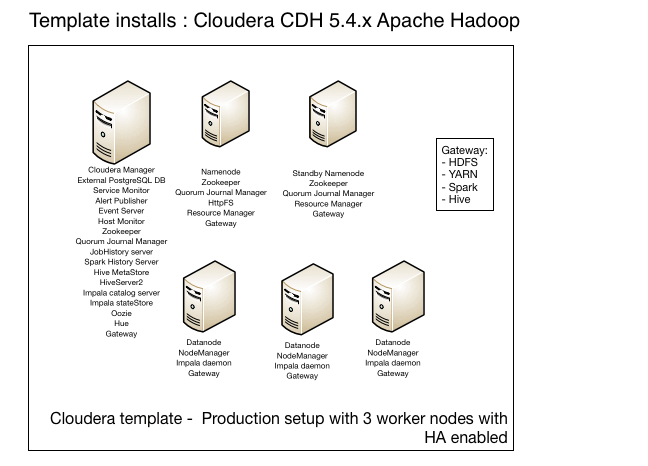 The template also supports installing Sentry, HBase, Flume, Sqoop and KMS, but these are not enabled by default and they can’t be enabled by just setting a variable, so you would need to change the script to install these components too.
After understanding which file does what, we stared modifying things and this is what we will explain in the rest of this post. You can find our modified template on GitHub.
Using an existing VNet/subnet
We created the VNet separately, using a template similar to the 101-create-site-to-site-vpn template on the Azure github. After creating the VNET we had to take out the part from the Cloudera template which also creates a VNet. In the shared-resources.json remove the following part:
{
  "apiVersion": "2015-05-01-preview",
  "type": "Microsoft.Network/virtualNetworks",
  "name": "[parameters('networkSpec').virtualNetworkName]",
  "dependsOn": [
    "[concat('Microsoft.Network/networkSecurityGroups/', parameters('networkSpec').virtualNetworkName, '-sg')]"
  ],
  "location": "[parameters('location')]",
  "properties": {
    "addressSpace": {
      "addressPrefixes": [
        "[parameters('networkSpec').addressPrefix]"
      ]
    },
    "subnets": [
      {
        "name": "[parameters('networkSpec').virtualNetworkSubnetName]",
        "properties": {
          "addressPrefix": "[parameters('networkSpec').subnetPrefix]",
          "networkSecurityGroup": {
            "id": "[resourceId('Microsoft.Network/networkSecurityGroups', concat(parameters('networkSpec').virtualNetworkName, '-sg'))]"
          }
        }
      }
    ]
  }
}
Then we added a new variable called vNetResourceGroup in the azuredeploy.parameters.json
"vnetResourceGroup": {
    "value": "my-networking"
  },
and we made sure that this can be read by the template file. To achieve this we defined it in the azuredeploy.json:
"vnetResourceGroup": {
      "type": "string"
    },
In azuredeply.json we also made sure that now the VnetID references this parameter. The VnetID variable in in the networkSpec section:
"VnetID": "[resourceId(parameters('vnetResourceGroup'),'Microsoft.Network/virtualNetworks', parameters('virtualNetworkName'))]"
Next in the master-node.json and data-node.json we need to make sure that the subnet reference is actually made using the previously defined VnetID. This is done in the ipConfigurations part of the network interfaces:
"subnet": {
                "id": "[concat(parameters('networkSpec').VnetID, '/subnets/', parameters('networkSpec').virtualNetworkSubnetName)]"
              },
If you look carefully you will notice that we actually do not have to send an extra parameter between the azuredeploy.json and the master-node.json/data-node.json even though we did add a new parameter. This is because we added VNetID to the parameter group called networkSpec and this group is transferred to the needed template files.
Use DNS to resolve host names
To use the DNS server for forward and reverse lookup we had to set up /etc/resolv.conf on the Linux machines. For this we needed to set IP addresses and hostnames of the DNS servers. We also needed to set the hostname properly, so we had to know the domain suffix. As a first step we made sure that all these parameters are defined in azuredeploy.parameters.json:
"dns1IP": {
  "value": "172.20.210.4"
},
"dns2IP": {
  "value": "172.20.210.5"
},
"dns1Name": {
  "value": "dc1.mydomain.nl"
},
"dns2Name": {
  "value": "dc2.mydomain.nl"
},
"dnsNameSuffix": {
    "value": ".mydomain.nl"
},
We had to make sure that azuredeploy.json can read these parameters:
"dnsNameSuffix": {
  "type": "string",
  "metadata": {
    "description": "Internal DNS suffix"
  }
},
    "dns1IP": {
  "type": "string",
  "metadata": {
    "description": "DNS IP"
  }
},
"dns2IP": {
  "type": "string",
  "metadata": {
    "description": "DNS IP"
  }
},
"dns1Name": {
  "type": "string",
  "metadata": {
    "description": "DNS Name"
  }
},
"dns2Name": {
  "type": "string",
  "metadata": {
    "description": "DNS Name"
  }
},
Next, we transferred the new parameters using the vmSpec complex variable in azuredeploy.json
"vmSpec": {
  "vmSize": "[parameters('vmSize')]",
  "privateIPAddressPrefix": "[parameters('nodeAddressPrefix')]",
  "adminUserName": "[parameters('adminUserName')]",
  "adminPassword": "[parameters('adminPassword')]",
  "dnsNameSuffix": "[parameters('dnsNameSuffix')]",
  "domainName": "[parameters('domainName')]",
  "hadoopAdmin": "[parameters('hadoopAdmin')]",
  "dns1IP": "[parameters('dns1IP')]",
  "dns2IP": "[parameters('dns2IP')]",
  "dns1Name": "[parameters('dns1Name')]",
  "dns2Name": "[parameters('dns2Name')]",
  "masterNodeASName": "[concat(parameters('dnsNamePrefix'), '-mnAS')]",
  "dataNodeASName": "[concat(parameters('dnsNamePrefix'), '-dnAS')]"
},
Now these parameters can be accessed by the master-node.json and data-node.json template files. So in these files we need to make sure that the parameters are transferred to the initialize-node.sh script file. We just defined extra command line arguments for the script called in the Microsoft.Compute/virtualMachines/extensions part which calls a CustomScriptForLinux type.
"commandToExecute": "[concat('sh initialize-node.sh \"', parameters('vmSpec').adminUserName, '\" ', 'masternode', ' \"', concat(variables('vmName'), copyIndex(),parameters('vmSpec').dnsNameSuffix), '\" \"', parameters('vmSpec').dns1IP, '\" \"', parameters('vmSpec').dns2IP, '\" \"', parameters('vmSpec').dns1Name, '\" \"', parameters('vmSpec').dns2Name, '\" \"', parameters('vmSpec').hadoopAdmin, '\" \"', parameters('vmSpec').domainName, '\" >> /home/$ADMINUSER/initialize-masternode.log 2>&1')]"
If you compare this script with the initial script you will see that we also deleted quite a few command-line arguments which were used for the Cloudera installation, which we are not doing with the template file.
So how does the initialize-node.sh script know if it is installing a data node or a master node? Well, if you look closely you see that the second argument transferred to this script is actually the node type.
In the initialize-node.sh script we then read the command line arguments:
ADMINUSER=$1
NODETYPE=$2
MYHOSTNAME=$3
DNS1IP=$4
DNS2IP=$5
DNS1NAME=$6
DNS2NAME=$7
HADOOPADMIN=$8
DOMAINNAME=$9
So we can set up /etc/resolv.conf. To make sure that upon restart this won’t be overridden, we also created a dhclient-enter-hooks file.
cat > /etc/dhclient-enter-hooks <> EOF #!/bin/sh make_resolv_conf() { echo "doing nothing to resolv.conf" } EOF cat > /etc/resolv.conf <> EOF
#!/bin/sh
search $DOMAINNAME
nameserver $DNS1IP
nameserver $DNS2IP
EOF
chmod a+x /etc/dhclient-enter-hooks
Disable Ipv6
In the initialize-node.sh script file we can just add the following lines:
echo "NETWORKING_IPV6=no" >> /etc/sysconfig/network
echo "SEARCH=${DOMAINNAME}" >> /etc/sysconfig/network-scripts/ifcfg-eth0
echo "NETWORKING_IPV6=no" >> /etc/sysconfig/network-scripts/ifcfg-eth0
/etc/init.d/ip6tables save
/etc/init.d/ip6tables stop
chkconfig ip6tables off
and IPv6 will be disabled.
Configure other NTPD server
In the initialize-node.sh script file we add the following lines:
sed -i 's/^server/#server/' /etc/ntp.conf
echo "server ${DNS1NAME} iburst" >> /etc/ntp.conf
service ntpd start
service ntpd status
chkconfig ntpd on
and NTPD will connect to the PDC server to obtain the time. In its turn this domain controller connects to the external NTPD server to obtain its time. Strangely enough, Microsoft suggests only connecting the PDC to the external time server. The BDC should get its time from the PDC. Guess it shouldn’t be a big problem, unless your PDC goes down for a longer time.
Deploying the (customized) template
First before you start deploying you should check if you can start the requested machines using your Azure subscription account. The account by default has a core limit of 20. It is important to emphasize that quotas for resources in Azure Resource Groups are per-region accessible by your subscription. If you need to request a quota increase, you need to decide how many cores you want to use and in which region. Then make a specific request for Azure Resource Group core quotas for the amounts and regions that you want.
To install a Cloudera PoC environment with the template you would need at least 4 * 16 cores, if you only want 3 worker nodes. Each machine deployed by the Cloudera template is a DS14 machine which has 16 cores. If you do not want to change anything in the template you can easily deploy this using the Azure Marketplace. In this case you can just provide the parameters requested by the UI and you would end up with a running cluster.
 If you change something in the template, like we did, you need to make sure that the changes are in a public GitHub repository, otherwise the deployment process won’t be able to access it. You can use parameters defined in the azuredeploy.parameters.json. This file contains sensitive information, so it should not be in the public GitHub repo.
Alternatively, if you’re not comfortable in creating a public GitHub repository you could place the script files in Azure storage and provide storage account and key information.
To be able to use your own template in GitHub, you need to modify the scriptsUri variable in azuredeploy.json. First we define a parameter:
"scriptUri": {
  "type": "string",
  "metadata": {
    "description": "The public github repo where the scripts are."
  }
Then we make sure we use this parameter in azuredeploy.json in the variables section:
"scriptUri": {
    "value": "https://raw.githubusercontent.com/godatadriven/public_cloudera_on_azure/master"
  }
Because we are not using the marketplace to deploy, we need to create a separate resource group where we place the created assets. This way it will be easier to modify and delete the resources inside this group. With the Azure CLI you can create a resource group the following way:
azure group create -n "myResourceGroup" -l "West Europe"
And then you can start deploying your cluster:
azure group deployment create -g myResourceGroup -n "MyClouderaDeployment" -f azuredeploy.json -e azuredeploy-parameters.json
Make sure that after you deploy you change the password of the user you just created to access the hosts and also the Cloudera Manager user password. Currently, passwords can be plainly seen in your deployment configuration on Azure. Also the parameters transferred to the shell scripts can be seen on the hosts in the /var/log/azure/..../extension.log. So here you would also see the password for Cloudera Manager. If you want to change this you should consider integrating Azure Key Vault into the scripts. This way you would be able to use SSH-keys to access your machines.
We decided to run the template without using Key Vault, just making sure that the given user isn’t allowed to log in with a password. Because we did not install Cloudera Manager with the template, we did not have to worry about that password.
Summary
The Cloudera template is a great basis to provision a Hadoop cluster on Azure. If you do not have too many exotic requests you can use the template as is. You have the freedom and responsibility to maintain the machines and the cluster. Even if you have are special requirements, the template is a great starting point and it’s not hard to modify it to your needs.
Questions or comments? Please let us know in the comments.