
We all know it; first impressions are the most lasting. As in real-world, sluggish load times can leave a negative impression for any website and even negatively affect your business. Below we’ll walk through how Azure CDN can improve that first impression, speeding up websites hosted on WordPress or Joomla.
As with most users, our goal was to test and improve the performance of our website, not only in Europe, but also globally. Since most of the content in this example is static, it’s a perfect candidate to be included into a Content Delivery Network (CDN).
Read on to learn how we reduced the load time of our website cloudelicous.net from more than three seconds down to approximately one second.
Preparing for optimized delivery
It’s good to get an understanding of how fast or slow the current website is. Helpful tools are provided by GTmetrix and Pingdom, but you can also use Load Test from Azure DevOps. As a preparation, we looked into the following two topics:
- Optimizing Images is the low hanging fruit – reduce the size of images without losing out on quality. We use ShortPixel (available as a free plugin), which reduced the file size by ~60% without noticeable degrading the quality.
- Caching of Content is another very well-known and important practice. We decided to use the WordPress plugin Swift Performance, available as a free and premium version.
After implementing the solution described above, we started with the performance analysis using Pingdom and ended up with a score as follows:
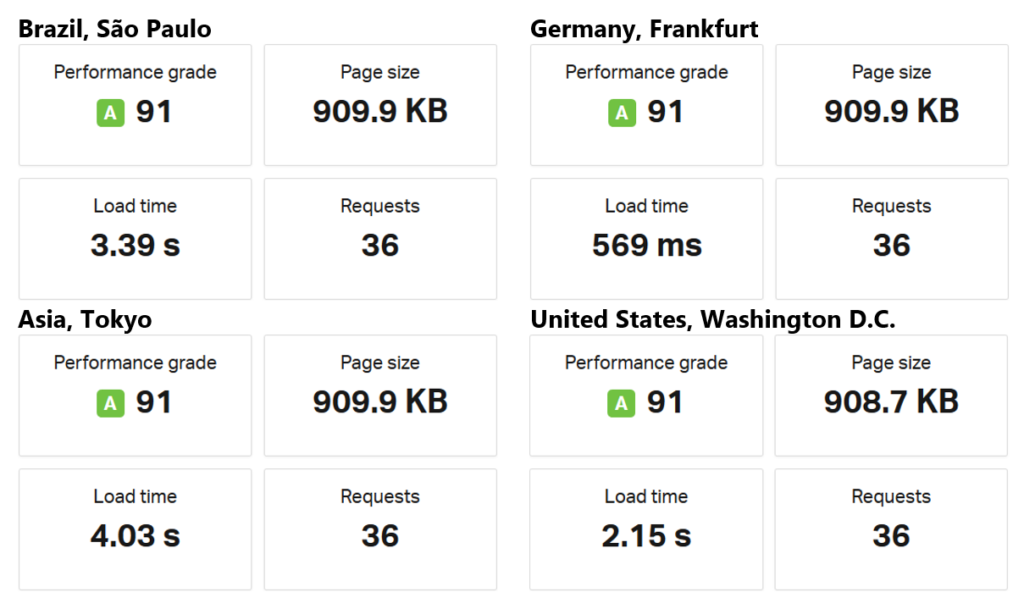
The performance grade was already quite okay in Germany, but performed poorly for users in US, Brazil, and Tokyo. With image optimization and caching already in place, fronting the content with Content Delivery Network (CDN) is the last possible way to boost the performance.
You may find various articles on how to improve the performance of a website, but using CDN is something that gave us the biggest bang for our buck.
What is Azure CDN?
Let’s dive into this question for a second: A Content Delivery Network (CDN) is a distributed network of servers that can efficiently deliver web content to users. CDNs deliver cached and dynamic content from edge servers and/or Point of Presence (POP) locations that are, in the case of Azure, deployed in over 129 sites globally to minimize latency. For more information, reference the official documentation.
Having a CDN brings the content of the website closer to its visitors. Using a local CDN POP helps accelerate downloading and display content. Other reasons for using a CDN could be to:
- reduce the stress on your origin, your web server
- protect the web server from denial of service attacks (DDoS)
- access to a high performing edge network at a affordable price
Does it make sense to use a CDN?
The prominent question at this point is when should a CDN be used. In a typical case, you should use a CDN when your website is getting accessed beyond your local region. Our blog is hosted in Europe, extending the capabilities with CDN was a logical step to improve the experience for Asia and Americas.
The Azure CDN platform is comprised of three providers, namely Azure CDN from Verizon, Azure CDN from Akamai, and Azure CDN from Microsoft.
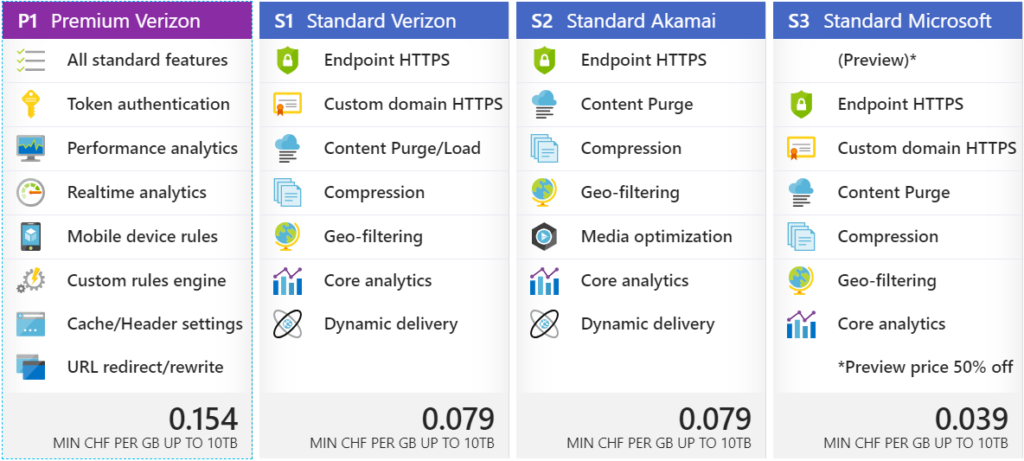
We chose the “Standard Verizon” in our example, but we could have chosen any other provider as well. We didn’t require any special features, but the most fancy is probably the “Custom domain HTTPS” support, which allows us to specify a custom domain name “cdn.cloudelicious.net”, instead of “cloudelicous.azureedge.net”.
Configure Azure CDN
The configuration of the CDN is very straightforward. We configured it with the following settings:
- Origin
- “cloudelicious.net” is configured as the “Origin hostname”, which defines the URL where the CDN is pulling the content from;
- “Origin host header” and “Origin path” are left blank, as they are not required for our setup;
- We also enabled HTTPS (443) as the protocol of choice.
- Compression
- We enabled compression, which will compress the CSS and HTML files.
- Custom Domains
- We added “cdn.cloudelicious.net” as our custom hostname, and then enabled https over custom domain.
We will be using Azure CLI for enabling CDN. Think of the resource group (cloudelicious-prod-rg) you want to use for this and start with the creation of the CDN profile (cloudelicious-prod-profile). In this step the SKU will be selected, which will be “Standard Verizon” in the example below.
az cdn profile create -g ‘cloudelicious-prod-rg’ -n ‘cloudelicious-prod-profile’ –sku Standard_Verizon
A named endpoint “cloudelicious-prod-endpoint” is created to connect to a CDN. In this step the origin hostname and the URL of the website (www.cloudelicious.net) will be specified, SSL only (TCP 443) and compression will be enabled as well:
az cdn endpoint create -g ‘cloudelicious-prod-rg’ -n ‘cloudelicious-prod-endpoint’ –profile-name ‘cloudelicious-prod-profile’ –origin ‘cdn.cloudelicious.net’ –no-http –enable-compression
The next step is the configuration and enablement of the custom domain “cdn.cloudelicious.net’”. Of course, this domain name has to be registered in your DNS before proceeding.
az cdn custom-domain create -g ‘cloudelicious-prod-rg’ –endpoint-name ‘cloudelicious-prod-endpoint’ –profile-name ‘cloudelicious-prod-profile’ -n ‘cloudelicious’ –hostname ‘cdn.cloudelicious.net’
Using the final command to enable the custom domain, including validation can be completed within a few hours.
az cdn custom-domain enable-https -g ‘cloudelicious-prod-rg’ –endpoint-name ‘cloudelicious-prod-endpoint’ –profile-name ‘cloudelicious-prod-profile’ -n ‘cloudelicious’
The steps above are all you need to configure. Remember the URL specified under name “cloudelicous.azureedge.net” or custom domain “cdn.cloudelicious.net” as this will be used later to configure the CDN for the website, in the example using WordPress or Joomla.
If you want to know more about Azure CDN, check out this Azure Friday show to get an understanding of how CDN works.
Enable Joomla for CDN
As mentioned during the introduction, Joomla is one of the most popular content management systems (CMS), along with WordPress. The integration of Azure CDN into a Joomla-based website is as easy and can be done by installing the extension for CDN. The extensions to add/configure the CDN endpoints are the following and are not exclusive:
- CDN for Joomla! Use paid version for HTTPS support
- JCH Optimize
The extension updates the website to support rewriting, which ensures static assets are loaded from the CDN and not anymore from the origin server.
The configuration is straightforward. Add the CDN endpoint name as the “CDN Domain” and check the file types you want to load from the CDN. One thing not to forget is to clear the cache, this will purge all the stored cached files and force up to pull the assets from the CDN.
Same as above, the configuration is straight forward. Add the CDN Endpoint Name as the “CDN Domain” and check the file types you want to load from the CDN. One thing not to forget is to clear the cache – this will purge all the stored cached files and force to pull the assets from the CDN.
Enable WordPress for CDN
If you are using WordPress, as we are with our blog cloudelicious.net, then you have to install a WordPress plugin. The requirement is to use a plugin that does URL rewrites using the CDN hostname on the webpage, since default WordPress doesn’t do that. Using a plugin is a prerequisite as WordPress uses absolute URLs for linking on its page by default. It would bypass the CDN if no rewriting is done.
The plugin is needed to add/configure the CDN endpoints. In most cases, a caching plugin offers this integration. For this test we used “Swift Performance“ as it provided the best improvement. The configuration of the CDN isn’t complicated and is activated by adding the CDN’s endpoint. Simply add the URL defined before in our case “cdn.cloudelicious.net”.
It takes a few minutes to deploy, plus it’s easy and maintains itself once the configuration is done. No need to push content, Azure CDN is taking care of everything from this moment. To run some tests on CDN, utilize CDN Planet, which offers a good tool.
Cross-Origin Resource Sharing (CORS)
Depending on the scenario, you might need to enable Cross-Origin Resource Sharing (CORS). CORS is an essential component when loading web fonts or images from another domain, or loading them from the CDN. When not handled correctly, the data won’t be loaded or displayed unless it is explicitly stated in the HTTP header. If not stated, an error like the following would be shown:
Access to Font has been blocked by CORS policy: No ‘Access-Control-Allow-Origin’ header is present on the requested resource
The configuration can be done directly on the web server (the origin), or on the CDN Endpoint if supported. As we went with the Verizon Standard SKU, we had to configure the CORS header on the origin server. The code snippets below can be used to add the HTTP Header Access-Control-Allow-Origin for *.css files and web fonts:
.htaccess
<IfModule mod_headers.c>
   <FilesMatch "\.(ttf|ttc|otf|eot|woff|font.css|css)$">
     Header set Access-Control-Allow-Origin "https://www.cloudelicous.net"
   </FilesMatch>
</IfModule>
Nginx
location ~ \.(ttf|ttc|otf|eot|woff|font.css|css)$ {
            add_header Access-Control-Allow-Origin "
https://www.cloudelicous.net";
}
In the example above, our site “https://www.cloudelicous.net” is granted access to the requested resources, such as css files and web fonts. For testing purpose, you might want to start using a wildcard (*) to setup the HTTP header, which disables CORS and allows any URL to access the CDN Endpoint. I wouldn’t recommend this for production.
If you don’t have access to the origin server, you will need to use Azure CDN Premium SKU offers to set CORS header from the CDN. As mentioned above, this capability is not yet available with the Azure CDN Standard SKU’s.
Performance improvement
You probably wonder how much this configuration changed the performance of the website. We didn’t expect miracles, but we were very happy with the new score of caching and CDN:
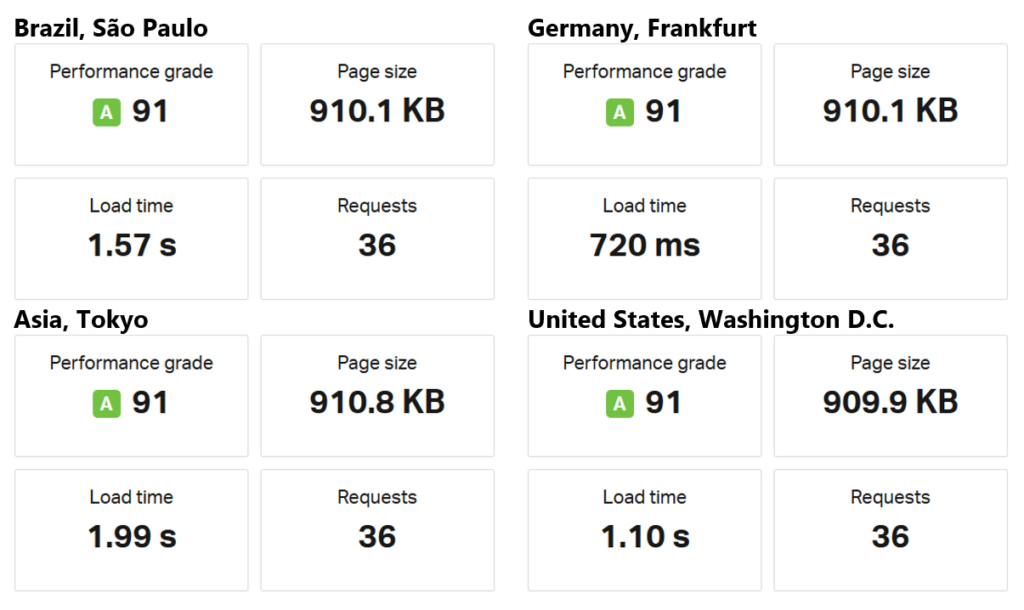
We had a significant improvement in speed from oversees. There is a slight lag when accessing the website from the same local area, but the load time of 720 ms is still very fast. As you can see from above, the configuration was also super easy and set up requires only three steps:
- Setup Azure CDN
- Install a Joomla/WordPress plugin or extension
- Configure the CMS to use CDN
We reduced total load time from more than three seconds down to approximately one second (average). This is a considerable reduction that you can feel as an end-user. Of course, these results can change again when more content has been published. Also updating Joomla/WordPress or updating the plugins could have an impact. But the performance improvements after implementing caching and a CDN are overwhelmingly positive.
Questions or feedback? Let us know in the comments.
Follow Michel @michelluescher and on his blog cloudelicious.net