
The eBPF for Windows runtime has introduced a new mode of operation, native code generation, which exists alongside the currently supported modes of operation for eBPF programs: JIT (just-in-time compilation) and an interpreter, with the administrator able to select the mode when a program is loaded. The native code generation mode involves loading Windows drivers that contain signed eBPF programs. Due to the risks associated with having an interpreter in the kernel address space, it was decided to only enable it for non-production signed builds. The JIT mode supports the ability to dynamically generate code, write them into kernel pages, and finally set the permissions on the page from read/write to read/execute.
Enter Windows Hyper-V hypervisor, a type 1 hypervisor, which has the Hypervisor-protected Code Integrity (HVCI) feature. It splits the kernel memory space into virtual trust levels (VTLs), with isolation enforced at the hardware level using virtualization extensions of the CPU. Most parts of the Windows’ kernel and all drivers operate in VTL0, the lowest trusted level, with privileged operations being performed inside the Windows secure kernel operating in VTL1. During the boot process, the hypervisor verifies the integrity of the secure kernel using cryptographic signatures prior to launching it, after which the secure kernel verifies the cryptographic signature of each code page prior to enabling read/execute permissions on the page. The signatures are validated using keys obtained from X.509 certificates that chain up to a Microsoft trusted root certificate. The net effect of this policy is that if HVCI is enabled, it is no longer possible to inject dynamically generated code pages into the kernel, which prevents the use of JIT mode.
Similarly, Windows uses cryptographic signatures to restrict what code can be executed in the kernel. In keeping with these principles, eBPF for Windows has introduced a new mode of execution that an administrator can choose to use that maintains the integrity of the kernel and provides the safety promises of eBPF: native code generation. The process starts with the existing tool chains, whereby eBPF programs are compiled into eBPF bytecode and emitted as ELF object files. The examples below assume the eBPF-for-Windows NuGet package has been unpacked to c:\ebpf and that the command is being executed from within a Developer Command Prompt for VS 2019.
How to use native code generation
Hello_world.c:
// Copyright (c) Microsoft Corporation
// SPDX-License-Identifier: MIT
#include "bpf_helpers.h"SEC("bind")
int
HelloWorld()
{
bpf_printk("Hello World!");
return 0;
}
Compile to eBPF
>clang -target bpf -O2 -Werror -Ic:/ebpf/include -c hello_world.c -o out/hello_world.o
>llvm-objdump -S out/hello_world.o
eBPF bytecode
b7 01 00 00 72 6c 64 21 r1 = 560229490
63 1a f8 ff 00 00 00 00 *(u32 *)(r10 - 8) = r1
18 01 00 00 48 65 6c 6c 00 00 00 00 6f 20 57 6f r1 = 8022916924116329800 ll
7b 1a f0 ff 00 00 00 00 *(u64 *)(r10 - 16) = r1
b7 01 00 00 00 00 00 00 r1 = 0
73 1a fc ff 00 00 00 00 *(u8 *)(r10 - 4) = r1
bf a1 00 00 00 00 00 00 r1 = r10
07 01 00 00 f0 ff ff ff r1 += -16
b7 02 00 00 0d 00 00 00 r2 = 13
85 00 00 00 0c 00 00 00 call 12
b7 00 00 00 00 00 00 00 r0 = 0
95 00 00 00 00 00 00 00 exit
The next step involves a new tool introduced specifically to support this scenario: bpf2c. This tool parses the supplied ELF file, extracting the list of maps and stored programs before handing off the byte code to the eBPF verifier, which proves that eBPF byte code is effectively sandboxed and constrained to terminate within a set number of instructions. The tool then performs a per-instruction translation of the eBPF byte code into the equivalent C statements and emits skeleton code used to perform relocation operations at run time. For convenience, the NuGet package also contains a PowerShell script that invokes bpf2c and then uses MSBuild to produce the final Portable Executable (PE) image, (an image format used by Windows). As an aside, the process of generating the native image is decoupled from the process of developing the eBPF program, making it a deployment time decision rather than a development time one.
> powershell c:\ebpf\bin\Convert-BpfToNative.ps1 hello_world.o
C:\Users\user\hello_world\out>powershell c:\ebpf\bin\Convert-BpfToNative.ps1 hello_world.o
Microsoft (R) Build Engine version 16.9.0+57a23d249 for .NET Framework
Copyright (C) Microsoft Corporation. All rights reserved.

Build started 5/17/2022 9:38:43 AM.
Project "C:\Users\user\hello_world\out\hello_world.vcxproj" on node 1 (default targets).
DriverBuildNotifications:
  Building 'hello_world_km' with toolset 'WindowsKernelModeDriver10.0' and the 'Desktop' target platform.
  Using KMDF 1.15.
<Lines removed for clarity>
Done Building Project "C:\Users\user\hello_world\out\hello_world.vcxproj" (default targets).


Build succeeded.
    0 Warning(s)
    0 Error(s)

Time Elapsed 00:00:03.57

> type hello_world_driver.c
// Snip – Removed boiler plate driver code and map setup.
static uint64_t
HelloWorld(void* context)
{
    // Prologue
    uint64_t stack[(UBPF_STACK_SIZE + 7) / 8];
    register uint64_t r0 = 0;
    register uint64_t r1 = 0;
    register uint64_t r2 = 0;
    register uint64_t r3 = 0;
    register uint64_t r4 = 0;
    register uint64_t r5 = 0;
    register uint64_t r10 = 0;

    r1 = (uintptr_t)context;
    r10 = (uintptr_t)((uint8_t*)stack + sizeof(stack));

    // EBPF_OP_MOV64_IMM pc=0 dst=r1 src=r0 offset=0 imm=560229490
    r1 = IMMEDIATE(560229490);
    // EBPF_OP_STXW pc=1 dst=r10 src=r1 offset=-8 imm=0
    *(uint32_t*)(uintptr_t)(r10 + OFFSET(-8)) = (uint32_t)r1;
    // EBPF_OP_LDDW pc=2 dst=r1 src=r0 offset=0 imm=1819043144
    r1 = (uint64_t)8022916924116329800;
    // EBPF_OP_STXDW pc=4 dst=r10 src=r1 offset=-16 imm=0
    *(uint64_t*)(uintptr_t)(r10 + OFFSET(-16)) = (uint64_t)r1;
    // EBPF_OP_MOV64_IMM pc=5 dst=r1 src=r0 offset=0 imm=0
    r1 = IMMEDIATE(0);
    // EBPF_OP_STXB pc=6 dst=r10 src=r1 offset=-4 imm=0
    *(uint8_t*)(uintptr_t)(r10 + OFFSET(-4)) = (uint8_t)r1;
    // EBPF_OP_MOV64_REG pc=7 dst=r1 src=r10 offset=0 imm=0
    r1 = r10;
    // EBPF_OP_ADD64_IMM pc=8 dst=r1 src=r0 offset=0 imm=-16
    r1 += IMMEDIATE(-16);
    // EBPF_OP_MOV64_IMM pc=9 dst=r2 src=r0 offset=0 imm=13
    r2 = IMMEDIATE(13);
    // EBPF_OP_CALL pc=10 dst=r0 src=r0 offset=0 imm=12
    r0 = HelloWorld_helpers[0].address(r1, r2, r3, r4, r5);
    if ((HelloWorld_helpers[0].tail_call) && (r0 == 0))
        return 0;
    // EBPF_OP_MOV64_IMM pc=11 dst=r0 src=r0 offset=0 imm=0
    r0 = IMMEDIATE(0);
    // EBPF_OP_EXIT pc=12 dst=r0 src=r0 offset=0 imm=0
    return r0;
}
As illustrated here each eBPF instruction is translated into an equivalent C statement, with eBPF registers being emulated using stack variables named R0 to R10.
Lastly, the tool adds a set of boilerplate code that handles the interactions with the I/O Manager required to load the code into the Windows kernel, with the result being a single C file. The Convert-BpfToNative.ps1 script then invokes the normal Windows Driver Kit (WDK) tools to compile and link the eBPF program into its final PE image. Once the developer is ready to deploy their eBPF program in a production environment that has HVCI enabled, they will need to get their driver signed via the normal driver signing process. For a production workflow, one could imagine a service that consumes the ELF file (the eBPF byte code), securely verifies that it is safe, generates the native image, and signs it before publishing it for deployment. This could then be integrated into the existing developer workflows.
The eBPF for Windows runtime has been enlightened to support these eBPF programs hosted in Windows drivers, resulting in a developer experience that closely mimics the behavior of eBPF programs that use JIT. The result is a pipeline that looks like this:

The net effect is to introduce a new statically sandboxed model for Windows Drivers, with the resulting driver being signed using standard Windows driver signing mechanisms. While this additional step does increase the time needed to deploy an eBPF program, some customers have determined that the tradeoff is justified by the ability to safely add eBPF programs to systems with HVCI enabled.
Diagnostics and eBPF programs
One of the key pain points of developing eBPF programs is making sure they pass verification. The process of loading programs once they have been compiled, potentially on an entirely different system, gives rise to a subpar developer experience. As part of adding support for native code generation, eBPF for Windows has integrated the verification into the build pipeline, so that developers get build-time feedback when an eBPF program fails verification.
Using a slightly more complex eBPF program as an example, the developer gets a build-time error when the program fails verification:
eBPF C code
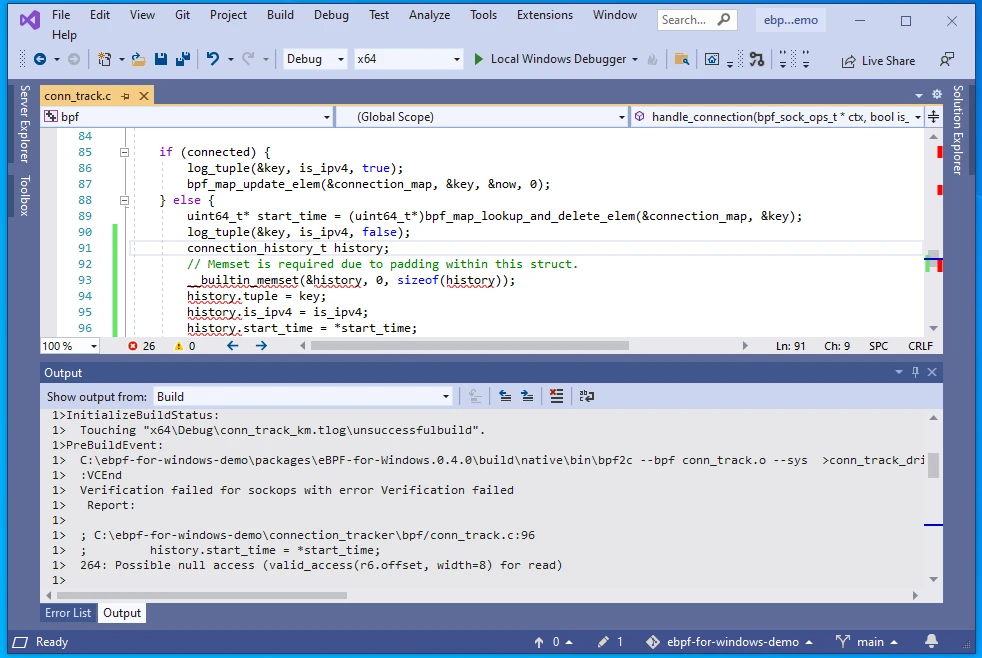
This then points the developer to line 96 of the source code, where they can see that the start time variable could be NULL.
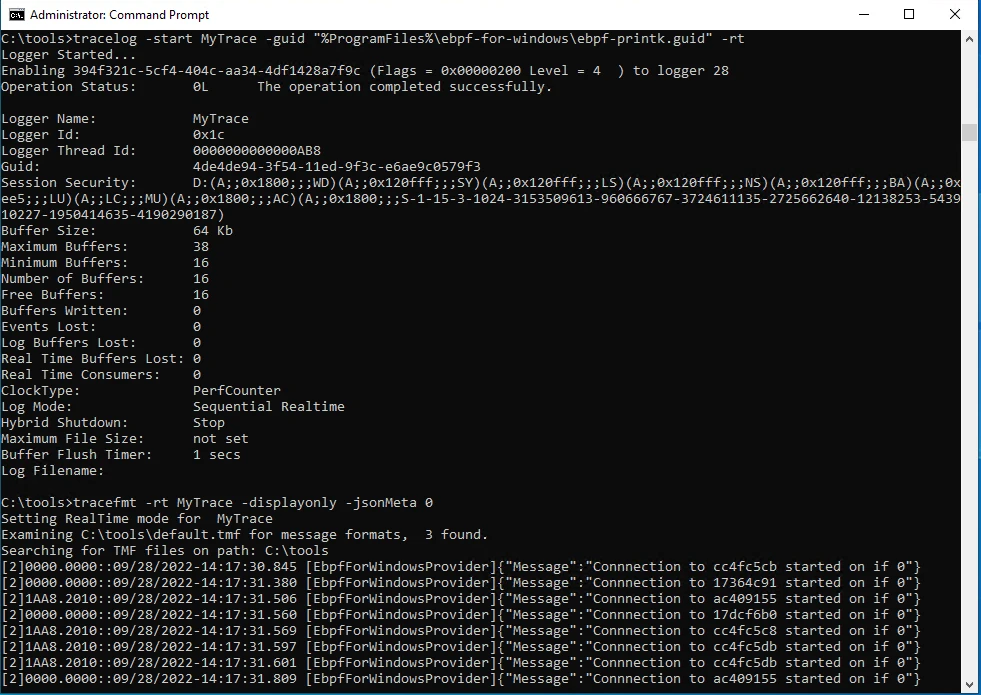
As with all other instances of code, eBPF programs can have bugs. While the verifier can prove that code is safe, it is unable to prove code is correct. One approach that was pioneered by the Linux community is the use of logging built around the bpf_printk style macro, which permits developers to insert trace statements into their eBPF programs to aid diagnosability. To both maintain compatibility with the Linux eBPF ecosystem as well as being a useful mechanism, eBPF for Windows has adopted a similar approach. One of the key differences is how these events are implemented, with Linux using a file-based approach and Windows using Event Tracing for Windows (ETW). ETW has a long history within Windows and a rich ecosystem of tools that can be used to capture and process traces.
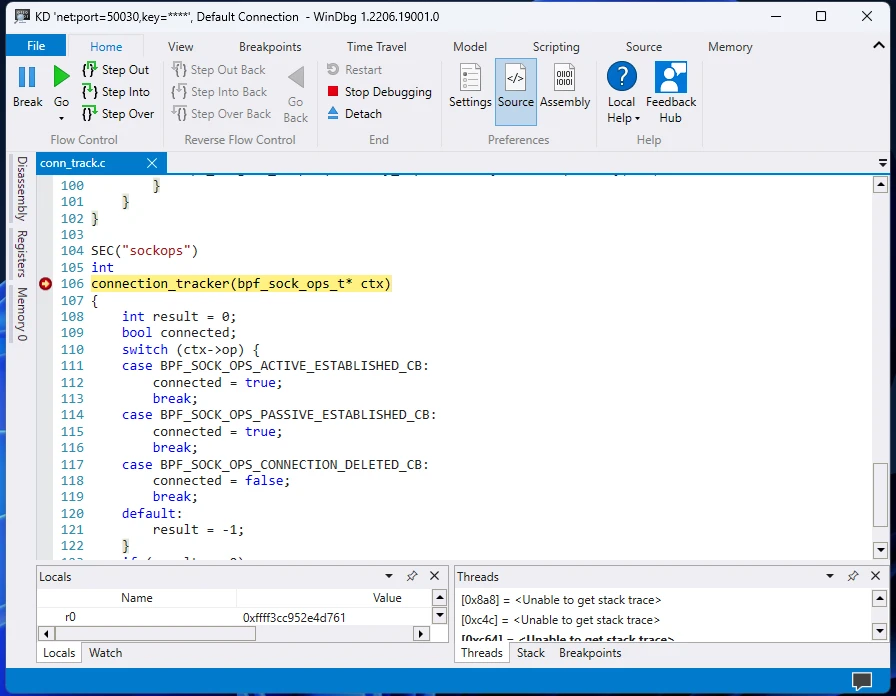
A second useful tool that is now available to developers using native-code generation is the ability to perform source-level debugging of eBPF programs. If the eBPF program is compiled with BTF data, the bpf2c tool will translate this in addition to the instructions and emit the appropriate pragmas containing the original file name and line numbers (with plans to extend this to allow the debugger to show eBPF local variables in the future). These are then consumed by the Windows Developer Kit tools and encoded into the final driver and symbol files, which the debugger can use to perform source-level debugging. In addition, these same symbol files can then be used by profiling tools to determine hot spots within eBPF programs and areas where performance could be improved.
Learn more
The introduction of support for a native image generation enhances eBPF For Windows in three areas:
- A new mode of execution permits eBPF programs to be deployed on previously unsupported systems.
- A mechanism for offline verification and signing of eBPF programs.
- The ability for developers to perform source-level debugging of their eBPF programs.
While support will continue for the existing JIT mode, this change gives developers and administrators flexibility in how programs are deployed. Separating the process of native image generation from the development of the eBPF program places the decision on how to deploy an eBPF program in the hands of the administrator and unburdens the developer from deployment time concerns.