Backup and Restore Enhancements in SQL Server 2014 CTP2
SQL Server 2014 CTP2 includes three SQL Server Backup and Restore enhancements. These enhancements enable using Windows Azure for backups, providing options to ease and automate backup management, and improved security for backups through encryption.
In addition, to enable backup to Windows Azure from previous versions of SQL Server, a stand-alone tool is now available. A brief description of the tool and the link to the download center is included at the end of this article.
The three enhancements are described in detail below:
SQL Server Management Studio Support for SQL Server Backup to URL (Windows Azure storage)
Support for SQL Server backup to and restore from the Windows Azure was introduced in SQL Server 2012 SP1 CU2 with Transact-SQL, SMO and PowerShell support. In the current release, the feature is further enhanced to include UI support. Backup and Restore tasks, and maintenance plans now include URL as a destination option when backing up or restoring a database.
Following are the UI changes in SSMS:
Backup UI Changes:
- When you right click a database and select Tasks, and choose Backup, the Back Up Database dialog that launches includes new options to support backup to Windows Azure. The dialog box has three pages, General, Media Options, and Backup Options. The General page now includes URL as one of the destination options.

- File Name: Name of the backup file.
- SQL Credential: You can either specify an existing SQL Server Credential or create a new one by clicking the Create… button. The new dialog that opens when you click create requires a management certificate or a publishing profile for the Azure subscription. If you do not have access to the management certificate or publishing profile, you can create a credential by specifying the Windows Azure storage account name and access keys. In SSMS, from the instance, right click Security, select New, and select Credential to create a new SQL Credential.
- Azure storage container: The name of the Azure storage container.
- URL prefix: This is generated automatically using the information you provide in the above fields. You don’t have to edit the information in this field. If however, you do, make sure it matches with the other information. For example. If you manually edit the storage URL, then the SQL Credential should have the authentication information for the storage specified.
2. If you click the Create… button, you will see a new dialog titled Backup to URL – Create Credential as shown below.

- SQL Credential: Enter the name for the new SQL credential. This credential is used by SQL Server to authenticate to the Windows Azure storage account.
- Windows Azure Credentials: When using this dialog to create a credential, you must provide a Windows Azure Management Certificate added to the local certificate store or a publishing profile downloaded to your computer to validate the subscription and the storage account information. If you use the publishing profile, the subscription and the certificate are automatically populated.
- Select, type, or paste your Windows Azure subscription ID that matches the management certificate from the local certificate store.
- Storage Account: Select the account you want to use for storing the backups. The system stores this information in the SQL Credential that is created when you click Create.
3. When you select URL as the destination, you will only see certain options enabled on the Media Options page. If you want to overwrite a backup stored in Windows Azure storage, you can do so using Transact-SQL using the WITH FORMAT option.

Maintenance Plan Wizard has similar changes to the Define a Backup Page to support backup to Windows Azure storage.
Restore UI Changes:
In the Restore task, you now have the option of selecting URL as the device to restore from. If you select URL, you are asked to specify the SQL Credential to authenticate to the Windows Azure storage.
- When you select Device on the General page of the Restore task, the Backup Devices dialog that launches includes URL as a backup media Type.

2. When you select URL as the media type and click Add, you see a new dialog –Connect to Windows Azure Storage, which allows you to specify the SQL Credential to authenticate to the storage account.
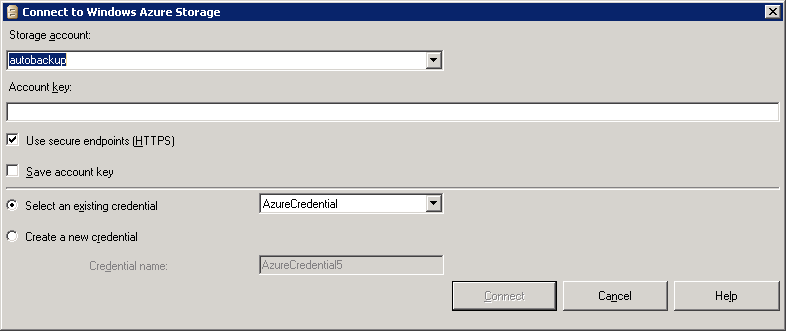
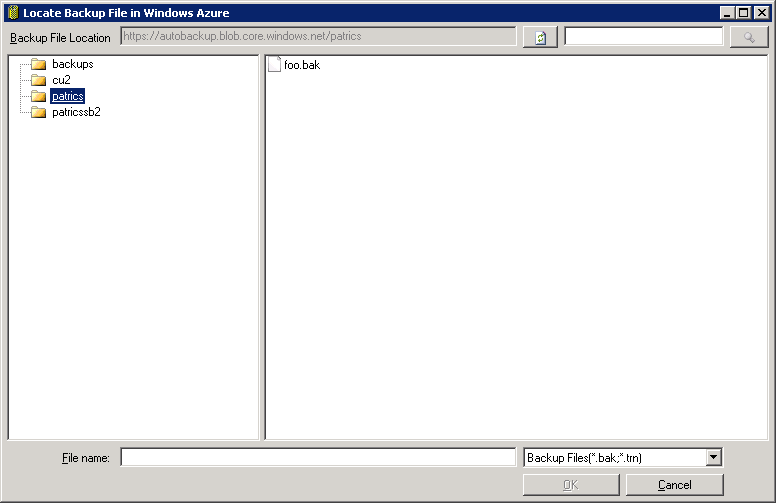
3. Once connected to the storage, the backup files are retrieved from the storage.
Here is the link to the topic that describes the feature in detail: SQL Server Backup to URL
SQL Server Managed Backup to Windows Azure Storage
Built on top of the SQL Server Backup to URL technology, SQL Server 2014 CTP2 includes the option to let SQL Server create and manage the backup strategy. SQL Server creates a backup strategy intelligently, one that is based on recoverability to a point in time within the specified retention period and transaction activity on the database. The destination for the backup file is Windows Azure Storage. Once you configure this feature either for a database or for an entire instance, SQL Server manages the backup frequency for full and log backups. It supports point in time restore based on the retention time period you specify when configuring SQL Server Managed Backup. It also supports the use of encryption. Encryption is also a new feature released in SQL Server 2014 CTP2 and is described later in this blog post.
Following are sample Transact-SQL statements for configuring SQL Server Managed Backup to Windows Azure.
For a database:
Use msdb;
 GO
 EXEC smart_admin.sp_set_db_backup
 @database_name='TestDB'
 ,@enable_backup=1
 ,@retention_days =30
 ,@credential_name ='MyCredential'
 ,@encryption_algorithm ='AES_256'
 ,@encryptor_type= 'Certificate'
 ,@encryptor_name='MyServerCert01';
 GO
For an instance of SQL Server:
Use msdb;
 GO
 EXEC smart_admin.sp_set_instance_backup
 @enable_backup=1
 ,@retention_days=30
 ,@credential_name='sqlbackuptoURL',
 ,@encryption_algorithm ='AES_128'
 ,@encryptor_type= 'Certificate'
 ,@encryptor_name='MyBackupCert';

 GO
Important: To create a backup certificate to use when configuring smart backup, use the steps described in the Encrypted Backup section below.
Here is the link to the topic that describes the feature in detail: SQL Server Managed Backup to Windows Azure
Encrypted Backup
To secure you backup data, you can now select to encrypt when you create a backup. The encryption options include an encryption algorithm and a certificate or asymmetric key to be used for the encryption. Only asymmetric keys residing in the Extended Key Management is supported.
Multiple encryption algorithms up to AES 256 bit are supported giving you a variety of algorithms to choose from. Adding backup encryption to a TDE encrypted database, gives additional protection for your data.
You can control the process using Transact-SQL, SMO, PowerShell, or SSMS. Encryption options can also be used when configuring SQL Server Managed Backup to Windows Azure, therefore providing additional security for your off-site data.
It is very important that the certificate or key used for encrypting must be backed up to a different location than the backup that the certificate or key is used to encrypt. Without this certificate or key the backup file cannot be restored.
Important: Restore validates the thumbprint of the certificate during the restore operation. Therefore, the certificate used to create the backup must be retained in its original state. Renewing the expiry date for example changes the thumbprint and thus can render the certificate unusable.
Below are some simple steps you can follow to test out the feature.
1. Create a Database Master Key for the master database on the instance
USE master;
 GO
 CREATE MASTER KEY ENCRYPTION BY PASSWORD = '23987hxJ#KL95234nl0zBef';
2. Create an encryption certificate
Use Master
 GO
 CREATE CERTIFICATE MyTestDBBackupEncryptCert
 WITH SUBJECT = 'MyTestDB Backup Encryption Certificate';
3. Backup a database and choose the encryption option, specify an encryption algorithm, specify the certificate to use.
BACKUP DATABASE [MyTestDB]
 TO DISK = N'C:\Program Files\Microsoft SQL Server\MSSQL12.MSSQLSERVER\MSSQL\Backup\MyTestDB.bak'
 WITH
 ENCRYPTION
 (
 ALGORITHM = AES_256,
 SERVER CERTIFICATE = MyTestDBBackupEncryptCert
 ),
 STATS = 10
 GO
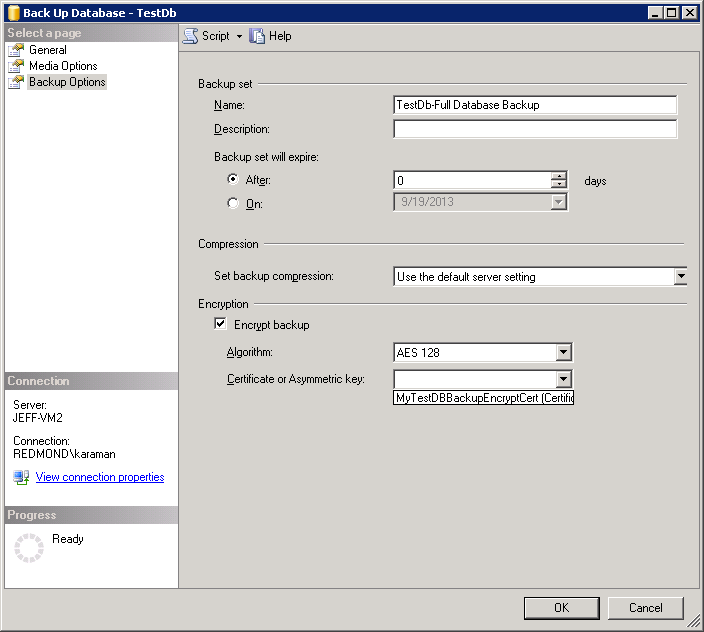
Backup UI Changes:
The Backup Options page of the Back Up Database Task dialog has the new encryption options.
Maintenance Plan Wizard has similar changes to the Define a Backup Page to support backup to Windows Azure storage.
Here is the topic that describes the feature in detail: Backup Encryption
SQL Server Backup to Windows Azure Tool
This stand-alone tool can be configured to redirect SQL Server backups to Windows Azure storage. To be used for SQL Server versions that do not have the built in ability to backup to Windows Azure, it also includes the options to encrypt and compress during backup.
For more information, see the download page.