- Home
- Security, Compliance, and Identity
- Security, Compliance, and Identity Blog
- Configuring Remote Desktop IP Virtualization II
- Subscribe to RSS Feed
- Mark as New
- Mark as Read
- Bookmark
- Subscribe
- Printer Friendly Page
- Report Inappropriate Content
Part II: Using Group Policy MMC
Part I of this blog post series describes what Remote Desktop IP Virtualization is all about, illustrates the scenarios where it can add value, lists the requirements for configuring a server in Remote Desktop IP Virtualization mode and details the steps involved in configuring per-program and per-session Remote Desktop IP Virtualization through RD Session Host Configuration MMC snap-in.
This post explains how to do all this automatically on managed computers by using Group Policy (GP) objects.
-
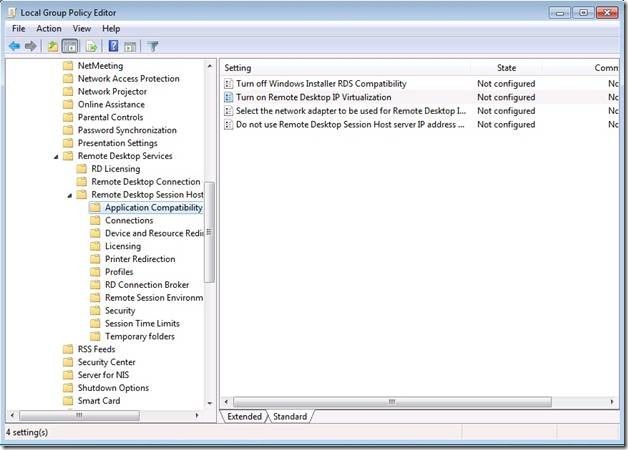
Launch gpedit.msc and navigate to Application Compatibility. Navigate to
Computer configuration Administrative Templates Windows ComponentsRemote Desktop Services Remote Desktop Session Host Application Compatibility
-
Configure the network adapter for IP Virtualization.
Double click or right click “Select the network adapter to be used for Remote Desktop IP Virtualization” and select ‘Edit’ option to bring up the GP dialog.
a. Select “Enabled” to enable this GP or “Disabled” to disable this GP
b. Optional: Enter a comment for the setting in the comment field.
c. In the Options box on the left pane, enter the network ID in the form of “IP Address/network mask length”
d. Click OK or Apply to accept the settings.
Remote Desktop IP Virtualization will automatically find the network adapter that has been assigned the IP address in the subnet. Refer to http://technet.microsoft.com/en-us/library/cc958832.aspx for how to convert a network mask to a network mask length.
Note:
· Only single network adapter scenarios are currently supported. If the server has multiple enabled network adapters, only the adapter specified in the settings will be used for Remote Desktop IP Virtualization. -
Enable Remote Desktop IP virtualization
Double click or right click “ Turn on Remote Desktop IP Virtualization” and select the ‘Edit’ option to bring up the GP dialog.
a. Select “ Enabled ” to enable this GP or “ Disabled ” to disable this GP.
b. Optional: Enter any comment for the setting in the comment field.
c. To configure Per Session IP virtualization mode, select ‘ Per Session’ IP Virtualization mode. Click OK or Apply to accept the settings.
d. To configure Per Program IP virtualization mode, select ’Per Program’ IP Virtualization mode. In the “Assign virtual IP addresses to these programs”, enter the names of programs to be assigned virtual IP address. You can enter just the name of program, in which case Remote Desktop IP Virtualization will assign a virtual IP to any program that has the same name, or you can enter full path to the program, in which case only the program at the specified location will be virtualized. In the example below, any program named iexplore.exe and only c:latestmstsc.exe will be assigned the virtual IP address. Click OK or Apply to accept the settings.
Note:
· “Per Program” mode is of no practical significance if no programs are selected that use virtual IP addresses.
· If the server is configured in “Per Session” mode, the list of applications specified in the “Assign virtual IP addresses to these programs” is ignored.
If Remote Desktop IP Virtualization is enabled but virtual IP addresses are not available (i.e. DHCP server runs out of virtual IP addresses), the default behavior is for the session to fall back to using the IP address of the Remote Desktop Session Host server. If you wish to disallow this behavior and force unique IP addresses to be used for individual sessions or specified applications, you can configure this through the “Do not use Remote Desktop Session Host server IP address when virtual IP address is not available” policy setting.
So, if virtual IP addresses are not available, with this policy enabled:
- If the server is configured in per session RD IP Virtualization mode – After user logs on, a message box is popped in the session warning the user that no IP is available and user can chose to continue or logoff, if the user chooses to continue, no winsock connectivity is available for the session.
- If the server is configured in per program RD IP Virtualization mode – Similar to per session, except that the message box pops up only when the user starts the FIRST winsock application, (like browsing…). The only choice for the user is to click the ‘OK’ button restricting him from launching this application.
At no time is a session force disconnected or force logged off.
To configure the above policy setting, double click or right click “Do not use Remote Desktop Session Host server IP address when virtual IP address is not available” and select ‘Edit’ option to bring up GP dialog.
a. Select “Enabled” to enable this GP i.e. the IP address of the RD Session Host server is not used if a virtual IP is not available.
b. Select “Disabled” to disable this GP i.e. the IP address of the RD Session Host server is used if a virtual IP is not available.
c. Optional: Enter any comment for the setting in the comment field.
d. Click OK or Apply to accept the settings.
Related Posts:
In addition to RD Session Host Configuration MMC snap-in and GPO, Remote Desktop IP Virtualization can also be configured through RDS Provider for Windows PowerShell and WMI.
Part III (coming soon) of this blog post series has information on configuring RD IP virtualization through RDS Provider for Windows PowerShell.
You must be a registered user to add a comment. If you've already registered, sign in. Otherwise, register and sign in.


