

Configuring WinRM over HTTPS to enable PowerShell remoting

 By Marcus Robinson, Technical Evangelist at Microsoft
PowerShell remoting allows machines to be remotely managed using PowerShell. PowerShell remoting is commonly used with virtual machines running on Azure. When we create a classic/service manager VM on Azure, it is automatically configured with a WinRM endpoint so that we can connect using PowerShell remoting. However, if we create a VM using Resource Manager WinRM over HTTPS, it’s not configured by default. I had a query from a colleague regarding enabling WinRM over HTTPS, so I’ve documented the steps I provided to get them up and running.
The virtual machines I tested this with were running Windows Server 2012 R2, and the client OS was Windows 10. Both were clean installs with no prior configuration beyond the default configuration made by Azure.
Modify Network Security Group
WinRM over HTTPS uses port 5986. The first step is to enable traffic directed to this port to pass to the VM. This is done by adding a rule to the Network Security Group (NSG):
-
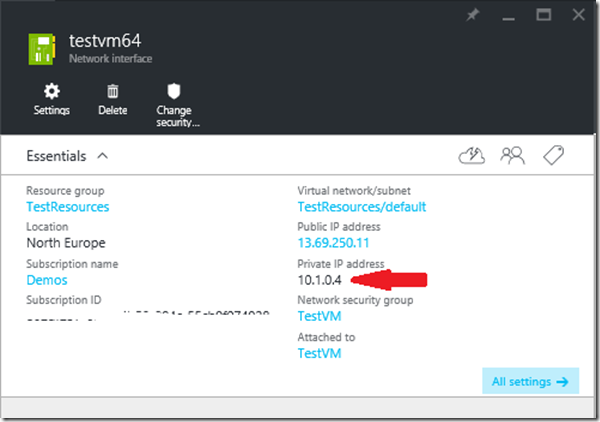
- Navigate to Virtual Machines | <your_vm> | Settings | Network Interfaces | <your_nic>
- Click on the NSG name:
- Go to Settings | Inbound Security Rules
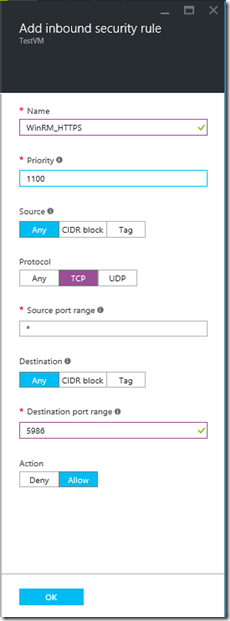
- Add a rule called WinRM_HTTPS for TCP port 5986. You may choose to (and I would recommend) restricting the source address to your client’s public IP.
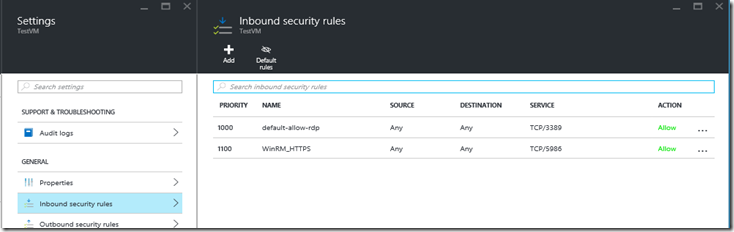
- The NSG should now look like this:
Create Firewall Rule inside the server OS
- We must enable traffic over 5986 through Windows Firewall.
- Open Windows Firewall with Advanced Security

- Navigate to Inbound Rules | New Rule…
- In the Wizard select Port, TCP, 5986, Allow the connection, leave all network profiles selected, and name it WinRM HTTPS. The rule will look something like this:

Create Cert
To secure the connection a certificate needs to be created inside the server VM. You may choose to use a publicly trusted certificate, but for our purposes we are using a self-signed certificate as I just want to get up and running as quickly as possible. You need to provide a DNS name, later in the post we will connect via IP address and skip the DNS name check so it doesn’t actually matter what you set this to. However, best practice would be to ensure you have a DNS name resolving to your Azure VM’s public IP address and use that DNS name.
- Log onto the server using RDP.
- Open a PowerShell prompt as Administrator and execute the following: New-SelfSignedCertificate -DnsName <your_server_dns_name_or_whatever_you_like> -CertStoreLocation Cert:\LocalMachine\My
- Copy the certificate thumbprint returned by the command to the clipboard:

Configure WinRM to listen on 5986
By default, WinRM over HTTP is configured to listed on 5985. We need to enable it on 5986 and bind the certificate.
- Open a command prompt window as Administrator (not PowerShell)
- Run the following command, pasting your new certificate’s thumbprint into the command (all on one line):
winrm create winrm/config/Listener?Address=*+Transport=HTTPS @{Hostname=”<your_server_dns_name_or_whatever_you_like>”; CertificateThumbprint=”<certificate_thumbprint_from powershell>”}
You should get the following returned:

Connect from the client PC
To connect from the client PC, open a PowerShell prompt and execute the following, using your server IP address/DNS name and local admin username. Please note that as we are using a self-signed certificate I have skipped the Certification Authority (CA) check, and as I’m using an IP address I have skipped the Common Name (CN) check. You will be prompted for the password.
$so = New-PsSessionOption –SkipCACheck -SkipCNCheck
Enter-PSSession -ComputerName <ip_address_or_dns_name_of_server> -Credential <local_admin_username> -UseSSL -SessionOption $so
You should now get a prompt as follows:

You can now execute commands on your remote server!