Where did my Dynamics 365 Business Central Document View in Outlook go?
With the newest version of Outlook clients, the Outlook team has changed the way add-in manifest files specify their contextual rules for matching text within the body of the email. This change rolled out in requirement set version 1.5, which is used by the latest version of the Outlook 2016 desktop client as well as the new version of OWA. In short, the Document View add-in is no longer usable in the newest Outlook clients.
Fix on the way
The Document View Outlook add-in for Microsoft Dynamics 365 Business Central has been updated to version 2.1.0.0, which includes the required changes so that any document numbers found within the email body will be highlighted once again, giving you the ability to quickly look at document information in the context of your email. This update is part of the upcoming 2019 release wave 2 for Business Central.
Great! What about in the meantime?
If you’re feeling adventurous, you can download and modify your Document View add-in manifest file so that you can get your Document View back sooner than thenext major update of Business Central.
Step One: Download the add-in manifest file
The first step is to get to the Office Add-in Management page in Business Central and download the Document View manifest file.

Figure 1 – Downloading the Document View add-in manifest file
This will download a file titled Document View.xml to your machine. We will need to open this file in a text editor.
Step Two: Append a new section to the add-in manifest file
Once you have opened your Document View manifest file, identify the closing </OfficeApp> tag.
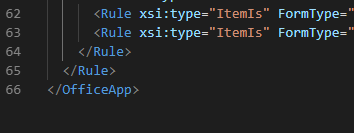
Figure 2 – End of manifest file
In between </Rule> and </OfficeApp>, we will be adding a new XML section to the file. Make a new line after the </Rule> element, then copy and paste the XML below into this area.
 <DisableEntityHighlighting>false</DisableEntityHighlighting>
  <VersionOverrides xmlns="http://schemas.microsoft.com/office/mailappversionoverrides" xsi:type="VersionOverridesV1_0">
    <!-- VersionOverrides for the v1.1 schema -->
    <VersionOverrides xmlns="http://schemas.microsoft.com/office/mailappversionoverrides/1.1" xsi:type="VersionOverridesV1_1">
      <Requirements>
        <bt:Sets DefaultMinVersion="1.5">
          <bt:Set Name="Mailbox" />
        </bt:Sets>
      </Requirements>
      <Hosts>
        <Host xsi:type="MailHost">
          <DesktopFormFactor>
            <!-- DetectedEntity -->
            <ExtensionPoint xsi:type="DetectedEntity">
              <Label resid="contextLabel" />
              <SourceLocation resid="detectedEntityUrl" />
              <Rule xsi:type="RuleCollection" Mode="And">
                <Rule xsi:type="ItemIs" ItemType="Message" />
                <Rule xsi:type="RuleCollection" Mode="Or">
                  <Rule xsi:type="ItemHasRegularExpressionMatch" ... />
                  <Rule xsi:type="ItemHasRegularExpressionMatch" ... />
                </Rule>
              </Rule>
            </ExtensionPoint>
          </DesktopFormFactor>
        </Host>
      </Hosts>
      <Resources>
        <bt:Urls>
          <bt:Url id="detectedEntityUrl" DefaultValue="Copy URL From Above" />
        </bt:Urls>
        <bt:ShortStrings>
          <bt:String id="contextLabel" DefaultValue="Document View" />
        </bt:ShortStrings>
      </Resources>
    </VersionOverrides>
  </VersionOverrides>
Figure 3 – New manifest section
Make note of the two highlighted sections. In the next step, we will copy values from the original part of your manifest file, replacing these values.
Step Three: Update the templated values
Regular Expression Rules
In the original part of the manifest file, there were either one or two regular expression rules. One is to match document names (such as invoice, order, and so on), and one matches document numbers (such as SQU-1001, INV-1000, and so on). Find these two rules (depending on how you have your number series set up, there may only be one rule). Then copy them and replace the rules in the new section (highlighted in Figure 3).
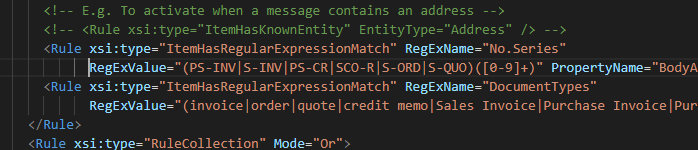
Figure 4 – The rules from the original add-in manifest file. Copy these to the corresponding area in the new section.
Detected Entity URL
The last thing to update is the detectedEntityUrl value within the Resources section of the manifest file. You will get this from one of the URLs in the top part of the manifest file, within the FormSettings section.
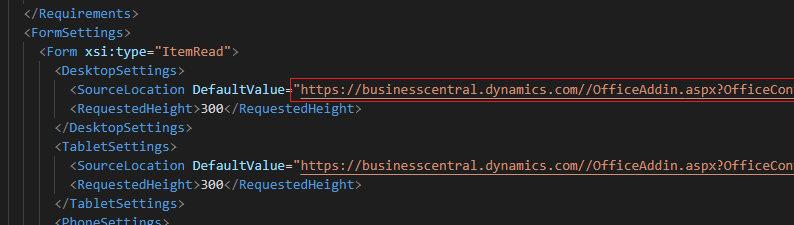
Figure 5 – The URL to copy and paste into the detectedEntityUrl value
Once you have made the required changes, make sure to save your manifest file. It is now ready to deploy to Outlook.
Step Four: Deploy your add-in manifest file
To deploy the new manifest file, we will need to open up OWA. As there are multiple ways to deploy Outlook add-ins, if you already have a preferred method, you can do that and skip this step. The easiest way I’ve found to deploy add-ins is to navigate directly to this URL: https://outlook.office.com/owa/?path=/options/manageapps. Give it a second to load, and then you should see something similar to Figure 6.
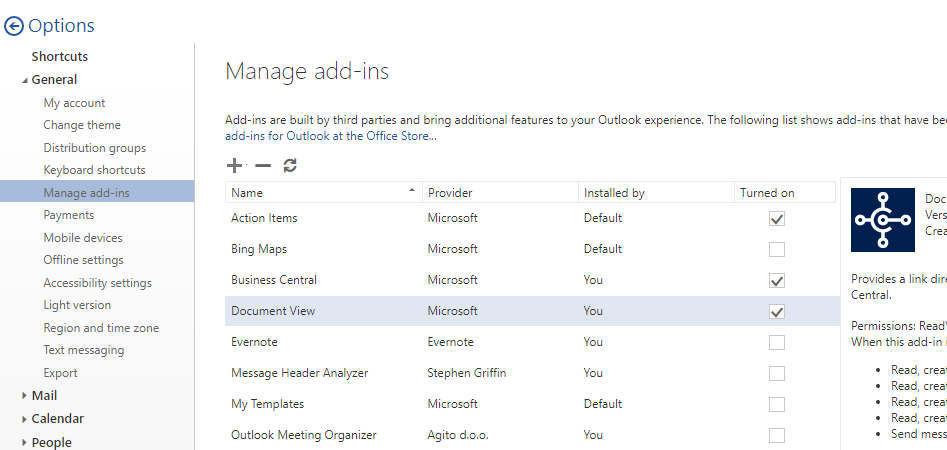
Figure 6 – Manage add-ins view within OWA
Click the + button at the top of the add-in list. Then choose Add from a file. In the flyout window on the right, browse to your updated manifest file, then click Next and review the confirmation warning. Finally, click Install. Assuming everything in your manifest file is correct, you will get a success confirmation.
That’s it
Your Outlook add-in is now ready to go, and it should now highlight document numbers the same way that you are used to.
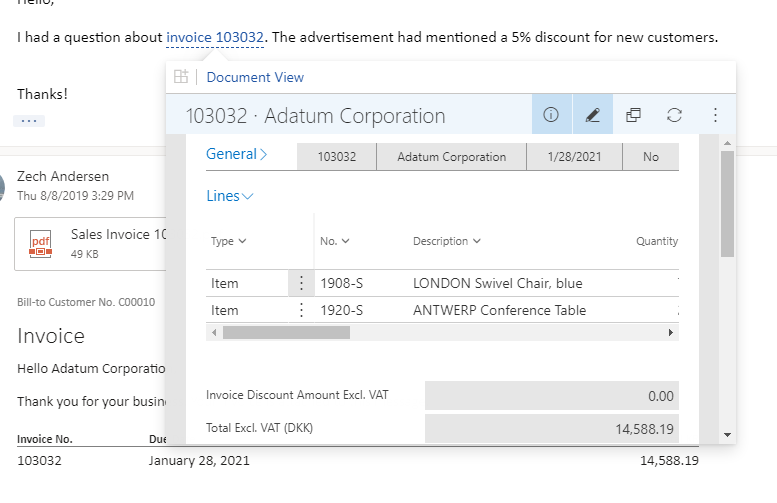
Figure 7 – Document View add-in back in action!