
Introduction
Over the last few years IoT devices, machine learning (ML), and artificial intelligence (AI) have become very popular and now a lot of companies are moving forward to use them in production. All cloud providers, including Microsoft Azure, provide services on how to deploy developed ML algorithms to edge devices. The main concern of some industries (e.g., automotive, agriculture) is that in production the cost for data transfer, out of the total cost of ownership, could be huge.
First of all, let’s take a look at how Azure ML IoT works when reducing the data transfer matters.
There are multiple situations when working with predictions in “offline” mode is needed, when the device doesn’t have direct access to the internet. Here are a couple of them:
- Underground facilities (parking lots, basement, some part of factories without a WiFi connection)
- Movables devices (vehicles, planes, drones, etc.)
Azure ML IoT general overview
Before we continue, let’s take a look at two different types of devices and how they could be connected to the cloud.
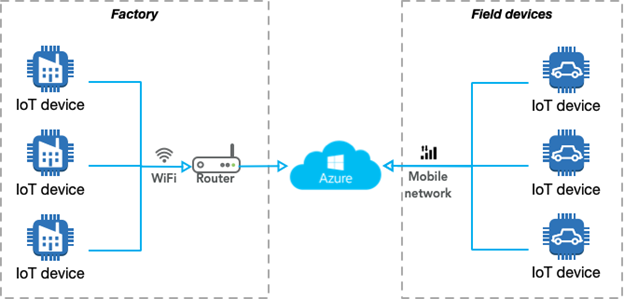
As we can see, usually non-movable IoT devices (for instance, factories) use WiFi or Ethernet to connect to the internet. Other types of devices are movable and for some industries (e.g., automotive, maps development, agriculture) a mobile network is the only type of connection available for them (e.g., drones, vehicles).
Azure does not differentiate between these two types of devices—static and movable—and provides a single approach for them. The diagram below illustrates the Azure IoT ML workflow at a summary level:
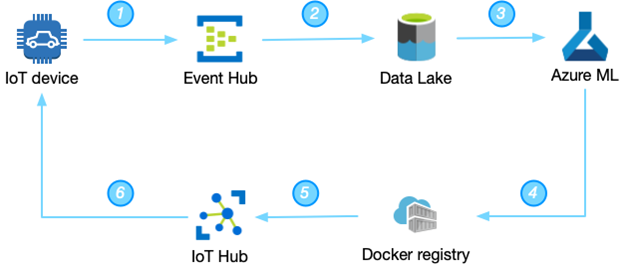
The main stages are:
- IoT device sends data to the Azure Event Hub. This is raw data transfer (usually via MQTT or HTTP connection). One note—the Azure SDK doesn’t currently provide the ability to downsample the data, so developers will need to implement a downsampling process.
- Azure provides an easy way to set up the whole pipeline to move data from the IoT device to the Data Lake. You could take a look at the proposed architecture from the Microsoft team on how to move data from IoT devices to the cloud.
- When data is landed in the Azure Data Lake Storage gen2, an engineer can start the development of their own algorithms. If you are a developer, you could start your journey with Azure ML and IoT with this introduction.
- After the development of the algorithm is completed, an engineer needs to create a Docker container with the serialized model (standard serialization for Azure ML is Python pickle library).
- After that, Azure IoT Hub transfers the newly generated Docker container to the IoT device.
- And the last step—update the IoT device with a newly generated Docker container. IoT Edge core provides the ability to monitor and detect automatically when a new image is available for the IoT device and start the update process automatically, which is amazing. Azure uses moby project to do a lot of things under the hood. Azure moved from Docker CE/EE to moby recently (more information about containers engines here).
What could go wrong here? Usually, you should update the model at least once per month (steps 4 through 6 above). The amount of data that needs to be transferred from the cloud to the device is large, but not critical for one device (60MB per model). Although the update for 1,000 devices will be 60,000 MB (60GB) at a time. 1GB of shared data (for 500 sim cards) for an AT&T business contract in the US costs approximately $720. This means that one update for 1,000 devices costs approximately $1,500. Companies, like delivery businesses, usually have about 100,000 vehicles, so the estimated price for them is approximately $150,000 per month.
Is it possible to reduce the 60MB per model?
Azure ML IoT Docker container deep dive
Microsoft is doing a great job writing the documentation, especially tutorials, for all of the services. For example, Microsoft Azure provides the following guide on how to deploy Azure Machine Learning as an IoT Edge module.
Following this tutorial, it is possible to develop your own anomaly detection algorithm and deploy it to the IoT device.
One of the first actions that you need to do is get a Python notebook from this Azure GitHub repository. Let’s take a closer look at how they developed the ability to create a Docker container with a pickled model in it (Part 4.2 Create Docker Image in the notebook).
from azureml.core.image import Image, ContainerImage

image_config = ContainerImage.image_configuration(runtime= "python",
                                 execution_script="iot_score.py",
                                 conda_file="myenv.yml",
                                 tags = {'area': "iot", 'type': "classification"},
                                 description = "IOT Edge anomaly detection demo")

image = Image.create(name = "tempanomalydetection",
                     # this is the model object
                     models = [model],
                     image_config = image_config,
                     workspace = ws)

image.wait_for_creation(show_output = True)
As you can see, they are triggering the function “create()” from azure.core.image package. (I didn’t find the source code for it on GitHub so appreciate it if anyone could point it out to me in the comments below).
During each run of that command, Azure Python notebooks will store the whole log in Azure Storage. The log file is stored in the new storage, which you can find in the Storage Explorer (usually name of your project and a random alphanumeric sequence) the blob container name is “azureml” and the folder is “ImageLogs.” Inside it, there is a set of folders for each “Image.create” run. Here is my build.log file to reference.
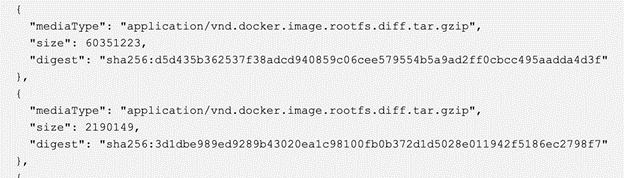
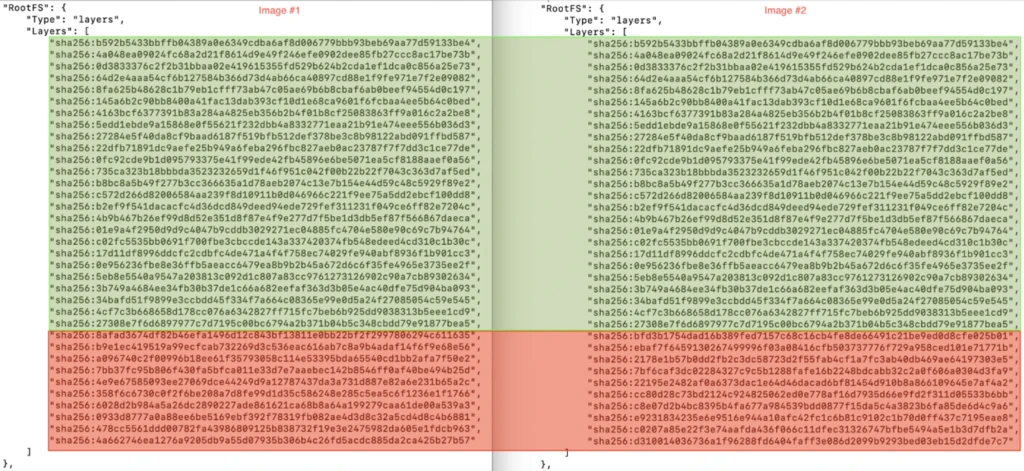
How the Docker image creation process looks like (the first command is on the bottom)?

If you want to deep dive what is unicorn, nginx, flask, etc., I recommend that you to take a look at Paige Liu’s blog post Inside the Docker image built by Azure Machine Learning service.
What is interesting here is that the Microsoft team placed a newly generated model (model.pkl) file on stage #5. The model size itself is only 6KB, but the Docker image layers diff size is 60MB (I’ve checked that on the device, 60MB was transferred from the cloud to the device).
During the docker creation process in our Python notebook we have the following code:
# This specifies the dependencies to include in the environment
from azureml.core.conda_dependencies import CondaDependencies

myenv = CondaDependencies.create(conda_packages=['pandas', 'scikit-learn', 'numpy'])

with open("myenv.yml","w") as f:
    f.write(myenv.serialize_to_string())
Microsoft provides the ability to select which conda packages are required to be installed on the device, which is great. But on which layer they are deploying it in the Docker container? As we can see from the layered images above, it’s on layer #11. What is the size of this layer?
60MB as an archive (you can find the size of the layer in the meta-information for your container in the Azure Container registry). If you are not familiar with Docker images, I should explain it a little bit more here why this is important and why this layer on “top” means that we need to transfer it all the time to the edge device.
Docker image layers overview
Each Docker container contains a base image and then a number of layers (unlimited) with additional files in it. Each layer (including the base image layer) has its sha5 hash, which is almost unique. The image below shows how this works (thank you cizxs for this diagram):
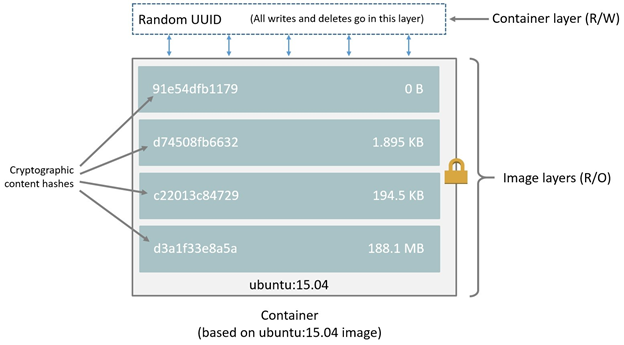
During the “pull,” Docker checks the local cache for that sha5 number and if a layer already exists then there’s no need to download it from the server. This reduces the size, which we need to transfer between Docker repository and end device. Usually, the Docker size for Python with all DS libraries is ~1GB, but with this layered approach, we need to transfer only a small amount of this information after the first setup (you can find more information on the internet, but I recommend to start from this Stackoverflow answer).
Each time we run Docker command (RUN / COPY / etc.), we are building a new layer. This newly generated layer will have its cryptographic hash. For us, it means that each new run of “Images.create()” function will generate a new layer with conda packages, even if we had not modified that section.
Azure ML IoT Docker container optimizations
Without any changes Docker container layers look like that:
As you can see, we’ve discovered where our 60MB came from. But what can we do with that? In theory, there are multiple steps that we could try:
- Update the Docker file and avoid any dependencies (you could do your base image in theory). See Microsoft documentation for this step.
- Modify the Python notebook.
Solution #1 will not work because during steps #6-#11, the Docker image also installs a lot of other components including Azure services and there’s no ability to override them.
Those services are already available after the first installation and already available on the edge device, so could we try to re-use them from the first image instead of trying to transfer them all the time?
First of all, we need to create a Docker image which will be based on the first version of the image, which is already on the device.
#Path to the image without tags
base_image_path = image.image_location[:image.image_location.rfind(":")]
#Registry path only
registry = image.image_location.split(".")[0]
#New tag version
version_new=image.version

#Dockerfile text
dockerfile = """
FROM {base_image_path}:{version_new} AS model
FROM {base_image_path}:{version_old}

COPY --from=model /var/azureml-app/azureml-models /var/azureml-app/azureml-models
COPY --from=model /var/azureml-app/iot_score.py /var/azureml-app/iot_score.py
""".format(base_image_path=base_image_path,version_new=image.version,version_old=1).strip()

#Store as lock Dockerfile file
%store dockerfile > Dockerfile

#Run new "build" stage for the newly generated Dockerfile via Azure Container Registry

!az acr build --image $image.name:iot-$version_new --registry $registry --file Dockerfile .
This code snippet shows you how to copy the azureml-models directory (by default this is a directory for model.pkl files) and iot_score.py (file to be executed on the edge device) from newly generated Docker image (with new layers) to the old version of Docker image (to avoid transferring conda dependencies). This is suitable only if conda dependencies list was not modified. The updated image will be stored in the same repository, but with tag “iot-{version_new}”, where the new version is a new tag, which was generated automatically for this image (auto-incremental number).
You should put this script right after you test your image, but before chapter 6 (Deploy container to Azure IoT Edge device) or at least as the first step in it.
Below you could find how that impact the layers:
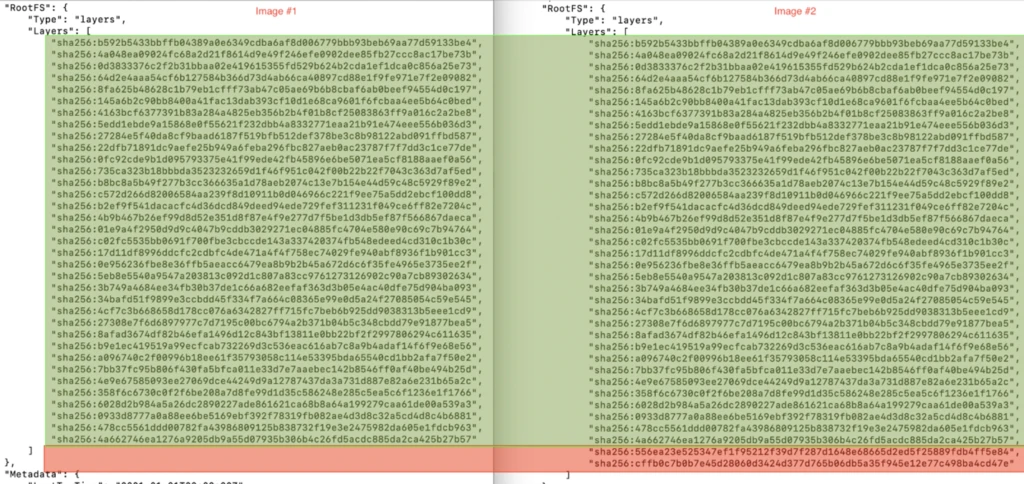
As you can see we’ve updated just two layers (you could do two COPY commands in one to have only one layer difference if you want).
The total size for these two layers is ~2KB.
We also need to change the deployment part:
# Update the workspace object
ws = Workspace.from_config()
image_location = image.image_location[:image.image_location.rfind(":")] + ":iot-" + str(image.version)

# Getting your container details
container_reg = ws.get_details()["containerRegistry"]
reg_name=container_reg.split("/")[-1]
container_url = "\"" + image_location + "\","
subscription_id = ws.subscription_id
print('{}'.format(image_location))
print('{}'.format(reg_name))
print('{}'.format(subscription_id))
from azure.mgmt.containerregistry import ContainerRegistryManagementClient
from azure.mgmt import containerregistry
client = ContainerRegistryManagementClient(ws._auth,subscription_id)
result= client.registries.list_credentials(resource_group_name, reg_name, custom_headers=None, raw=False)
username = result.username
password = result.passwords[0].value
And deployment.json configuration
file = open('iot-workshop-deployment-template.json')
contents = file.read()
contents = contents.replace('__MODULE_NAME', module_name)
contents = contents.replace('__REGISTRY_NAME', reg_name)
contents = contents.replace('__REGISTRY_USER_NAME', username)
contents = contents.replace('__REGISTRY_PASSWORD', password)
contents = contents.replace('__REGISTRY_IMAGE_LOCATION', image_location)
with open('./deployment.json', 'wt', encoding='utf-8') as output_file:
    output_file.write(contents)
Conclusion
We’ve just reduced the size for the Docker image layers, which needed to be transferred to the IoT device, from 60MB to 2KB. Now the update of the model in production will cost you only a few cents.
Questions or feedback? Please let me know in the comments below.