
Dynamics 365 Customer Insights – June 2019 release notes
The Dynamics 365 Customer Insights team is happy to announce the availability of our June release.
NEW FEATURES
- Power BI connector gets a data experience
- Improvements to the Dynamics Customer Card
- Segmentation from Customers page
- Segment draft mode
- Measures: New operators
- Provide feedback directly in the app
Power BI connector gets a data experience
Using Customer Insights’s Power BI connector is now easier than ever! When you install our updated connector, you can now simply sign-in with the same credentials you use to access the Customer Insights app, and you will be presented with a full list of the environments and entities you can import, without needing to type a thing! You do need to install the new connector, but it will work with any existing environments or accounts, including Microsoft ones.
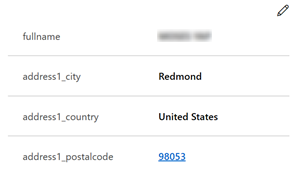
Improvements to the Dynamics Customer Card
You can now gain even more insights through the Dynamics Customer Card.
Visual Shortcuts for Measures
In addition to having measures appear in the customer card, you can add visual shortcuts for them, such as when a customer’s churn score becomes dangerously high. This will allow you to turn insights from Dynamics 365 Customer Insights into action even faster than before.
Clickable URLs in the Card
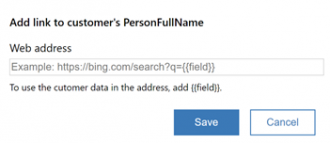
If fields used by Customer Insights related to another webpage, you can turn a piece of text into a clickable URL directly in the customer card. Say you have a customer’s homepage in your application that you used to unify customer data. Now you can go directly from your Dynamics application to that customer page in your browser, allowing you to check on your customer even faster than before.
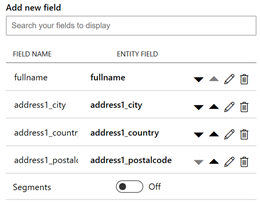
Reordering Made Easy
You can now reorder fields in the customer card directly from the edit screen.
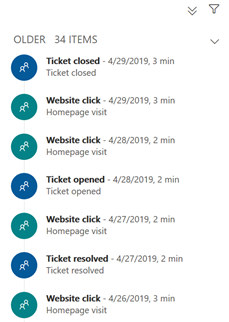
Improved Timeline View
The timeline control now has collapsible headings, allowing you to more easily navigate the timeline.
Segmentation from Customers page is now available
Overview
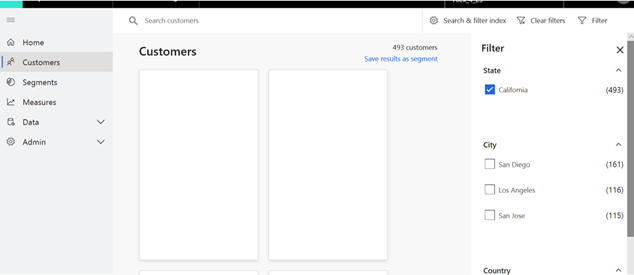
Until now, you could only create segments on the segment builder page. Today, we are pleased to announce a second way of segmenting your customers of interest: Segmentation from the Customers page. This segmentation feature is highly contextual. When we designed this feature, the user we had in mind is someone who applied some filters on the Customers page, but then couldn’t quickly segment by those filters. In the past, such a user needed to create the segment from scratch using the segment builder.
Applying filters on the Customers page
While visiting the Customers page (and assuming your administrator has indexed some fields as filterable) you can start filtering and searching for specific customer profiles. Click here to learn more on these capabilities as well as the administrator requirement. Note that segmentation from this page is available only around filters and not around search-each of the filters you select on the filters panel will be used to segment your customers in the next step.
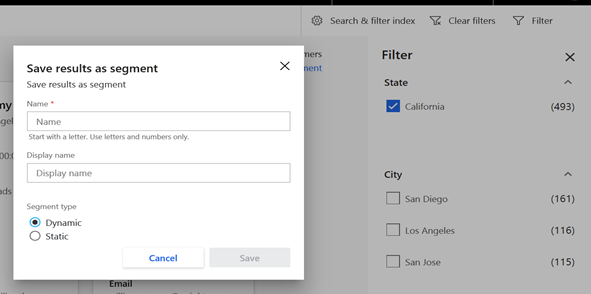
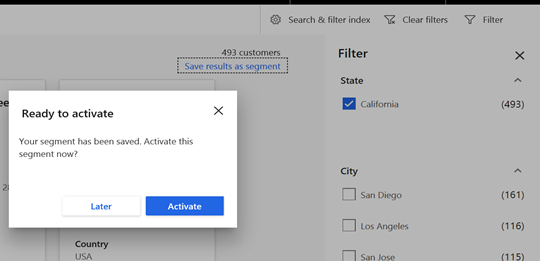
Save your results as a segment
Once some filters are selected, click the Save results as a segment button (shown beneath the members count) to quickly produce a segment:

The following dialog box will appear. Here, you need to give your segment a name and select whether it will be static or dynamic. You might also give your segment a more friendly name via the Display Name field (another new capability). Your segment will have this name on both the Segments and Home pages.
Viewing and editing your segment
Upon clicking Save, you will be prompted to either activate the segment now or later.
- You can revisit the segment definitions and expand them via the segment builder (accessible via the Edit button)
- An inactive segment will not be processed until you make it active (for dynamic segment) or click Run (for static segment)
Draft Mode for Segments is now available
Overview
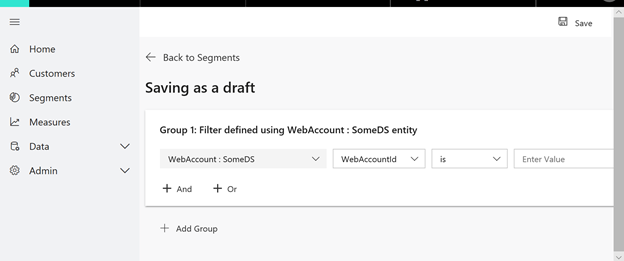
In Customer Insights, segmentation encapsulates diverse filters and operators to accommodate for a large range of business needs. At the same time, due to its sophistication, our segment builder requires you to make more than a few mandatory selections in order to generate a segment. Through the new Draft Mode capability, you can start saving incomplete segment definitions and revisit them later whenever you wish.
Moreover, our team utilized this opportunity and took a first step towards the simplification of the segment builder experience as a whole. The following pain points were addressed:
| Segment name | Segment properties | Active/Inactive state selection | Audience Type field | |
| Before | Naming your segment had several limitations | Properties tile took significant space from the filters area | Raised as needed on segments screen rather than the segment builder | Was an unneeded field |
| Today | A Display Name field without limitations was added | Properties components were moved to a side panel and filters area was expanded | Active/Inactive selection moved to the segment tile menu on the segments screen | Field was removed from the segment definition |
Saving your segment draft
In order for a segment to be processed you were required to complete certain selections (click here to learn more). However, saving your segment is now also possible with an incomplete definition. Simply click Save:
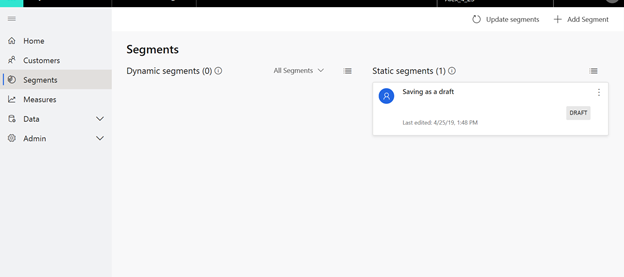
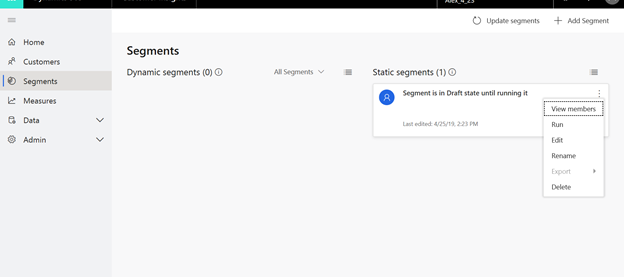
If your segment is a static segment, it will carry a Draft status on the segments page:
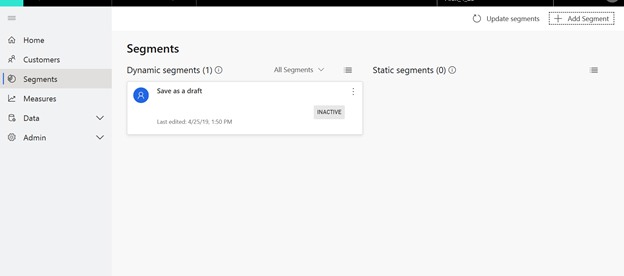
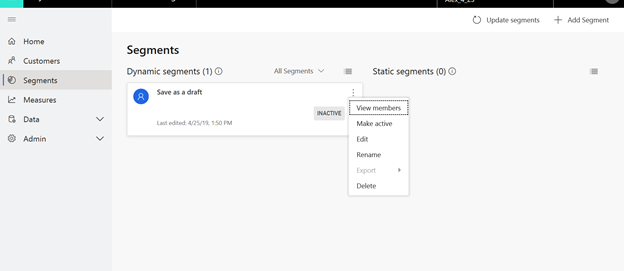
If it’s a dynamic segment, it will be inactive as long as it’s in draft mode:
Activating or Running your segment draft
Once all mandatory selections are made, you can process your segment. For static segments, that can be done via the Run button within the segment tile menu:
For dynamic segments you should select the Make active button from the segment tile menu:
Editing your segment draft
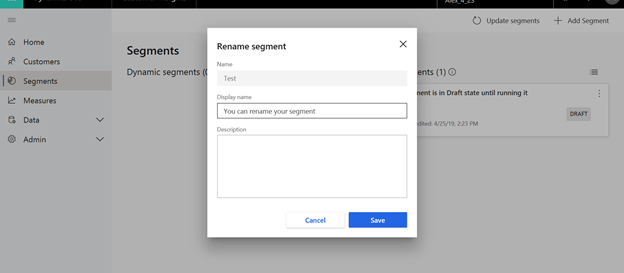
At any point you can also edit your segment draft. Clicking Edit will take you to the segment builder screen where you can continue defining your segment or reconfigure any prior selection. Clicking the Rename button will enable you to rename your segment as well as changing its description:
New operators are now supported in Measures
Overview
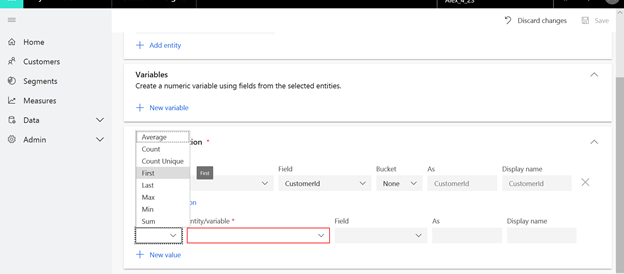
We are happy to announce the support of two new types of operators for values (aggregates): First and Last. This is our first step in turning the measures capability into a more comprehensive one and in the next few months we aim to bring various additional variables, values, and dimension types into fruition. You can also start utilizing the Max operator on Date fields.
Example use cases
Here are some examples for what you can achieve using these new operators:
- First operator: Pulling the last quote given to each of your customers for a product or service
- Last operator: Tracking the first user action taken on your website by each of your customers
- Max operator on a Date field: Getting the latest date for each of your customer engagements (in other words, when was the last time your business engaged with each of your customers?)
How to use First and Last operators
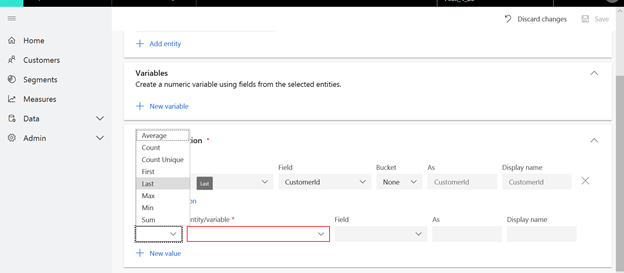
How do these operators work?
- With the First operator, the first record will be taken for each dimension value.
- With the Last operator, the last record that was added to each dimension value will be taken. For example, if the dimension is CustomerID and the Last operator is applied on a Sales attribute, the result will be the last sales record for each CustomerID.
Both operators can be applied as part of the definitions of all three measure types: Customer measure, Customer attribute, and Business measure.
As mentioned before, those operators were added to the Value (aggregate) list of operators:
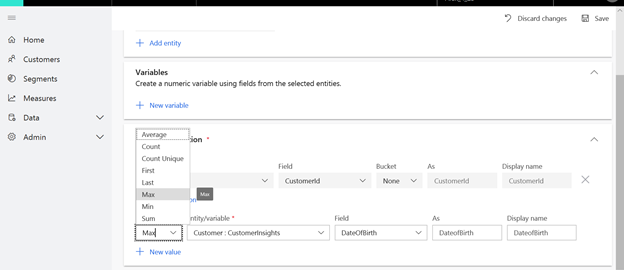
How to use the Max operator on Date fields
If it’s a value field, the operator will take the largest value for each dimension.
If it’s a Date field, the operator will take the latest date for each dimension value. For example, If the dimension is ActivityID and the operator was applied on the field ActivityDate then it will return the latest date for each ActivtyID.
This operator exists in the Value (aggregate) list of operators as well:
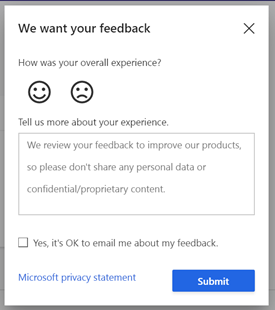
Provide feedback directly in the app
You can now provide feedback directly within Dynamics 365 Customer Insights. You can provide either a quick smiling- or frowning-face and also provide more detailed information to tell us about your experience.